> ## Documentation Index
> Fetch the complete documentation index at: https://docs.apinizer.com/llms.txt
> Use this file to discover all available pages before exploring further.
# API Mapping Creation
> You can create API mappings between source and target environments, map environment variables, define transformation rules, and validate your configuration with pre-transfer checks.
## Mapping List
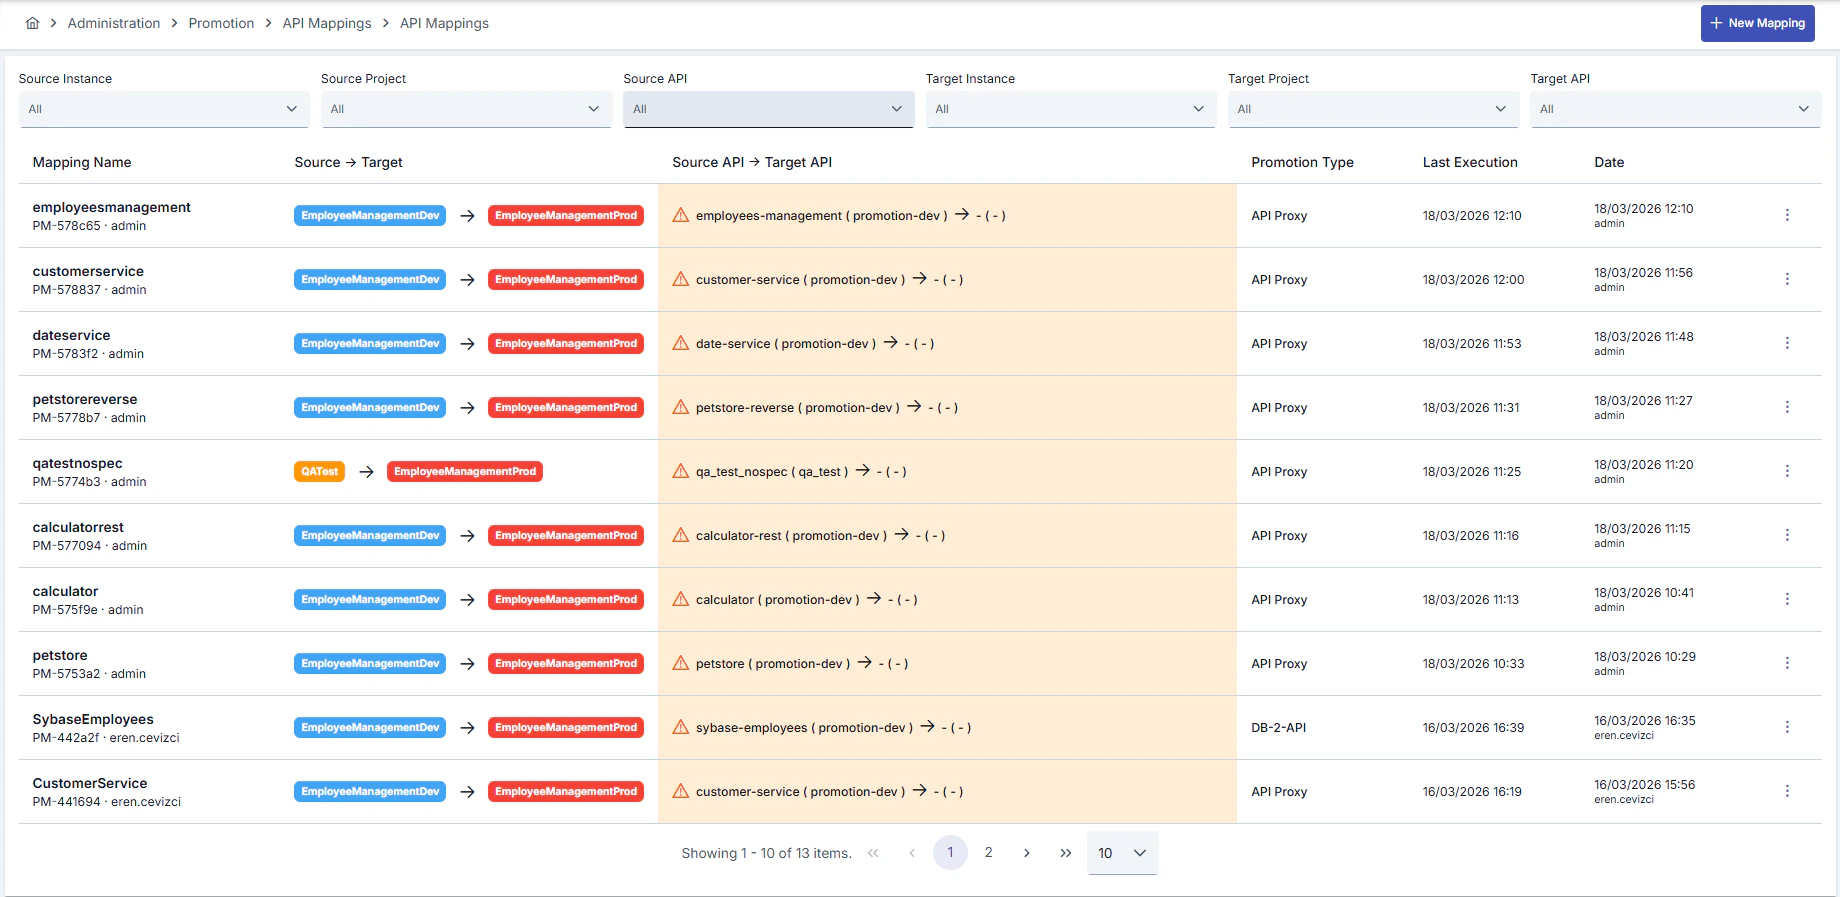
In the mapping list, you can view all defined mappings. The list offers the following filtering options:
* **Source Instance / Project / API**: Filter by a specific source
* **Target Instance / Project / API**: Filter by a specific target
* **Status**: Filter by Draft, Warning, or Ready status
Each mapping row shows source and target information, environment variable status (number of missing variables), and last execution time.
 ## Mapping Wizard
When you click the **New Mapping** button, a multi-step wizard opens. The wizard presents different steps depending on the promotion type you select.
### Step 1: General Info & Variables
In this step, you enter the basic configuration information:
#### Promotion Type Selection
## Mapping Wizard
When you click the **New Mapping** button, a multi-step wizard opens. The wizard presents different steps depending on the promotion type you select.
### Step 1: General Info & Variables
In this step, you enter the basic configuration information:
#### Promotion Type Selection
 First, select what you want to transfer:
| Type | Description |
| ------------------------------------------------------------- | -------------------------------------------------------------------------- |
| **[API Proxy](/en/concepts/core-concepts/what-is-api-proxy)** | Single API Proxy transfer. Creator dependencies are automatically detected |
| **DB-2-API** | Transfer DB-2-API Creator definition independently |
| **Script-2-API** | Transfer Script-2-API Creator definition independently |
| **Mock API** | Transfer Mock API Creator definition independently |
| **[Proxy Group](/en/concepts/core-concepts/api-proxy-group)** | Transfer Proxy Group with all its contents |
#### Source and Target Definition
First, select what you want to transfer:
| Type | Description |
| ------------------------------------------------------------- | -------------------------------------------------------------------------- |
| **[API Proxy](/en/concepts/core-concepts/what-is-api-proxy)** | Single API Proxy transfer. Creator dependencies are automatically detected |
| **DB-2-API** | Transfer DB-2-API Creator definition independently |
| **Script-2-API** | Transfer Script-2-API Creator definition independently |
| **Mock API** | Transfer Mock API Creator definition independently |
| **[Proxy Group](/en/concepts/core-concepts/api-proxy-group)** | Transfer Proxy Group with all its contents |
#### Source and Target Definition
 After selecting the promotion type, specify the source and target information:
1. Select **Source Instance** and **Source Project**
2. Select **Target Instance** and **Target Project**
3. Select the source API
If the source and target instances point to the same environment, a warning message is displayed.
#### Dependency Detection (API Proxy Type)
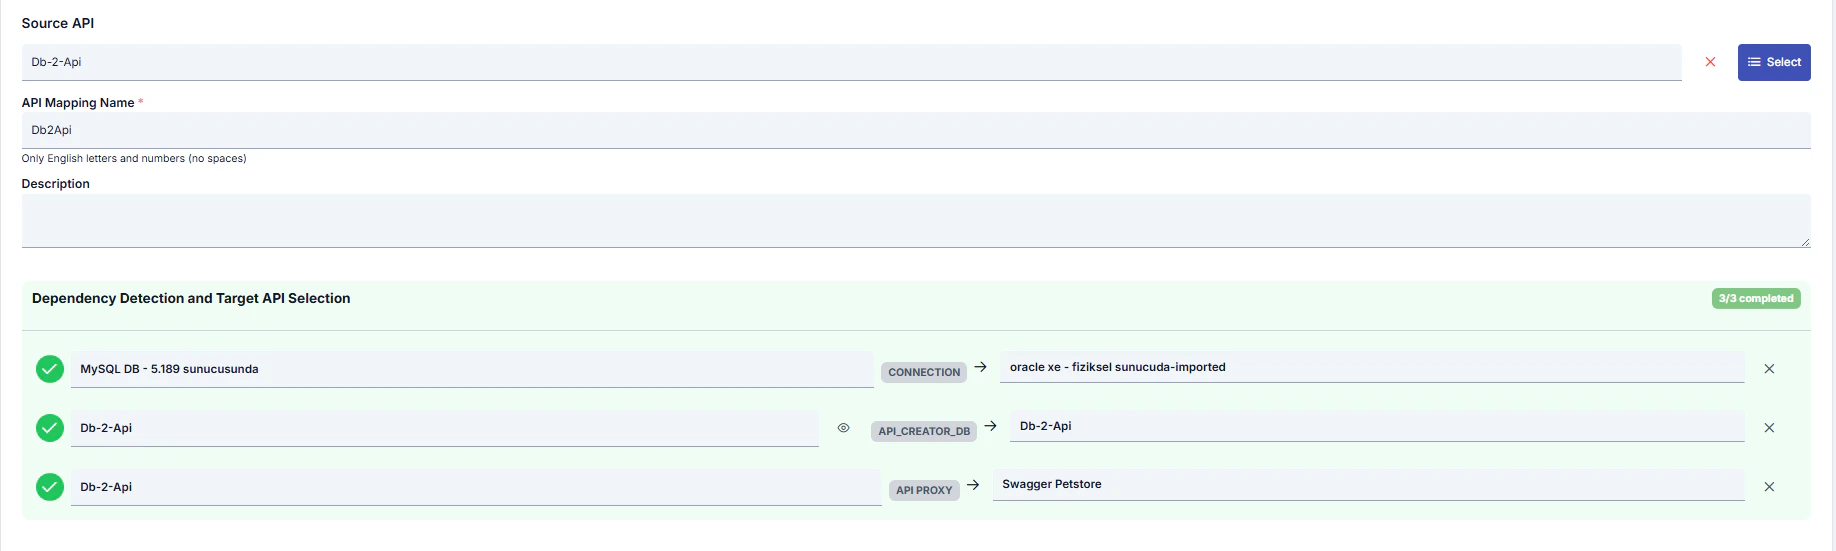
When a source API is selected, the system analyzes the API's creation type and automatically displays the required dependencies:
* **Manually created API Proxy**: No dependencies, only the proxy definition is transferred
* **API Proxy created via DB-2-API**: Creator + Database Connection are transferred together (mandatory)
* **API Proxy created via Script-2-API**: Creator is transferred together (mandatory)
* **API Proxy created via Mock API**: Creator is transferred together (mandatory)
Dependencies are completed in sequential steps. Each step becomes active after the previous one is completed.
After selecting the promotion type, specify the source and target information:
1. Select **Source Instance** and **Source Project**
2. Select **Target Instance** and **Target Project**
3. Select the source API
If the source and target instances point to the same environment, a warning message is displayed.
#### Dependency Detection (API Proxy Type)
When a source API is selected, the system analyzes the API's creation type and automatically displays the required dependencies:
* **Manually created API Proxy**: No dependencies, only the proxy definition is transferred
* **API Proxy created via DB-2-API**: Creator + Database Connection are transferred together (mandatory)
* **API Proxy created via Script-2-API**: Creator is transferred together (mandatory)
* **API Proxy created via Mock API**: Creator is transferred together (mandatory)
Dependencies are completed in sequential steps. Each step becomes active after the previous one is completed.
 #### Target API Selection
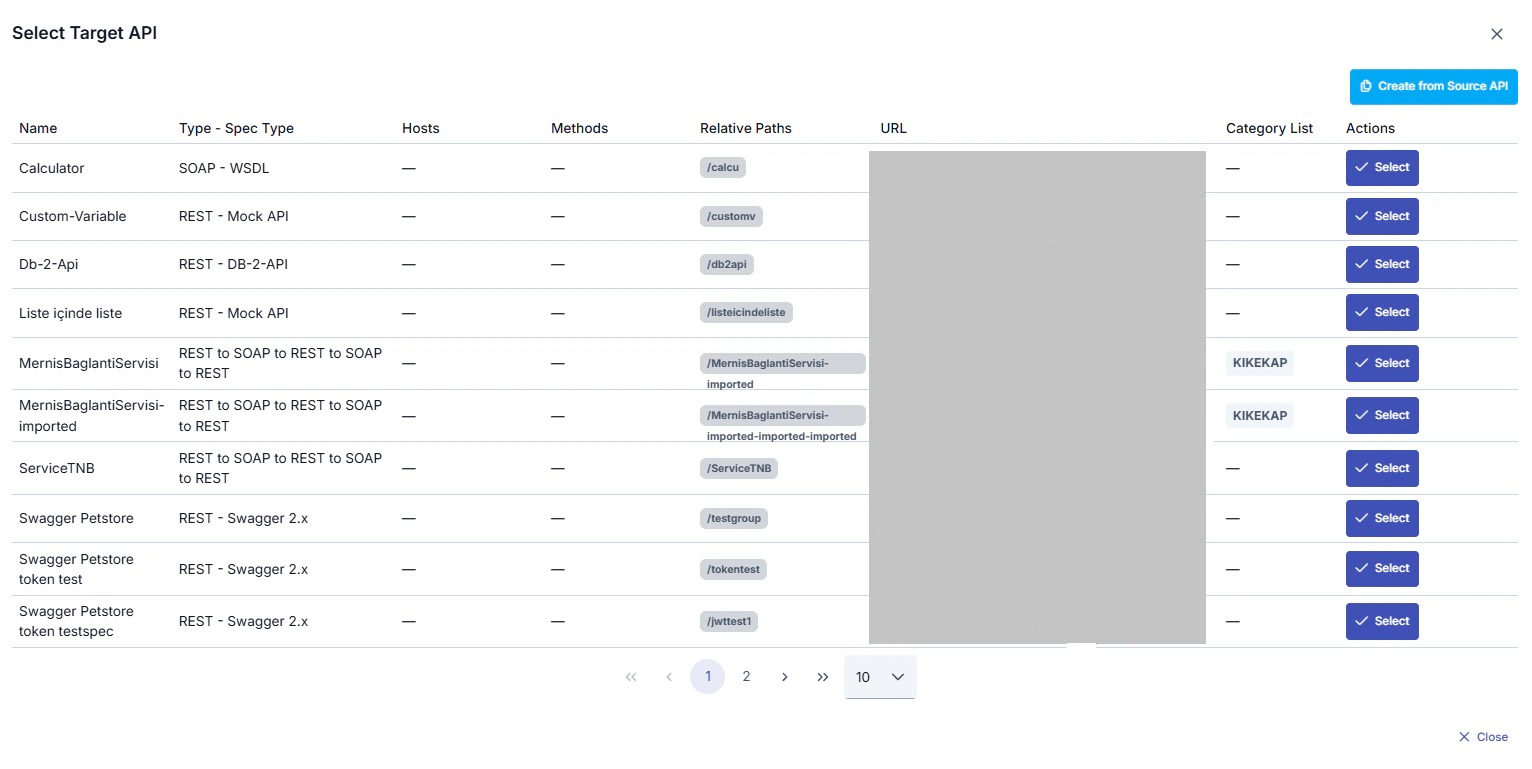
In the target environment, you have two options:
* **Update Existing API**: Select an existing API from the target project. The API's current configuration will be replaced with values from the source environment
* **Create New API**: Create a new API in the target environment from the source API
When using the update existing API option, the target API's current configuration will be replaced with values from the source environment. This operation cannot be undone.
If there is no matching API in the target environment, you can use the **Create from Source** button to automatically create a new API in the target environment from the source API.
#### Target API Selection
In the target environment, you have two options:
* **Update Existing API**: Select an existing API from the target project. The API's current configuration will be replaced with values from the source environment
* **Create New API**: Create a new API in the target environment from the source API
When using the update existing API option, the target API's current configuration will be replaced with values from the source environment. This operation cannot be undone.
If there is no matching API in the target environment, you can use the **Create from Source** button to automatically create a new API in the target environment from the source API.
 #### Proxy Group Scenario
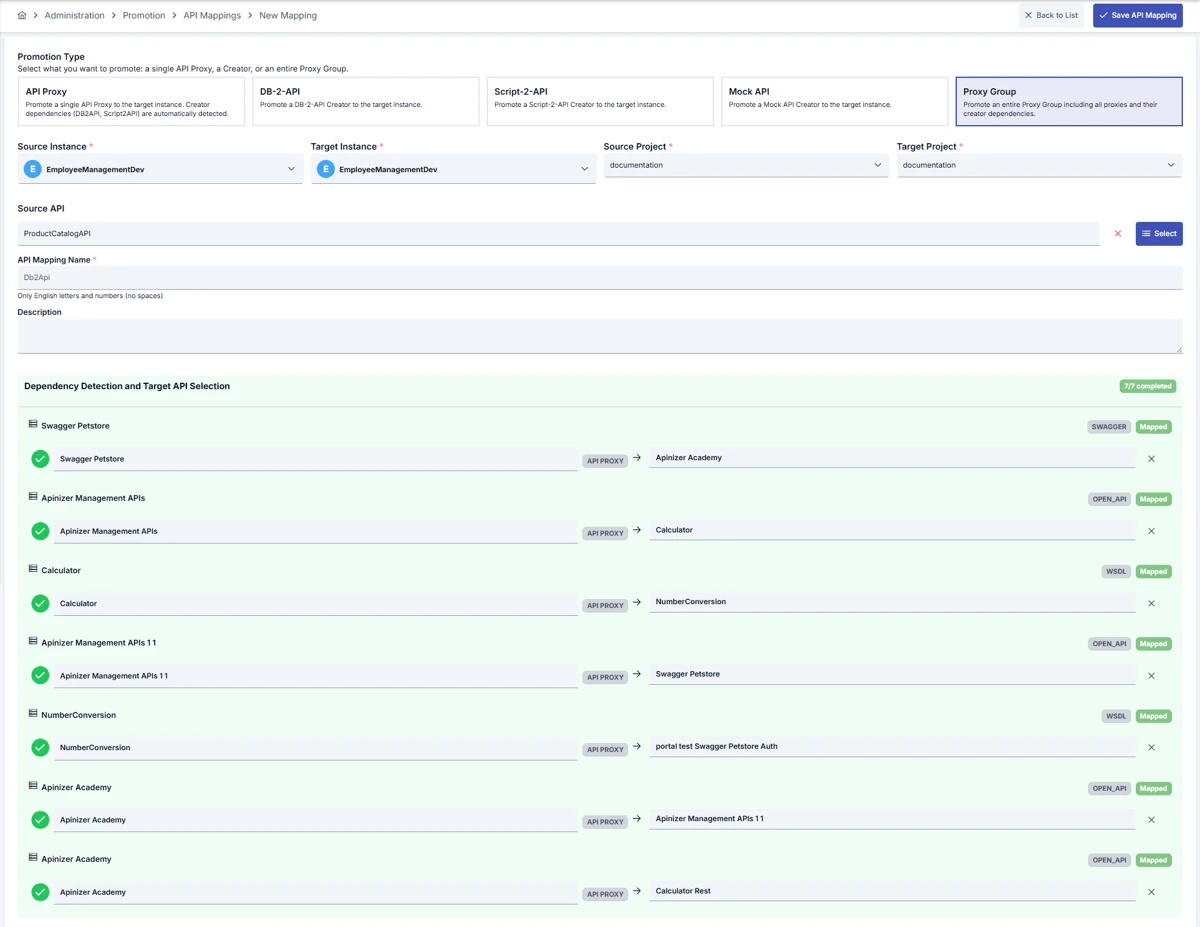
When a Proxy Group is selected, all proxies within the group are listed. Target mapping must be defined for each proxy:
* Transfer order: Group settings (CORS, authentication, rate limit, [client route](/en/concepts/core-concepts/client-route)) first, then each proxy and its dependencies in sequence
* Creator-based proxies require Creator + Connection
* Manual proxies only transfer the proxy definition
#### Proxy Group Scenario
When a Proxy Group is selected, all proxies within the group are listed. Target mapping must be defined for each proxy:
* Transfer order: Group settings (CORS, authentication, rate limit, [client route](/en/concepts/core-concepts/client-route)) first, then each proxy and its dependencies in sequence
* Creator-based proxies require Creator + Connection
* Manual proxies only transfer the proxy definition
 #### Deployment Environments
You can select which environments on the target instance the API will be deployed to.
#### Deployment Environments
You can select which environments on the target instance the API will be deployed to.
 ### Step 2: API Proxy Comparison
In this step, the differences between source and target API configurations are displayed.
#### Diff Summary
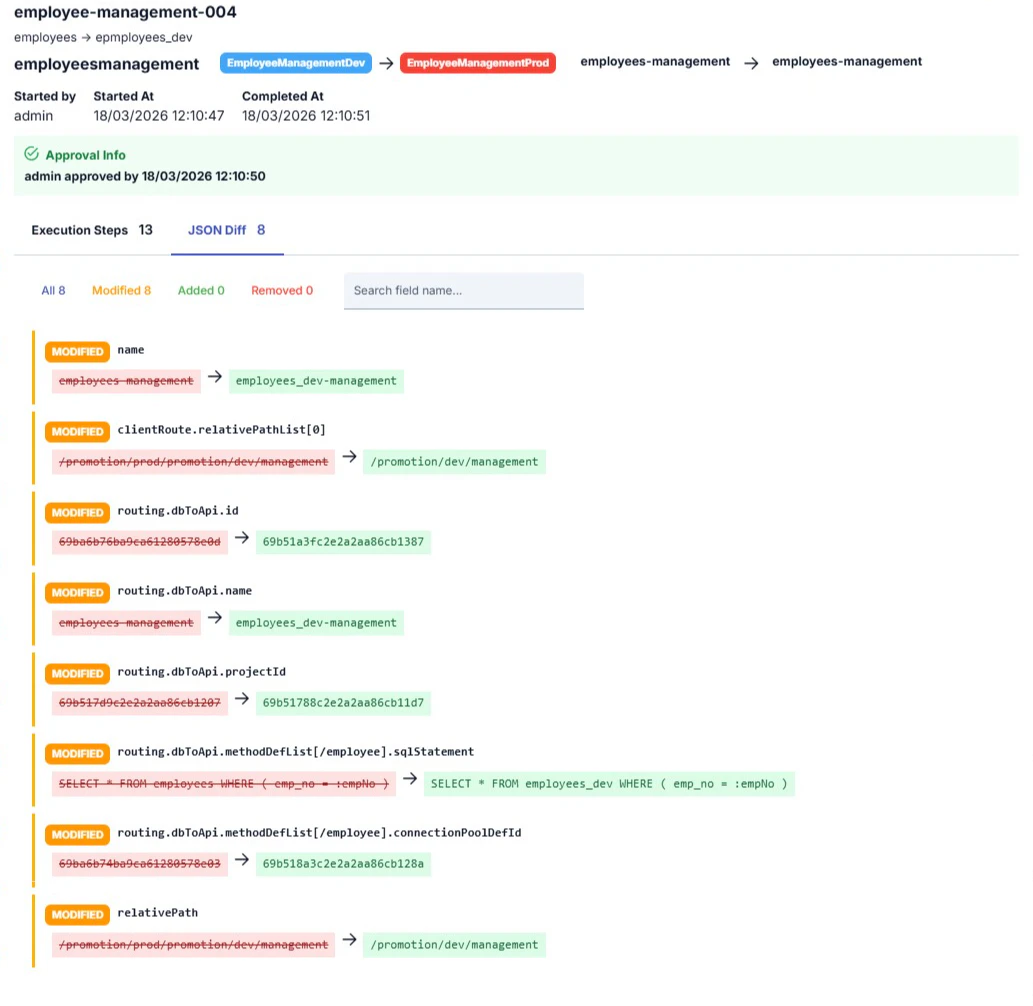
The comparison results show the following information:
* **Total number of differences**
* **Changed fields**: Fields present in both source and target but with different values
* **Added fields**: Fields present in source but not in target (will be added to the target)
* **Removed fields**: Fields present in target but not in source (will be removed from the target)
### Step 2: API Proxy Comparison
In this step, the differences between source and target API configurations are displayed.
#### Diff Summary
The comparison results show the following information:
* **Total number of differences**
* **Changed fields**: Fields present in both source and target but with different values
* **Added fields**: Fields present in source but not in target (will be added to the target)
* **Removed fields**: Fields present in target but not in source (will be removed from the target)
 #### Find & Replace Rules
You can define rules to automatically change specific fields or values in the API definition during the transfer. Each rule consists of a **Find** and a **Replace** value.
Rules can be defined as JSONPath expressions or plain text:
* **JSONPath example**: `$.routing.routingAddressWrapperList[0].address` — changes the Backend URL
* **Plain text**: Replaces a specific text value with another value
Find & Replace rules are applied only to the target API object. Dependent objects (connection, creator, group proxy) are not affected by these rules.
#### Find & Replace Rules
You can define rules to automatically change specific fields or values in the API definition during the transfer. Each rule consists of a **Find** and a **Replace** value.
Rules can be defined as JSONPath expressions or plain text:
* **JSONPath example**: `$.routing.routingAddressWrapperList[0].address` — changes the Backend URL
* **Plain text**: Replaces a specific text value with another value
Find & Replace rules are applied only to the target API object. Dependent objects (connection, creator, group proxy) are not affected by these rules.
 #### Excluded Fields
You can exclude specific fields during comparison and transfer. There are two types of excluded fields:
* **System Defaults** (cannot be modified): Environment-specific fields such as ID, creation/update date, user information are automatically excluded
* **User-Defined Fields**: You can add additional fields you want to exclude
#### Excluded Fields
You can exclude specific fields during comparison and transfer. There are two types of excluded fields:
* **System Defaults** (cannot be modified): Environment-specific fields such as ID, creation/update date, user information are automatically excluded
* **User-Defined Fields**: You can add additional fields you want to exclude
 ### Step 3: Variables Mapping
The counterparts of [environment variables](/en/concepts/core-concepts/environment-variable) used in the source API are mapped in the target environment in this step.
The system automatically detects environment variables in the source API and auto-maps variables defined with the same key in the target environment. Status information is shown for each variable:
* **Present**: A variable with the same key exists in the target environment
* **Missing**: No variable with this key was found in the target environment
If there are missing environment variables in the target environment, it is recommended to define these variables in the target environment before the transfer.
You can filter between variables: All, Present, or Missing.
### Step 3: Variables Mapping
The counterparts of [environment variables](/en/concepts/core-concepts/environment-variable) used in the source API are mapped in the target environment in this step.
The system automatically detects environment variables in the source API and auto-maps variables defined with the same key in the target environment. Status information is shown for each variable:
* **Present**: A variable with the same key exists in the target environment
* **Missing**: No variable with this key was found in the target environment
If there are missing environment variables in the target environment, it is recommended to define these variables in the target environment before the transfer.
You can filter between variables: All, Present, or Missing.
 ### Step 4: Pre-Flight Check
You can run pre-checks to verify that the configuration is complete before the transfer. Checks are performed in three categories:
| Category | Checks |
| ------------------------ | --------------------------------------------- |
| **System Checks** | Target environment connectivity, reachability |
| **Configuration Checks** | API version conflicts, project existence |
| **Security Checks** | Authorization verification, token validity |
Each check result is reported as **Success**, **Warning**, or **Error**.
### Step 5: Summary & Done
In the final step, a summary of the entire configuration is displayed:
* Instance information (source and target)
* Mapping information (API mapping)
* Environment variables status
* Find & Replace rules
* Excluded fields
* Connection status
After reviewing the summary, you can save the mapping with the **Complete** button.
### Step 4: Pre-Flight Check
You can run pre-checks to verify that the configuration is complete before the transfer. Checks are performed in three categories:
| Category | Checks |
| ------------------------ | --------------------------------------------- |
| **System Checks** | Target environment connectivity, reachability |
| **Configuration Checks** | API version conflicts, project existence |
| **Security Checks** | Authorization verification, token validity |
Each check result is reported as **Success**, **Warning**, or **Error**.
### Step 5: Summary & Done
In the final step, a summary of the entire configuration is displayed:
* Instance information (source and target)
* Mapping information (API mapping)
* Environment variables status
* Find & Replace rules
* Excluded fields
* Connection status
After reviewing the summary, you can save the mapping with the **Complete** button.
 ## Viewing and Editing Mappings
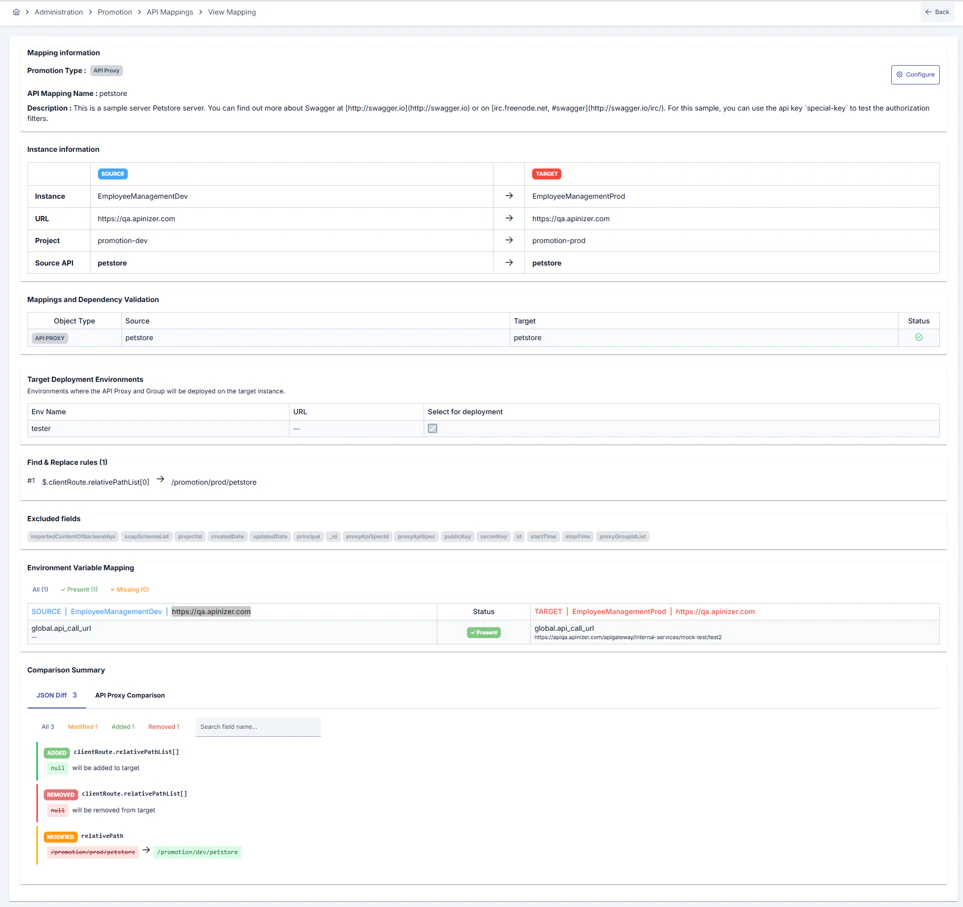
You can view and edit the details of a saved mapping. In the mapping detail screen:
* You can view source and target information
* You can update environment variable mappings
* You can edit Find & Replace rules
* You can refresh comparison results
* You can execute the mapping
## Cloning a Mapping
You can clone an existing mapping to quickly create a similar configuration for a different API or environment.
## Viewing and Editing Mappings
You can view and edit the details of a saved mapping. In the mapping detail screen:
* You can view source and target information
* You can update environment variable mappings
* You can edit Find & Replace rules
* You can refresh comparison results
* You can execute the mapping
## Cloning a Mapping
You can clone an existing mapping to quickly create a similar configuration for a different API or environment.