> ## Documentation Index
> Fetch the complete documentation index at: https://docs.apinizer.com/llms.txt
> Use this file to discover all available pages before exploring further.
# Credentials
> You can create, manage credentials of clients that will access API Proxies and configure access control settings. You can perform access control through credentials or API Proxies, configure token settings, and define JWK/mTLS settings.
Access control settings made with Identity Management in Apinizer can be configured in 2 different ways:
1. **Through credentials:** Go to the credential detail. In the credential detail, API Proxies that have been granted access permission and their settings are viewed and operations are performed.
2. **Through API Proxies:** Go to the API Proxy detail. Credentials that have been granted access permission to the API Proxy are viewed and operations are performed.
This page fulfills the condition in the first option.
Credential access permission alone is not sufficient for API proxy access. For the settings in the credential and access permission to be valid, one of the authentication policies must be added on the API Proxy and the **Security Manager** option must be selected as the authentication method in this policy.
## Credential List
**An image showing the list of existing credentials when the credentials page is first opened is shown below:**
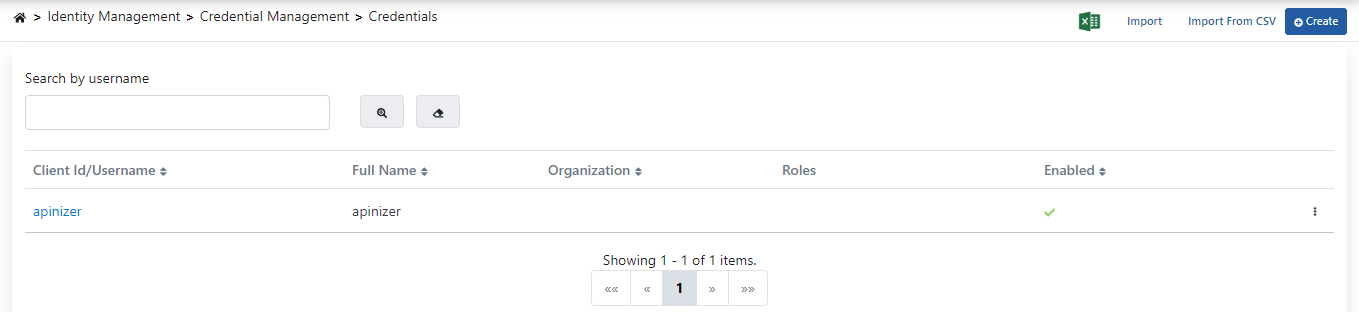 The fields used for screen components are shown in the table below.
| Field | Description |
| ----------------------------------------------------------------------------------- | ------------------------------------------------------------------------------------------------------------------------------------------------------------------------------------------------------------------------------------------------------------------------------------------- |
| Advanced Search *(Advanced Search)* | Used to perform detailed search on credentials. |
| Access Control List *(Access Control List)* | Table where credentials are listed and sorted. |
| Create *(Create)* | Used to create a new "Credential". |
| Import From CSV *(Import From CSV)* | Used for bulk credential saving. |
| Import *(Import)* | Used to import credential as .json or .zip extension. |
| Export Credential List as an Excel File *(Export Credential List as an Excel File)* | Used to download the credentials list as an excel file. |
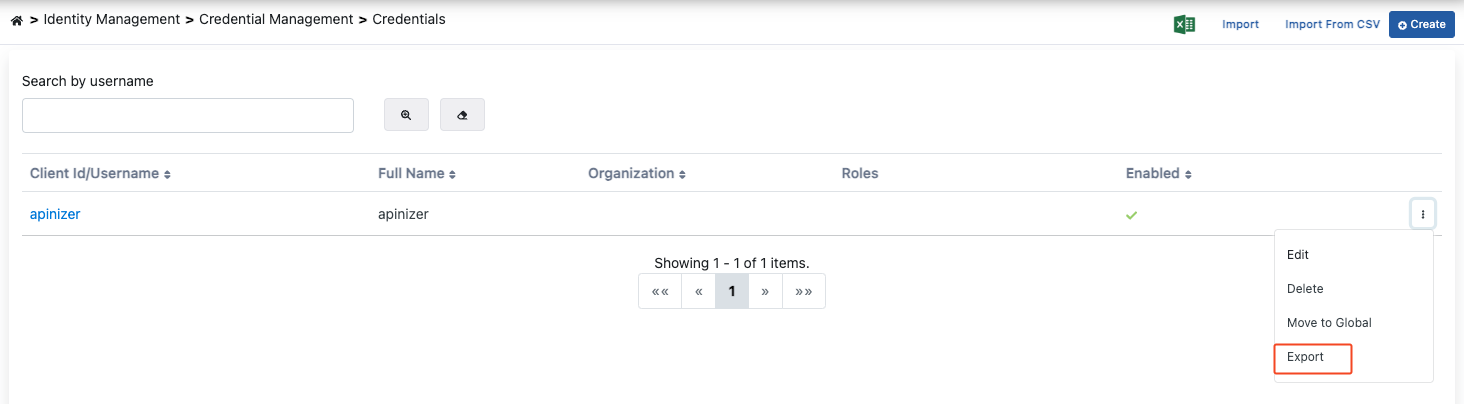
| Export *(Export)* | All data belonging to the credential can be exported to be reused in another project. In this process, only general information is exported. Advanced settings, API Proxy ACL, API Proxy Group ACL, JWK settings, and mTLS settings are not exported as they are project-based information. |
## Bulk Credential Import via CSV
The import from CSV feature can be used to import existing credentials to Apinizer.
If this feature is desired to be used;
Existing user information should be written with each record on one line.
The record must contain username and password information together and the password information must be in plain text.
The **#** sign should be placed as a separator between **username** and **password** information.
Each line should be separated with the Enter key.
Data prepared in this way is entered into the opened screen and the import button is pressed.
The fields used for screen components are shown in the table below.
| Field | Description |
| ----------------------------------------------------------------------------------- | ------------------------------------------------------------------------------------------------------------------------------------------------------------------------------------------------------------------------------------------------------------------------------------------- |
| Advanced Search *(Advanced Search)* | Used to perform detailed search on credentials. |
| Access Control List *(Access Control List)* | Table where credentials are listed and sorted. |
| Create *(Create)* | Used to create a new "Credential". |
| Import From CSV *(Import From CSV)* | Used for bulk credential saving. |
| Import *(Import)* | Used to import credential as .json or .zip extension. |
| Export Credential List as an Excel File *(Export Credential List as an Excel File)* | Used to download the credentials list as an excel file. |
| Export *(Export)* | All data belonging to the credential can be exported to be reused in another project. In this process, only general information is exported. Advanced settings, API Proxy ACL, API Proxy Group ACL, JWK settings, and mTLS settings are not exported as they are project-based information. |
## Bulk Credential Import via CSV
The import from CSV feature can be used to import existing credentials to Apinizer.
If this feature is desired to be used;
Existing user information should be written with each record on one line.
The record must contain username and password information together and the password information must be in plain text.
The **#** sign should be placed as a separator between **username** and **password** information.
Each line should be separated with the Enter key.
Data prepared in this way is entered into the opened screen and the import button is pressed.
 ## Exporting Credential
To export the Credential, **Export *(Export)*** is selected from the menu at the end of the row.
## Exporting Credential
To export the Credential, **Export *(Export)*** is selected from the menu at the end of the row.
 ## Globalizing Credential
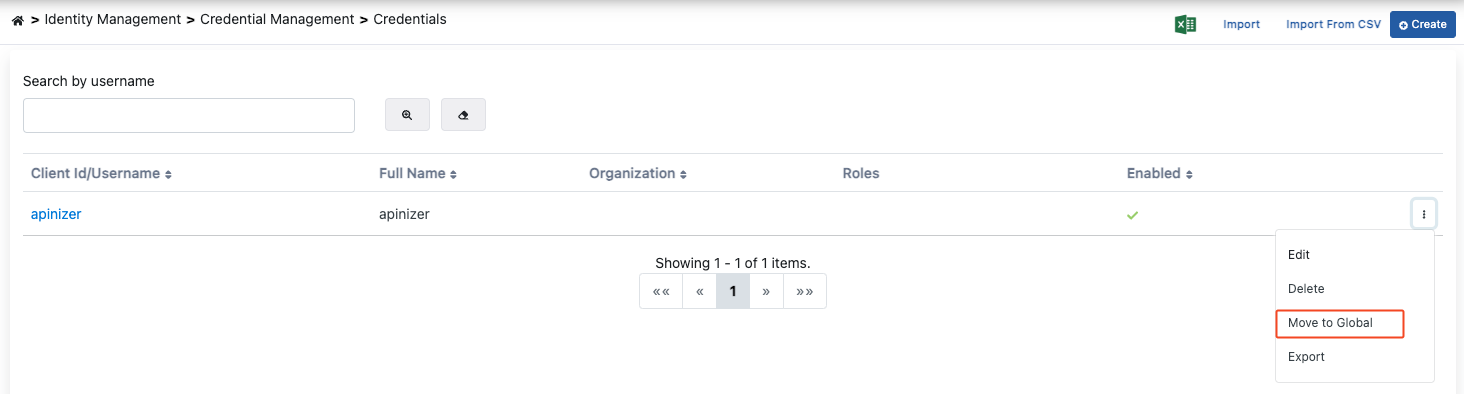
Credentials are moved to the Admin page with the "Globalize" option, removed from this list, made available in all projects, and management is left to the Admin user.
To globalize the Credential, **Move to Global *(Move to Global)*** is selected from the menu at the end of the row.
## Globalizing Credential
Credentials are moved to the Admin page with the "Globalize" option, removed from this list, made available in all projects, and management is left to the Admin user.
To globalize the Credential, **Move to Global *(Move to Global)*** is selected from the menu at the end of the row.
 ## Creating Credential
**To add credentials, when the Create button is pressed, the screen shown in the image below appears:**
## Creating Credential
**To add credentials, when the Create button is pressed, the screen shown in the image below appears:**
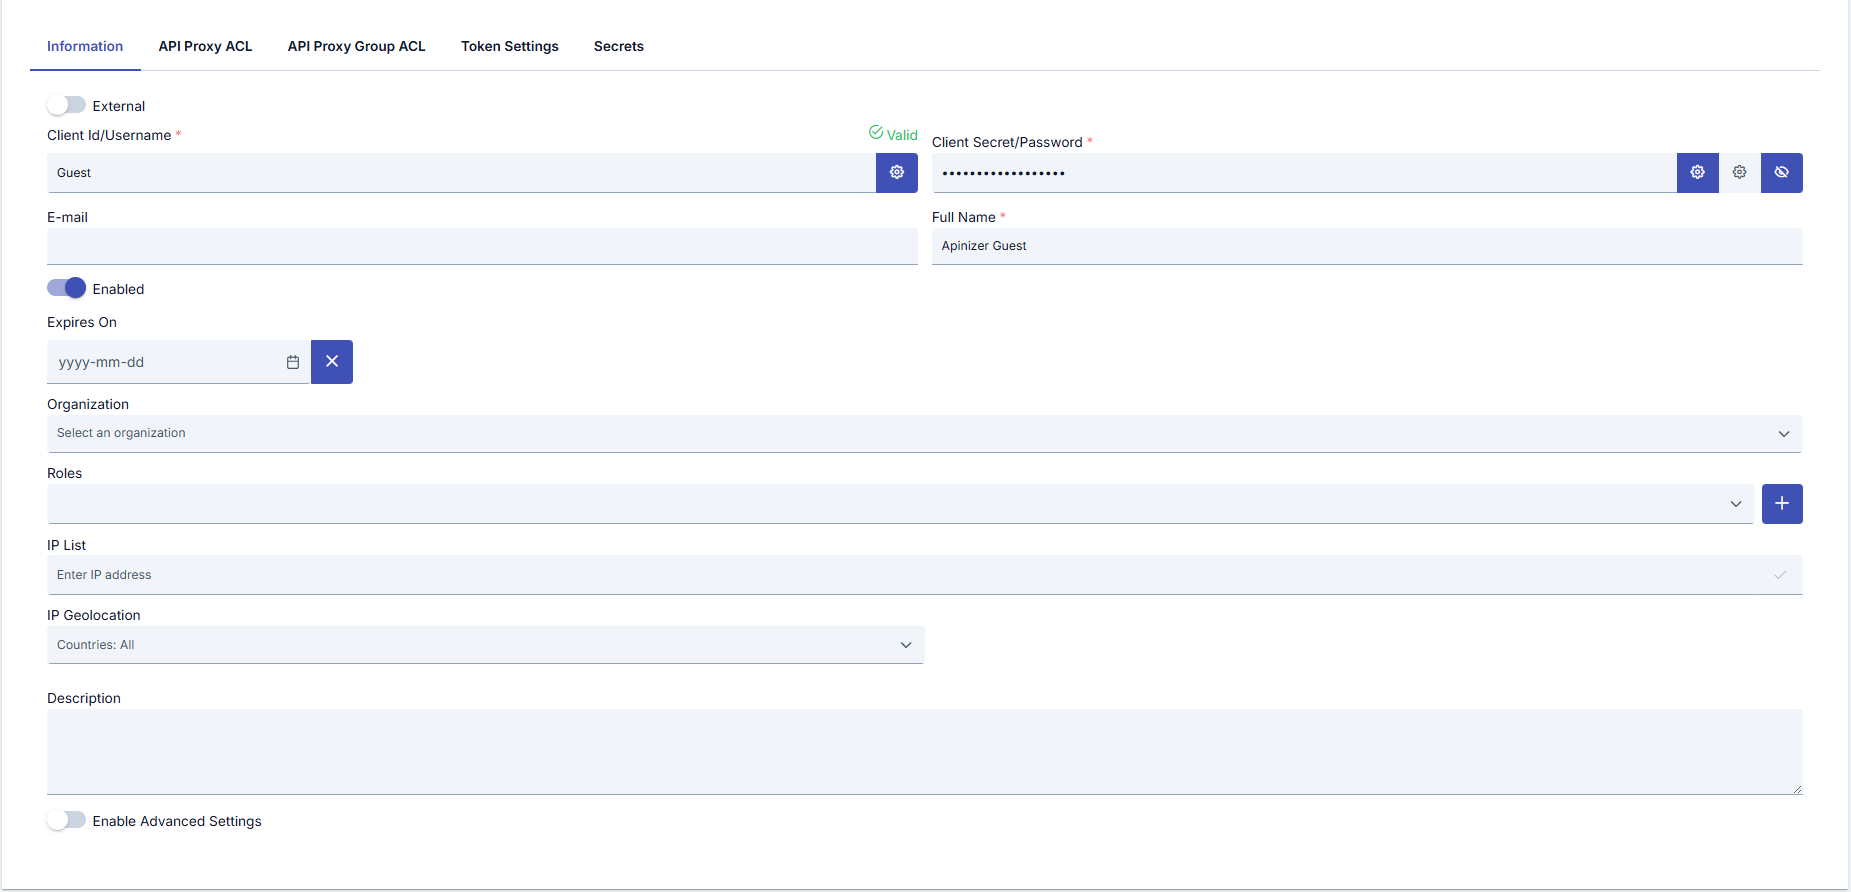 As seen in this image, we can perform two types of operations on credentials:
1. Entering, creating, or updating credential details
2. Creating or updating the credential's access control list
Credential field descriptions are as follows:
| Field | Description |
| ----------------------------------------------------- | ------------------------------------------------------------------------------------------------------------------------------------------------------------------------------------------------------------------------------ |
| Username *(Username)* | This is the "username" information that will represent the identity, this value is used to access the user identity for authorization. It must be unique and one-of-a-kind throughout the entire system. |
| Password *(Password)* | This is the password information of the identity. It can be automatically generated with the button next to it if desired. |
| E-Mail *(E-Mail)* | This is the mail information belonging to the client used to access the owner of the identity. |
| Full Name *(Full Name)* | This is the full name of the client who owns the identity. |
| Active | Specifies whether the credential is active (usable). If selected, it is active. |
| Expires On *(Expires On)* | If this date value is entered, the Credential will no longer be able to access from the time this date arrives. |
| Organization *(Organization)* | The organization/organization information that the credential is linked to can be optionally selected. It is kept only for information/reporting purposes. |
| Roles *(Roles)* | These are the roles that the credential has. Authorization is performed according to these roles. |
| IP List *(IP List)* | If the credential needs to come from certain IP addresses only, the information about which IP addresses this credential can access from is entered here. Leaving it empty means requests from all IPs will be accepted. |
| IP Geolocation *(IP Geolocation)* | Used to allow the credential to access only from specific countries. Country selection can be made. By default, "Countries: All" is selected and allows access from all countries. |
| Description | If a description about the credential is desired to be entered, this field can be filled. |
| Enable Advanced Settings *(Enable Advanced Settings)* | If there is a need to customize the credential's password and IP list on an environment basis, customization settings are activated with this option. When selected, password and IP list can be entered for each environment. |
| Environment Password *(Environment Password)* | A password can be entered to be used specifically for the environment in the relevant row. |
| Environment IP List *(Environment IP List)* | An IP list can be entered to be used specifically for the environment in the relevant row. |
## Credential Access Control Settings
To set access permissions for the credential, operations are performed by switching to the **Access Control List** panel.
In this panel, the API Proxy for which access permission is desired to be granted is selected from the screen that appears when the button marked in red in the image below is pressed.
As seen in this image, we can perform two types of operations on credentials:
1. Entering, creating, or updating credential details
2. Creating or updating the credential's access control list
Credential field descriptions are as follows:
| Field | Description |
| ----------------------------------------------------- | ------------------------------------------------------------------------------------------------------------------------------------------------------------------------------------------------------------------------------ |
| Username *(Username)* | This is the "username" information that will represent the identity, this value is used to access the user identity for authorization. It must be unique and one-of-a-kind throughout the entire system. |
| Password *(Password)* | This is the password information of the identity. It can be automatically generated with the button next to it if desired. |
| E-Mail *(E-Mail)* | This is the mail information belonging to the client used to access the owner of the identity. |
| Full Name *(Full Name)* | This is the full name of the client who owns the identity. |
| Active | Specifies whether the credential is active (usable). If selected, it is active. |
| Expires On *(Expires On)* | If this date value is entered, the Credential will no longer be able to access from the time this date arrives. |
| Organization *(Organization)* | The organization/organization information that the credential is linked to can be optionally selected. It is kept only for information/reporting purposes. |
| Roles *(Roles)* | These are the roles that the credential has. Authorization is performed according to these roles. |
| IP List *(IP List)* | If the credential needs to come from certain IP addresses only, the information about which IP addresses this credential can access from is entered here. Leaving it empty means requests from all IPs will be accepted. |
| IP Geolocation *(IP Geolocation)* | Used to allow the credential to access only from specific countries. Country selection can be made. By default, "Countries: All" is selected and allows access from all countries. |
| Description | If a description about the credential is desired to be entered, this field can be filled. |
| Enable Advanced Settings *(Enable Advanced Settings)* | If there is a need to customize the credential's password and IP list on an environment basis, customization settings are activated with this option. When selected, password and IP list can be entered for each environment. |
| Environment Password *(Environment Password)* | A password can be entered to be used specifically for the environment in the relevant row. |
| Environment IP List *(Environment IP List)* | An IP list can be entered to be used specifically for the environment in the relevant row. |
## Credential Access Control Settings
To set access permissions for the credential, operations are performed by switching to the **Access Control List** panel.
In this panel, the API Proxy for which access permission is desired to be granted is selected from the screen that appears when the button marked in red in the image below is pressed.
 From the opened screen, the desired API Proxy(ies) are selected and the **Add** button marked in red below is pressed.
 With this operation, access permission is granted to the credential for the selected API Proxies. For this operation to become active on live running rules, it must be deployed to environments.
For this, when operations are completed, press the **Save and Deploy** button in the upper right corner to activate the settings.
With this operation, access permission is granted to the credential for the selected API Proxies. For this operation to become active on live running rules, it must be deployed to environments.
For this, when operations are completed, press the **Save and Deploy** button in the upper right corner to activate the settings.
 ### API Proxy-Based Customization
To customize the credential on an API Proxy basis, press the **Edit** link in the relevant API Proxy record.
### API Proxy-Based Customization
To customize the credential on an API Proxy basis, press the **Edit** link in the relevant API Proxy record.
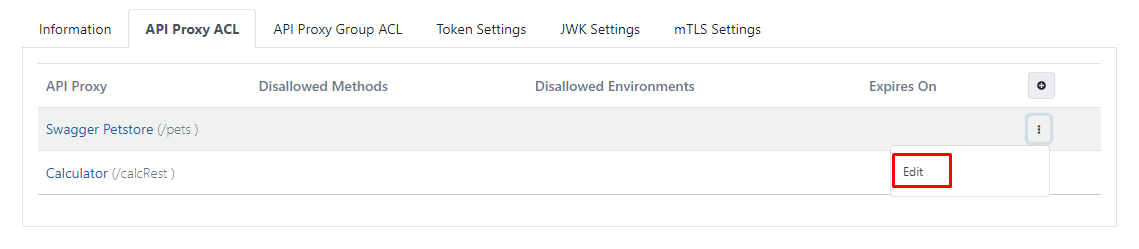 In the dialog that appears, API Proxy-specific settings for the credential can be made:
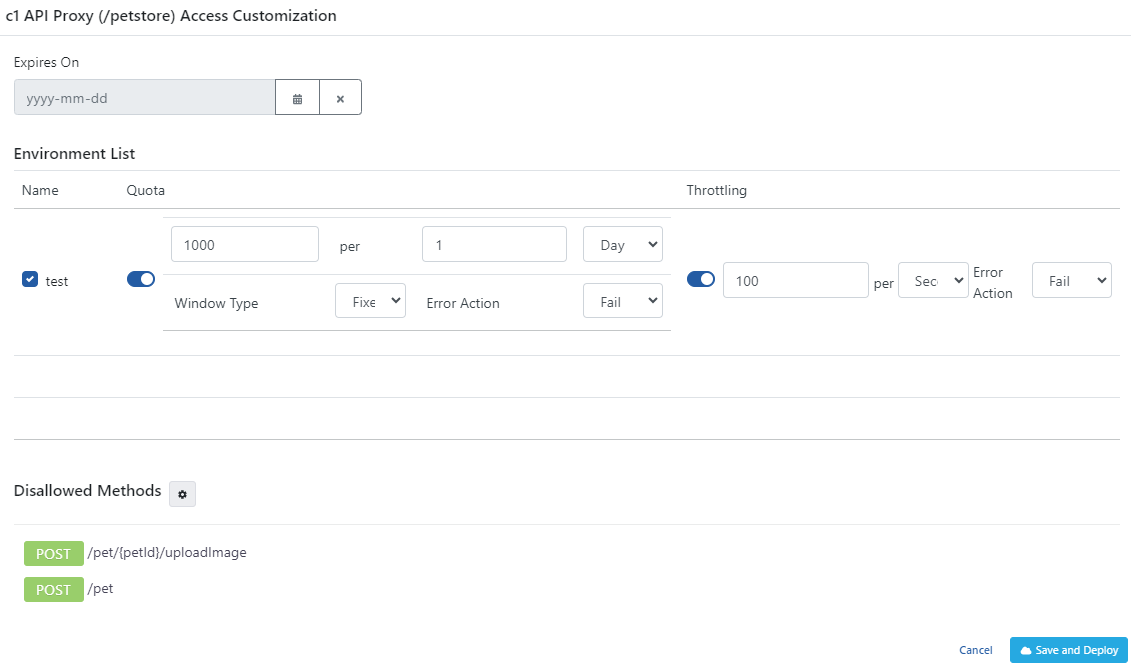 The fields used for API Proxy-based access customization configuration are shown in the table below.
| Field | Description |
| ----------------------------------------------------------------------- | --------------------------------------------------------------------------------------------------------------------------------------------------------------------------------------------------- |
| Expires On *(Expires On)* | If this date value is entered, the Credential will no longer be able to access the API Proxy from the time this date arrives. |
| Environment List *(Environment List)* | Enables entering Quota and Throttling values specific to the environment where the API Proxy is deployed. |
| Environment Quota *(Quota)* | The quota value specific to the specified environment of the API Proxy. |
| Environment Throttling *(Throttling)* | The throttling value specific to the specified environment of the API Proxy. |
| Message Count *(Message Count)* | The maximum number of messages that can be sent to the Backend API within the time given with the Throttling Interval. |
| Interval Time Amount *(Interval Time Amount)* | A numeric value indicating the duration of the limitation window in the selected time unit. |
| Interval Time Unit *(Interval Time Unit)* | The time interval unit used for API request limitation (for example, second, minute). |
| Interval Window Type *(Interval Window Type)* | The time interval method used for API request limitation (fixed or sliding). |
| Cache Connection Timeout (Second) *(Cache Connection Timeout (Second))* | The timeout duration for cache connection is specified. |
| Action for Cache Connection Error *(Action for Cache Connection Error)* | The action to be applied if the policy experiences a connection problem with the cache server is specified. |
| Disallowed Methods *(Disallowed Methods)* | If it is desired that the credential not access any method of the API Proxy regardless of the roles it has, the methods of the API Proxy that are desired to be closed to access are selected here. |
| Save and Deploy Button *(Save and Deploy)* | After completing the settings/changes, press the **Save and Deploy** button to activate the settings. |
## Token Settings
To perform operations for token settings, switch to the **Token Settings** panel.
**An image containing token settings is shown below:**
The fields used for API Proxy-based access customization configuration are shown in the table below.
| Field | Description |
| ----------------------------------------------------------------------- | --------------------------------------------------------------------------------------------------------------------------------------------------------------------------------------------------- |
| Expires On *(Expires On)* | If this date value is entered, the Credential will no longer be able to access the API Proxy from the time this date arrives. |
| Environment List *(Environment List)* | Enables entering Quota and Throttling values specific to the environment where the API Proxy is deployed. |
| Environment Quota *(Quota)* | The quota value specific to the specified environment of the API Proxy. |
| Environment Throttling *(Throttling)* | The throttling value specific to the specified environment of the API Proxy. |
| Message Count *(Message Count)* | The maximum number of messages that can be sent to the Backend API within the time given with the Throttling Interval. |
| Interval Time Amount *(Interval Time Amount)* | A numeric value indicating the duration of the limitation window in the selected time unit. |
| Interval Time Unit *(Interval Time Unit)* | The time interval unit used for API request limitation (for example, second, minute). |
| Interval Window Type *(Interval Window Type)* | The time interval method used for API request limitation (fixed or sliding). |
| Cache Connection Timeout (Second) *(Cache Connection Timeout (Second))* | The timeout duration for cache connection is specified. |
| Action for Cache Connection Error *(Action for Cache Connection Error)* | The action to be applied if the policy experiences a connection problem with the cache server is specified. |
| Disallowed Methods *(Disallowed Methods)* | If it is desired that the credential not access any method of the API Proxy regardless of the roles it has, the methods of the API Proxy that are desired to be closed to access are selected here. |
| Save and Deploy Button *(Save and Deploy)* | After completing the settings/changes, press the **Save and Deploy** button to activate the settings. |
## Token Settings
To perform operations for token settings, switch to the **Token Settings** panel.
**An image containing token settings is shown below:**
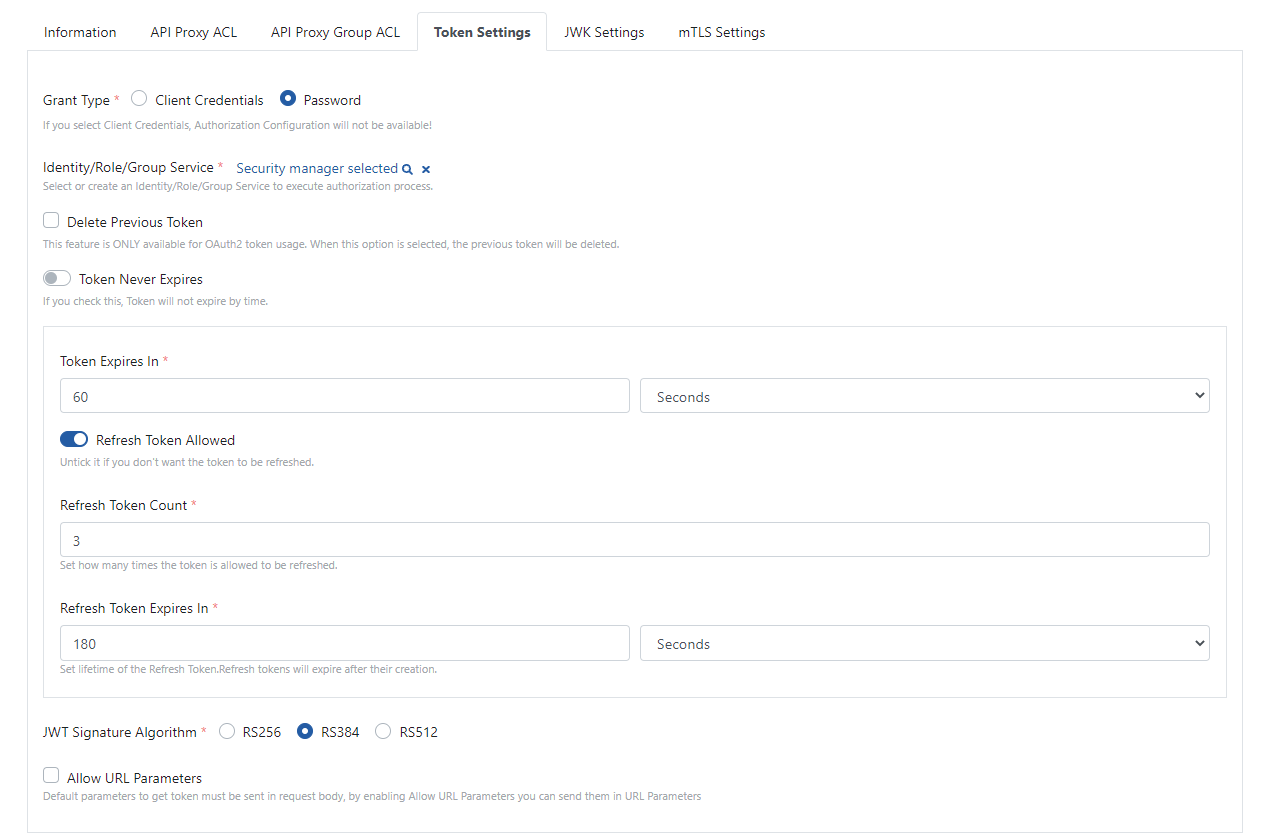 The fields used for token settings configuration are shown in the table below.
| Field | Description |
| ------------------------------------------------------------------------------- | -------------------------------------------------------------------------------------------------------------------------------------------------------------------------------- |
| Grant Type *(Grant Type)* | The information to be requested for token generation changes accordingly. Client Credentials or Password. |
| Identity/Role/Group Service *(Identity/Role/Group Service)* | If Grant Type is password; this is the identity provider service that specifies where the username and password information to be sent will be verified. |
| Select to JWT Regenerator Service API *(Select to JWT Regenerator Service API)* | This feature is only valid for JWT token usage. It enables the JWT token value to be regenerated through the selected API without authentication. |
| Delete Previous Token *(Delete Previous Token)* | This feature is only valid for OAuth2 token usage. In new token acquisitions or renewals, it invalidates the previous token. |
| Token Never Expires *(Token Never Expires)* | If this option is checked, the token does not become invalid over time, it can be used as long as desired. |
| Token Expires In *(Token Expires In)* | Specifies the lifetime during which the token will be usable. |
| Refresh Token Allowed *(Refresh Token Allowed)* | Enables the token refresh feature. |
| Refresh Token Count *(Refresh Token Count)* | Specifies how many times the token can be refreshed. |
| Refresh Token Expires In *(Refresh Token Expires In)* | Specifies the lifetime that the token will have with each refresh. |
| JWT Signature Algorithm *(JWT Signature Algorithm)* | This feature is only valid for JWT token usage. It is used to select the signature algorithm to be used when generating the token. |
| Allow URL Parameters *(Allow URL Parameters)* | Allows information to be sent as URL parameters when sending requests to the Token Service for token generation. It is recommended not to use it as it may pose a security risk. |
### Client Authentication — Authorization Basic Header Support (RFC 6749 §2.3.1)
#### Getting a Token with Basic Authorization
Credentials can now be presented using HTTP Basic Authentication:
```bash theme={null}
# With Basic Authorization header (new)
curl -u "my-client-id:my-secret" \
-d "grant_type=client_credentials" \
https://gateway.example.com/credential/token
```
#### Legacy Body-Parameter Method
Sending credentials in the request body is still supported:
```bash theme={null}
# Via body parameters (backward compatible)
curl -d "grant_type=client_credentials&client_id=my-client-id&client_secret=my-secret" \
https://gateway.example.com/credential/token
```
#### RFC Compliance Rules
* **Do not mix methods**: Sending both Basic header AND body parameters (`client_id`/`client_secret`) results in an `invalid_request` error (HTTP 400).
* **Valid Base64 required**: Malformed Basic headers (invalid Base64 or missing `:` separator) are rejected with `invalid_client` (HTTP 401).
* **Non-Basic schemes ignored**: Headers like `Authorization: Bearer ...` are ignored; the server falls back to body-parameter validation.
* **Password grant credentials in body**: The resource owner password (`username` and `password`) must always be sent in the request body; the Basic header is for client credentials only.
## JWK Settings
In the JWK settings tab, selections of JWK keys required for decrypting and/or verifying the signature of the incoming credential's JWK key-related data are made.
**An image containing JWK settings is shown below:**
The fields used for token settings configuration are shown in the table below.
| Field | Description |
| ------------------------------------------------------------------------------- | -------------------------------------------------------------------------------------------------------------------------------------------------------------------------------- |
| Grant Type *(Grant Type)* | The information to be requested for token generation changes accordingly. Client Credentials or Password. |
| Identity/Role/Group Service *(Identity/Role/Group Service)* | If Grant Type is password; this is the identity provider service that specifies where the username and password information to be sent will be verified. |
| Select to JWT Regenerator Service API *(Select to JWT Regenerator Service API)* | This feature is only valid for JWT token usage. It enables the JWT token value to be regenerated through the selected API without authentication. |
| Delete Previous Token *(Delete Previous Token)* | This feature is only valid for OAuth2 token usage. In new token acquisitions or renewals, it invalidates the previous token. |
| Token Never Expires *(Token Never Expires)* | If this option is checked, the token does not become invalid over time, it can be used as long as desired. |
| Token Expires In *(Token Expires In)* | Specifies the lifetime during which the token will be usable. |
| Refresh Token Allowed *(Refresh Token Allowed)* | Enables the token refresh feature. |
| Refresh Token Count *(Refresh Token Count)* | Specifies how many times the token can be refreshed. |
| Refresh Token Expires In *(Refresh Token Expires In)* | Specifies the lifetime that the token will have with each refresh. |
| JWT Signature Algorithm *(JWT Signature Algorithm)* | This feature is only valid for JWT token usage. It is used to select the signature algorithm to be used when generating the token. |
| Allow URL Parameters *(Allow URL Parameters)* | Allows information to be sent as URL parameters when sending requests to the Token Service for token generation. It is recommended not to use it as it may pose a security risk. |
### Client Authentication — Authorization Basic Header Support (RFC 6749 §2.3.1)
#### Getting a Token with Basic Authorization
Credentials can now be presented using HTTP Basic Authentication:
```bash theme={null}
# With Basic Authorization header (new)
curl -u "my-client-id:my-secret" \
-d "grant_type=client_credentials" \
https://gateway.example.com/credential/token
```
#### Legacy Body-Parameter Method
Sending credentials in the request body is still supported:
```bash theme={null}
# Via body parameters (backward compatible)
curl -d "grant_type=client_credentials&client_id=my-client-id&client_secret=my-secret" \
https://gateway.example.com/credential/token
```
#### RFC Compliance Rules
* **Do not mix methods**: Sending both Basic header AND body parameters (`client_id`/`client_secret`) results in an `invalid_request` error (HTTP 400).
* **Valid Base64 required**: Malformed Basic headers (invalid Base64 or missing `:` separator) are rejected with `invalid_client` (HTTP 401).
* **Non-Basic schemes ignored**: Headers like `Authorization: Bearer ...` are ignored; the server falls back to body-parameter validation.
* **Password grant credentials in body**: The resource owner password (`username` and `password`) must always be sent in the request body; the Basic header is for client credentials only.
## JWK Settings
In the JWK settings tab, selections of JWK keys required for decrypting and/or verifying the signature of the incoming credential's JWK key-related data are made.
**An image containing JWK settings is shown below:**
 The dialog that appears when JWK Settings is enabled is as follows:
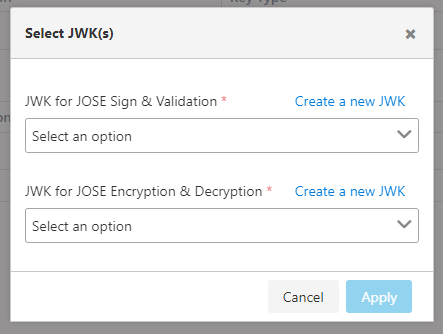 The fields used for JWK settings configuration are shown in the table below.
| Field | Description |
| ------------------------------------------------------------------------------- | -------------------------------------------------------------------------------------------------------------------------------------------------------------------------------------------------------------------------- |
| JWK for JOSE Sign & Validation *(JWK for JOSE Sign & Validation)* | This is the signing/signature verification JWK key that the credential has. When it is said to use the user's key in JOSE Validation/Implementation policies, this JWK is used for signing/signature verification. |
| JWK for JOSE Encryption & Descryption *(JWK for JOSE Encryption & Descryption)* | This is the encryption/decryption verification JWK key that the credential has. When it is said to use the user's key in JOSE Validation/Implementation policies, this JWK is used for encryption/decryption verification. |
## mTLS Settings
In the mTLS settings tab, the truststore selection required for the incoming credential's certificate to be verified with the mTLS Authentication Policy is made.
**An image containing mTLS settings is shown below:**
The fields used for JWK settings configuration are shown in the table below.
| Field | Description |
| ------------------------------------------------------------------------------- | -------------------------------------------------------------------------------------------------------------------------------------------------------------------------------------------------------------------------- |
| JWK for JOSE Sign & Validation *(JWK for JOSE Sign & Validation)* | This is the signing/signature verification JWK key that the credential has. When it is said to use the user's key in JOSE Validation/Implementation policies, this JWK is used for signing/signature verification. |
| JWK for JOSE Encryption & Descryption *(JWK for JOSE Encryption & Descryption)* | This is the encryption/decryption verification JWK key that the credential has. When it is said to use the user's key in JOSE Validation/Implementation policies, this JWK is used for encryption/decryption verification. |
## mTLS Settings
In the mTLS settings tab, the truststore selection required for the incoming credential's certificate to be verified with the mTLS Authentication Policy is made.
**An image containing mTLS settings is shown below:**
 The fields used for mTLS settings configuration are shown in the table below.
| Field | Description |
| ------------------------- | ---------------------------------------------------------------------------------------------------------------------- |
| Truststore *(Truststore)* | Truststore is selected. If it is not previously defined, a new one can be created by pressing the + button next to it. |
The fields used for mTLS settings configuration are shown in the table below.
| Field | Description |
| ------------------------- | ---------------------------------------------------------------------------------------------------------------------- |
| Truststore *(Truststore)* | Truststore is selected. If it is not previously defined, a new one can be created by pressing the + button next to it. |