> ## Documentation Index
> Fetch the complete documentation index at: https://docs.apinizer.com/llms.txt
> Use this file to discover all available pages before exploring further.
# Certificates
> You can define and manage certificates used in policies and connections. You can perform operations such as receiving via HTTPS/LDAPS connection, importing from file, pasting from clipboard, and truststore management.
## Creating a New Certificate
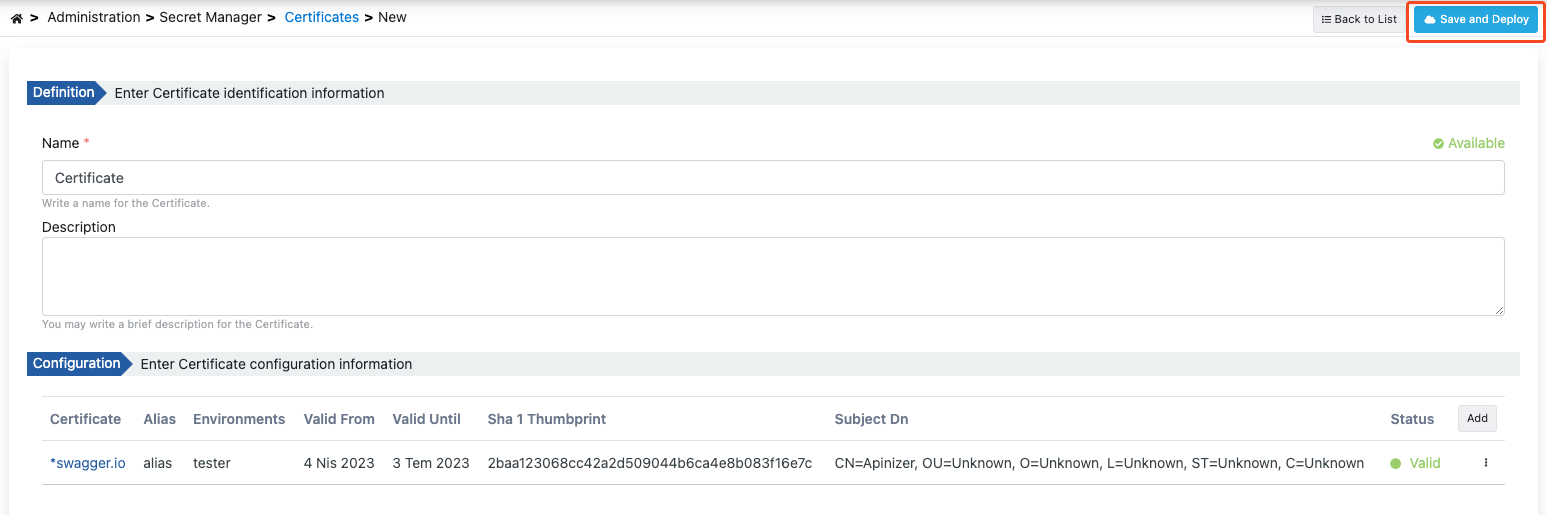
Click the **Create** button from the **Management → Secrets Management → Certificates** screen. Fill in the information under **Definition**. Then click the **New Certificate Definition** button.
 The fields used for certificate creation configuration are shown in the table below.
| Field | Description |
| ----------- | ----------------------------------------------------------------------------------------- |
| Name | Name information of the created certificate. |
| Description | A description can be written to facilitate management related to the created certificate. |
Fill in the configuration information for the Certificate in the opened window. Then click the **Apply** button. The saved **Certificate Definition** is listed in the table opened under **Configuration**.
The fields used for certificate creation configuration are shown in the table below.
| Field | Description |
| ----------- | ----------------------------------------------------------------------------------------- |
| Name | Name information of the created certificate. |
| Description | A description can be written to facilitate management related to the created certificate. |
Fill in the configuration information for the Certificate in the opened window. Then click the **Apply** button. The saved **Certificate Definition** is listed in the table opened under **Configuration**.
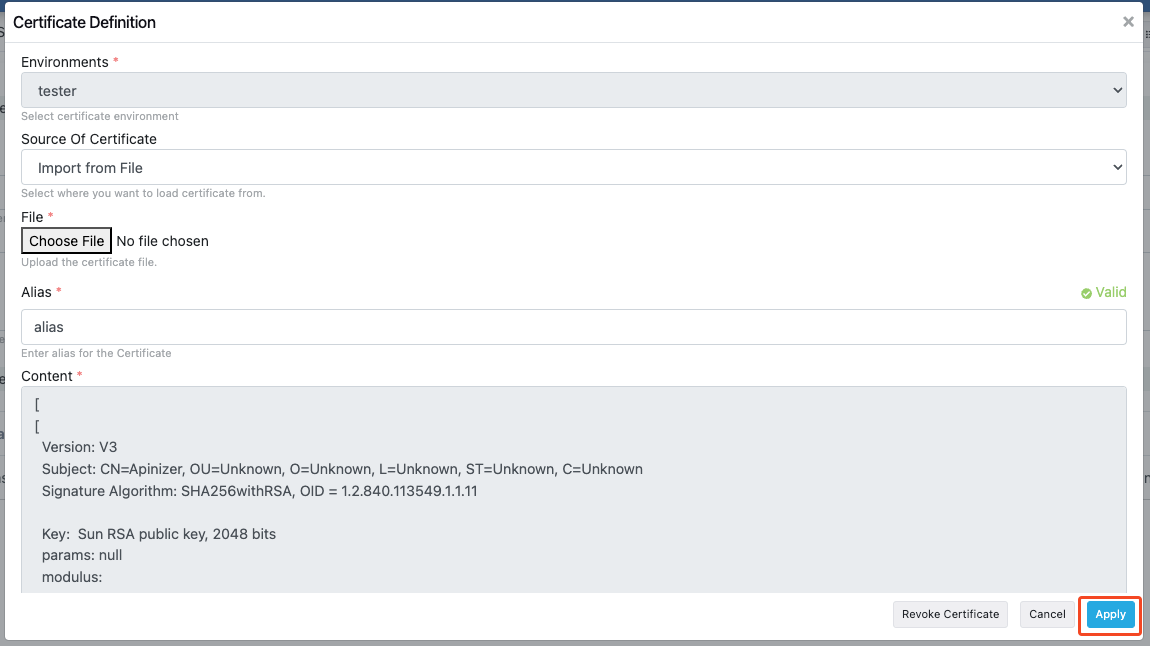
 The fields used for certificate definition configuration are shown in the table below.
| Field | Açıklama |
| --------------------------------------------- | ---------------------------------------------------------------------------------------------------------------------------------------------------------------------------------- |
| Environments (Environments) | The previously defined environment where the certificate will be used is selected. |
| Source Of Certificate (Source Of Certificate) | The source from which the certificate will be obtained. Three options are available:
The fields used for certificate definition configuration are shown in the table below.
| Field | Açıklama |
| --------------------------------------------- | ---------------------------------------------------------------------------------------------------------------------------------------------------------------------------------- |
| Environments (Environments) | The previously defined environment where the certificate will be used is selected. |
| Source Of Certificate (Source Of Certificate) | The source from which the certificate will be obtained. Three options are available:
- Receive via HTTPS/LDAPS Connection
- Import from File
- Paste from Clipboard |
| URL | When the Receive via HTTPS/LDAPS Connection option is selected, the HTTPS or LDAPS URL connection address is entered in the URL field and the button next to it is clicked. |
| File (File) | When the Import from File option is selected, the file containing the certificate is selected by clicking the "Select File" button. |
| Certificate (Certificate) | When the Paste from Clipboard option is selected, this is the field where the certificate will be pasted. |
| Encoding Type (Encoding Type) | When the Paste from Clipboard option is selected, the encoding type of the pasted certificate is selected. Two options are available:
- BASE64
- BASE64PEM |
| Alias | The alias information of the certificate is entered. |
| Content (Content) | This is the field where the content of the certificate is displayed. |
| Certificate (Certificate) | Obtained from the certificate. |
After completing the definition and configuration information, click the **Save and Deploy** button to deploy.
 ## API Manager Environment and JVM TrustStore Synchronization
In certificate environment selection, the **API Manager** environment has a special meaning. Certificates assigned to this environment are automatically added to the API Manager application's JVM TrustStore. This ensures that server certificates are validated during HTTPS calls made from API Manager (spec download, test console, OIDC discovery, etc.).
Certificates assigned to the API Manager environment are automatically loaded into the JVM when the application starts. When a certificate is added, updated, or deleted, the JVM TrustStore is updated immediately; no restart is required.
If API Manager connects to servers using self-signed certificates (e.g., spec URL or OIDC provider), the relevant certificate must be assigned to the **API Manager** environment here. Otherwise, a PKIX certificate error will occur during connection.
## Certificate Editing
To edit an existing certificate, click the **Edit** button from that certificate's menu.
## API Manager Environment and JVM TrustStore Synchronization
In certificate environment selection, the **API Manager** environment has a special meaning. Certificates assigned to this environment are automatically added to the API Manager application's JVM TrustStore. This ensures that server certificates are validated during HTTPS calls made from API Manager (spec download, test console, OIDC discovery, etc.).
Certificates assigned to the API Manager environment are automatically loaded into the JVM when the application starts. When a certificate is added, updated, or deleted, the JVM TrustStore is updated immediately; no restart is required.
If API Manager connects to servers using self-signed certificates (e.g., spec URL or OIDC provider), the relevant certificate must be assigned to the **API Manager** environment here. Otherwise, a PKIX certificate error will occur during connection.
## Certificate Editing
To edit an existing certificate, click the **Edit** button from that certificate's menu.
 In the screen opened when you click the **Edit** field, you can perform **update** and **cancel** operations on the certificate.
Click the **Apply** button to save the changes you made.
In the screen opened when you click the **Edit** field, you can perform **update** and **cancel** operations on the certificate.
Click the **Apply** button to save the changes you made.
 ### Updating Related JWKs
When a certificate is updated and the **Save and Deploy** button is clicked, if there are JWKs created from this certificate, the system automatically detects related JWKs and presents the user with options.
When a certificate is updated, JWKs created from this certificate can also be automatically updated or the relationship can be disconnected.
#### JWK Connection Dialog
When a certificate is updated and related JWKs are detected, the following dialog opens:
### Updating Related JWKs
When a certificate is updated and the **Save and Deploy** button is clicked, if there are JWKs created from this certificate, the system automatically detects related JWKs and presents the user with options.
When a certificate is updated, JWKs created from this certificate can also be automatically updated or the relationship can be disconnected.
#### JWK Connection Dialog
When a certificate is updated and related JWKs are detected, the following dialog opens:
 **Dialog Content:**
* **Title**: "JWK Connection"
* **Warning Message**: "This Certificate is used in X JWK(s). What would you like to do?"
* **Options**:
* **Update related JWKs**: Ensures that changes in the certificate are reflected to related JWKs as well. When this option is selected, related JWKs are automatically updated when the certificate is updated.
* **Update certificate only and disconnect**: Updates the certificate but disconnects the relationship with JWKs. When this option is selected, the certificate is updated but JWKs remain in their previous state and the relationship is removed.
* **Cancel**: Cancels the operation and no changes are made.
#### Update Flow
Edit the certificate information and click the **Save and Deploy** button.
The system checks for JWKs created from this certificate.
If there are related JWKs, the JWK Connection dialog opens.
The user selects one of three options:
* **Update**: Update related JWKs as well
* **Disconnect**: Update only the certificate, disconnect the relationship
* **Cancel**: Cancel the operation
When Update or Disconnect is selected, a confirmation dialog opens. The user confirms the operation by entering the certificate name.
After confirmation, the selected operation is performed and the certificate is updated.
Updating related JWKs may affect all policies and connections using these JWKs. Evaluate the impacts before proceeding.
## Certificate Deletion
To delete an existing certificate, click the **Delete** button from that certificate's menu.
**Dialog Content:**
* **Title**: "JWK Connection"
* **Warning Message**: "This Certificate is used in X JWK(s). What would you like to do?"
* **Options**:
* **Update related JWKs**: Ensures that changes in the certificate are reflected to related JWKs as well. When this option is selected, related JWKs are automatically updated when the certificate is updated.
* **Update certificate only and disconnect**: Updates the certificate but disconnects the relationship with JWKs. When this option is selected, the certificate is updated but JWKs remain in their previous state and the relationship is removed.
* **Cancel**: Cancels the operation and no changes are made.
#### Update Flow
Edit the certificate information and click the **Save and Deploy** button.
The system checks for JWKs created from this certificate.
If there are related JWKs, the JWK Connection dialog opens.
The user selects one of three options:
* **Update**: Update related JWKs as well
* **Disconnect**: Update only the certificate, disconnect the relationship
* **Cancel**: Cancel the operation
When Update or Disconnect is selected, a confirmation dialog opens. The user confirms the operation by entering the certificate name.
After confirmation, the selected operation is performed and the certificate is updated.
Updating related JWKs may affect all policies and connections using these JWKs. Evaluate the impacts before proceeding.
## Certificate Deletion
To delete an existing certificate, click the **Delete** button from that certificate's menu.
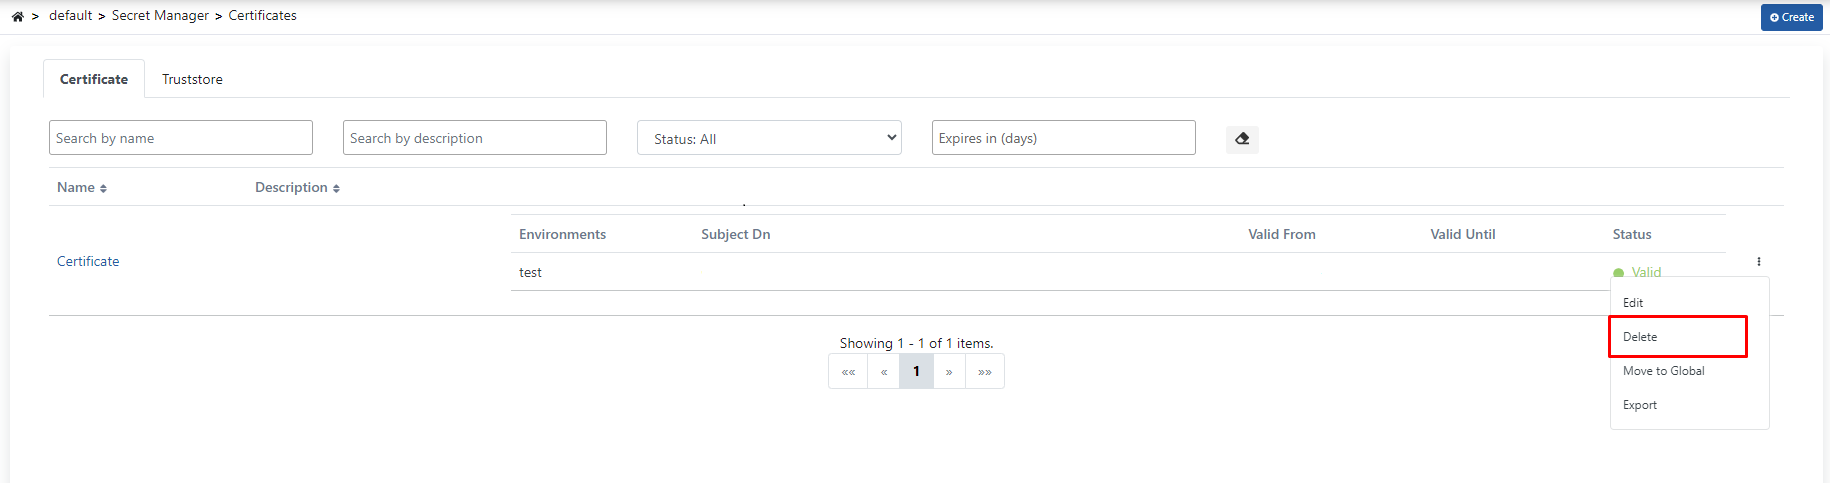 The system checks for JWKs created from this certificate. If there are related JWKs, the JWK Connection dialog opens.
If there are related JWKs, the following options are presented:
* **Delete JWKS**: Delete related JWKs as well
* **Delete Disconnect**: Delete only the certificate, keep JWKs (relationship is disconnected)
* **Cancel**: Cancel the operation
When Delete JWKS or Delete Disconnect is selected, a confirmation dialog opens. The user confirms the operation by entering the certificate name.
Click the **Delete** button again in the opened window to confirm.
The system checks for JWKs created from this certificate. If there are related JWKs, the JWK Connection dialog opens.
If there are related JWKs, the following options are presented:
* **Delete JWKS**: Delete related JWKs as well
* **Delete Disconnect**: Delete only the certificate, keep JWKs (relationship is disconnected)
* **Cancel**: Cancel the operation
When Delete JWKS or Delete Disconnect is selected, a confirmation dialog opens. The user confirms the operation by entering the certificate name.
Click the **Delete** button again in the opened window to confirm.
 ### Deleting Related JWKs
When a certificate is deleted, if there are JWKs created from this certificate, the system automatically detects related JWKs and presents the user with options.
When a certificate is deleted, related JWKs may also be deleted or the relationship may be disconnected. This operation cannot be undone. Evaluate the impacts before proceeding.
#### Deletion Flow
Start the certificate deletion operation.
The system checks for JWKs created from this certificate.
If there are related JWKs, the JWK Connection dialog opens.
The user selects one of three options: Delete JWKS, Delete Disconnect, or Cancel.
When Delete JWKS or Delete Disconnect is selected, a confirmation dialog opens. The user confirms the operation by entering the certificate name.
After confirmation, the selected operation is performed and the certificate is deleted.
## Certificate Export
Two different export options are available on the certificate view screen:
On the certificate view screen, two export buttons are available in the top menu:
* **Export as Certificate**: Exports the certificate in certificate file format.
* **Export**: Exports the certificate configuration in JSON/ZIP format. This format is suitable for importing into another Apinizer environment.
### Deleting Related JWKs
When a certificate is deleted, if there are JWKs created from this certificate, the system automatically detects related JWKs and presents the user with options.
When a certificate is deleted, related JWKs may also be deleted or the relationship may be disconnected. This operation cannot be undone. Evaluate the impacts before proceeding.
#### Deletion Flow
Start the certificate deletion operation.
The system checks for JWKs created from this certificate.
If there are related JWKs, the JWK Connection dialog opens.
The user selects one of three options: Delete JWKS, Delete Disconnect, or Cancel.
When Delete JWKS or Delete Disconnect is selected, a confirmation dialog opens. The user confirms the operation by entering the certificate name.
After confirmation, the selected operation is performed and the certificate is deleted.
## Certificate Export
Two different export options are available on the certificate view screen:
On the certificate view screen, two export buttons are available in the top menu:
* **Export as Certificate**: Exports the certificate in certificate file format.
* **Export**: Exports the certificate configuration in JSON/ZIP format. This format is suitable for importing into another Apinizer environment.
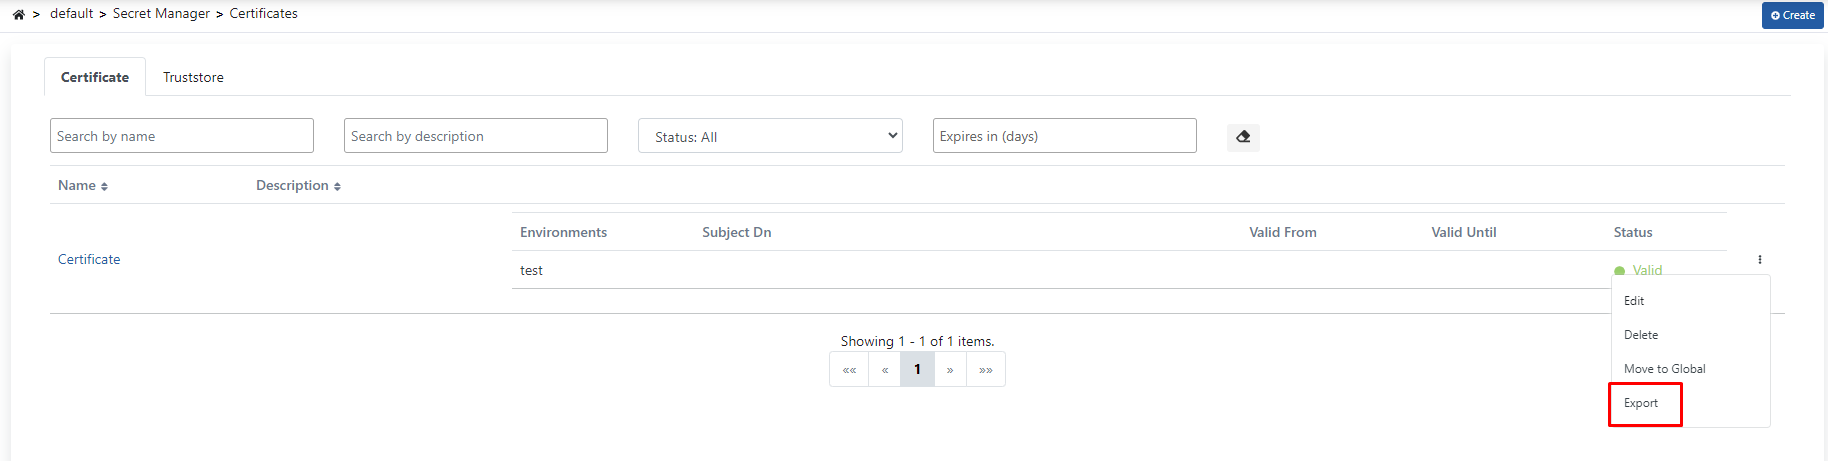 The file is automatically downloaded based on the selected export type. The ZIP format export file is named with date information and can be imported into other environments.
The JSON/ZIP format export contains the complete certificate configuration and can be used for migration to different Apinizer environments. The certificate format export downloads the certificate directly as a certificate file.
## Truststore
In the Truststore tab, digital certificates used in Apinizer and trusted root certificate authorities (CA) are listed.
The file is automatically downloaded based on the selected export type. The ZIP format export file is named with date information and can be imported into other environments.
The JSON/ZIP format export contains the complete certificate configuration and can be used for migration to different Apinizer environments. The certificate format export downloads the certificate directly as a certificate file.
## Truststore
In the Truststore tab, digital certificates used in Apinizer and trusted root certificate authorities (CA) are listed.
