> ## Documentation Index
> Fetch the complete documentation index at: https://docs.apinizer.com/llms.txt
> Use this file to discover all available pages before exploring further.
# API Developer Multi Portal Usage
> Steps for creating and managing new API Developer Portal on Apinizer. Each portal works completely isolated with independent configuration, theme, and access control.
## What is Multi Portal?
**API Developer Multi Portal** feature allows you to create and manage multiple independent API Developer Portals on the Apinizer platform. Each portal works as a completely independent environment with its own users, APIs, settings, and appearance.
### Simple Explanation with Examples
Imagine you are a company serving different groups:
**Scenario 1: Different Departments**
* **Sales Team Portal:** Special APIs and documentation for your sales team
* **Customer Service Portal:** Different APIs for your customer service team
* **IT Department Portal:** Advanced APIs for technical team
**Scenario 2: Different Customer Groups**
* **Partner Companies Portal:** Special APIs for your business partners
* **General User Portal:** Public APIs
* **Premium Customer Portal:** Premium APIs for your special customers
**Scenario 3: Different Environments**
* **Test Portal:** For development and testing
* **Production Portal:** For live system
* **Demo Portal:** For demonstrations and demos
Each portal is like a separate website working on its own. Changes you make in one do not affect others.
### Multi Portal Advantages
Each portal has its own settings, users, and APIs. Changes made in one portal do not affect others.
You can use different logo, color scheme, theme, and content for each portal. Each portal can have its own brand.
Each portal has its own security settings. Users can only access portals they are authorized for.
You can activate different features for different portals. For example, Analytics can be open in one and closed in another.
You can assign different administrators for each portal. Departments can independently manage their own portals.
You can create as many portals as you need. Each portal can be scaled separately.
### How Does Multi Portal Work?
**Single Platform, Multiple Portals**
On the Apinizer platform, you can manage all your portals from a single management panel:
1. **Portal Creation:** When you create a new portal, the system automatically:
* Creates a unique URL for the portal
* Allocates a separate database area
* Prepares an independent working environment
2. **Portal Management:** For each portal:
* You can configure its own settings
* You can add its own users
* You can publish its own APIs
* You can customize its own appearance
3. **Portal Access:** Each portal:
* Has its own URL (e.g., `https://api.company.com/portal/partner-portal`)
* Has its own login page
* Has its own user accounts
### Portal Isolation
Each portal works in a completely isolated structure technically:
| Component | Description |
| ------------- | ------------------------------------------------------------------- |
| **Namespace** | Each portal works in its own namespace, separate from other portals |
| **Pod** | Each portal works in its own working unit (pod) |
| **Secret** | Each portal has its own security keys and passwords |
| **Service** | Each portal has its own service configuration |
Thanks to this isolation:
* A problem occurring in one portal does not affect others
* Security vulnerabilities do not spread from one portal to another
* Performance issues remain isolated
### Independent Configuration
All settings and configurations of each portal are independent from each other:
Different for each portal:
* Logo and brand image
* Color scheme (primary color, secondary color, background)
* Font settings
* Home page content
* Footer content
**Example:** You can use your company logo in partner portal, and a different logo in general portal.
Different for each portal:
* User registration permissions (open/closed)
* Auto approval settings
* API subscription approval processes
* Credential management permissions
* IP restrictions
**Example:** Auto approval can be open in partner portal, manual approval may be required in general portal.
Different for each portal:
* User accounts (a user can register to multiple portals)
* User roles and permissions
* Portal administrators
* Organization structures
**Example:** The same person can be in both partner portal and general portal with different roles.
Different for each portal:
* Published API products
* API documentation
* Pricing plans
* Content pages
* Files and resources
**Example:** Premium APIs can be published in partner portal, basic APIs in general portal.
Different for each portal:
* Try It Out (test console) active/passive
* Analytics feature active/passive
* Jira integration active/passive
* How to Use menu active/passive
**Example:** All features can be open in premium portal, only basic features can be open in basic portal.
Different for each portal:
* Default language (Turkish/English)
* Multi-language support (open/closed)
* Language content
**Example:** Turkey portal can be Turkish, global portal can be English.
### When Should You Use Multi Portal?
It is recommended to use Multi Portal feature in the following situations:
**Usage Scenario:**
* You offer different APIs to different customer groups
* You want a special portal for partner companies
* You want to offer a separate experience for premium customers
**Advantage:** Each customer group experiences a portal experience customized according to their needs.
**Usage Scenario:**
* Different departments within the company want to manage their own APIs
* Each department wants to independently manage their own portals
* You want to control data sharing between departments
**Advantage:** Each department independently manages their own portals, central control is provided.
**Usage Scenario:**
* You want separate portals for test and production environments
* You want a separate portal for demo and presentations
* You want to keep development processes isolated
**Advantage:** Changes in test environment do not affect production, safe development is done.
**Usage Scenario:**
* You want localized portals for different countries/regions
* You want different language and content for each region
* You want to comply with local regulations
**Advantage:** Each region experiences a portal experience in their own language and culture.
### Multi Portal vs Single Portal
| Feature | Single Portal | Multi Portal |
| ------------------- | -------------------------------- | ----------------------------------------- |
| **User Management** | All users access the same portal | Each portal has its own users |
| **API Management** | All APIs in one place | Each portal publishes its own APIs |
| **Customization** | Single appearance | Each portal can have different appearance |
| **Security** | Single security policy | Each portal has its own security settings |
| **Management** | Central management | Each portal can be managed independently |
| **Flexibility** | Limited | High flexibility |
| **Complexity** | Simple | More complex (but more powerful) |
### Summary
**Multi Portal** allows you to create and manage multiple independent API Developer Portals on the Apinizer platform. Each portal:
✅ Has its own users\
✅ Publishes its own APIs\
✅ Has its own appearance\
✅ Has its own settings\
✅ Works completely independently
This way, you can offer customized portal experiences for different customer groups, departments, or environments, and manage each one independently.
Multi Portal feature is ideal for large organizations and companies serving different customer segments. A single portal may be sufficient for small-scale projects.
## Prerequisites
**API Developer Multi Portal Installation** must be completed to add a new API Developer Portal.
Please review the [API Developer Multi Portal Installation](/en/setup/apinizer/api-multi-portal) documentation for installation.
## Portal Listing and Viewing
### Accessing Portal List
Log in to Apinizer Manager interface
Click on **Portal** tab in the top menu bar
Portal list automatically loads and all portals are displayed
 ## Creating New Portal
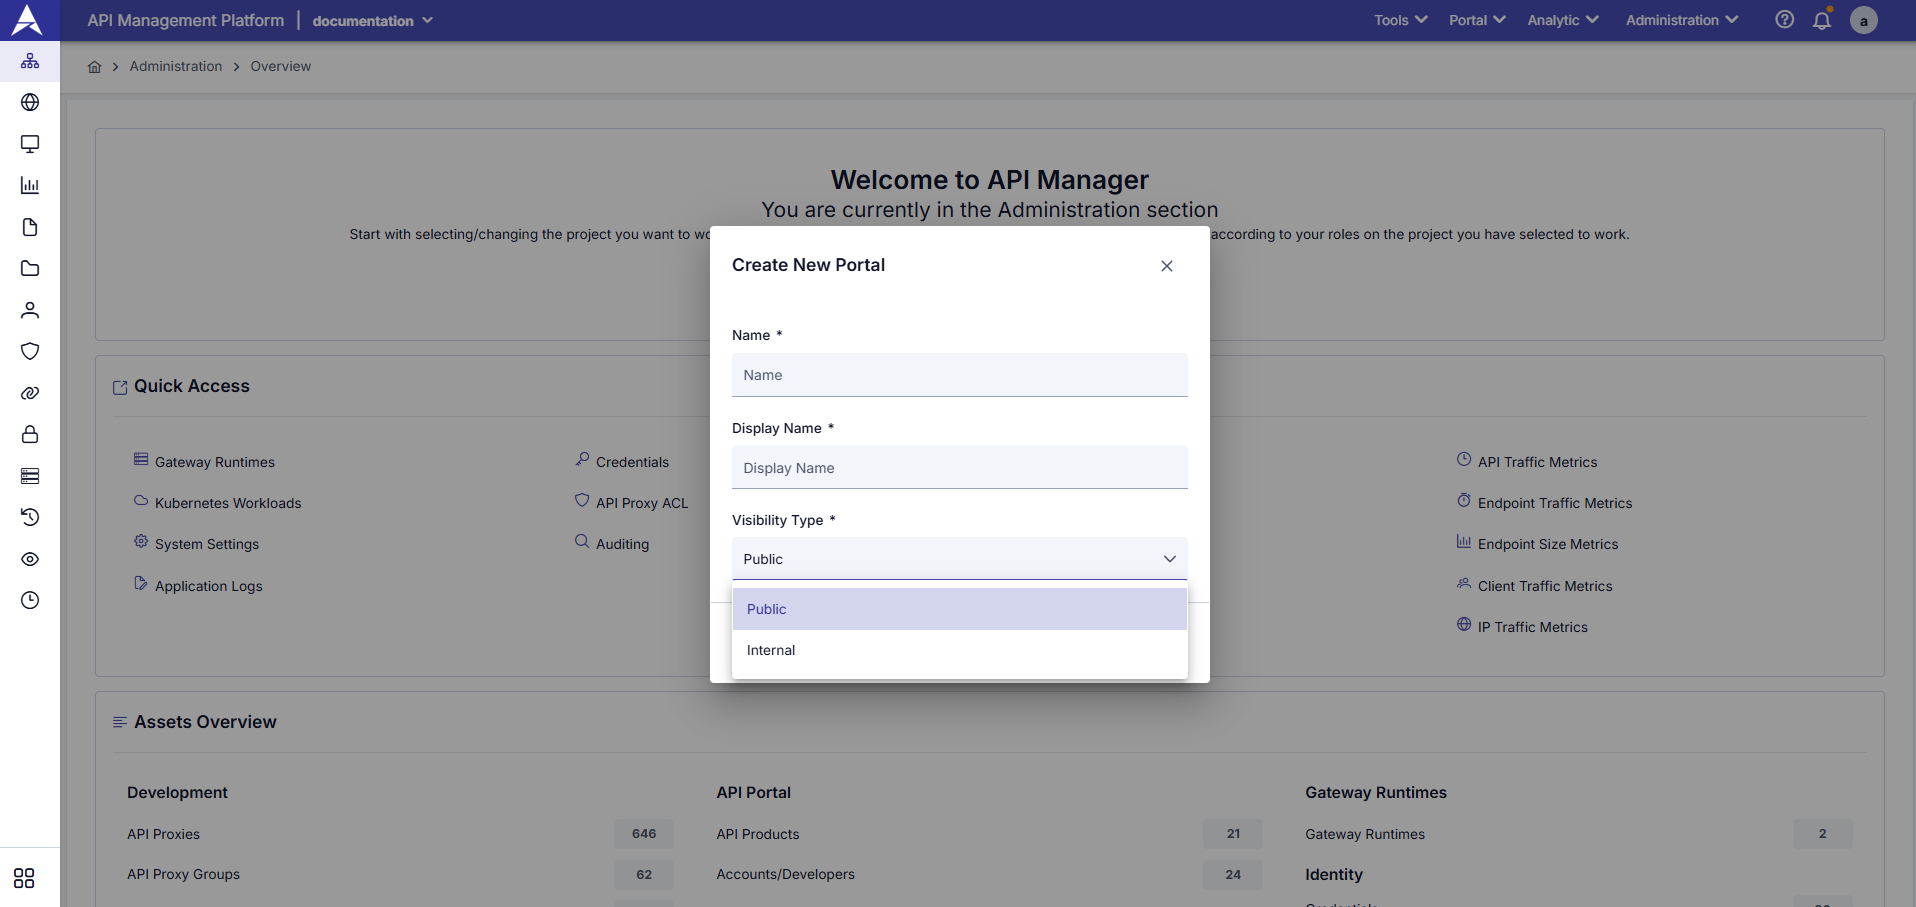
Follow the steps below to create a new API Developer Portal:
* Click on **Portal** tab in the top menu bar
* Click **"+ Create New Portal"** button in the top right corner
* Portal creation form opens
Fill in the following information in the opened form window:
* Enter a unique identifier name for the portal
* Only letters, numbers, and dash (-) characters can be used
* Space character cannot be used
* Example: `partner-portal`, `internal-dev-portal`
This name is used as a technical identifier within the system and cannot be changed later.
* Name that will appear in portal user interface
* Turkish and English characters can be used
* Space character can be used
* Example: `Partner API Portal`, `Internal Developer Portal`
This name appears on portal home page and in email notifications.
Select portal access level:
**Public (Open to Everyone):**
* Portal is open to everyone
* Anyone who registers can access the portal
* Suitable for general use
**Internal (Internal Use):**
* Portal is only open to authorized users
* Requires administrator approval
* Suitable for corporate internal use
* Make sure all required fields are filled
* Click **"Create"** button
* System creates the portal and the process is completed
* Success message is shown and you are redirected to portal list
## Creating New Portal
Follow the steps below to create a new API Developer Portal:
* Click on **Portal** tab in the top menu bar
* Click **"+ Create New Portal"** button in the top right corner
* Portal creation form opens
Fill in the following information in the opened form window:
* Enter a unique identifier name for the portal
* Only letters, numbers, and dash (-) characters can be used
* Space character cannot be used
* Example: `partner-portal`, `internal-dev-portal`
This name is used as a technical identifier within the system and cannot be changed later.
* Name that will appear in portal user interface
* Turkish and English characters can be used
* Space character can be used
* Example: `Partner API Portal`, `Internal Developer Portal`
This name appears on portal home page and in email notifications.
Select portal access level:
**Public (Open to Everyone):**
* Portal is open to everyone
* Anyone who registers can access the portal
* Suitable for general use
**Internal (Internal Use):**
* Portal is only open to authorized users
* Requires administrator approval
* Suitable for corporate internal use
* Make sure all required fields are filled
* Click **"Create"** button
* System creates the portal and the process is completed
* Success message is shown and you are redirected to portal list
 After the portal is created, a unique URL is automatically created for the portal. You can customize this URL from portal settings.
## Accessing Portal Detail Page
You can use one of the following methods to access the portal detail page:
* Click on one of the portals displayed in the portal list
* Portal detail page opens
* Click on the three-dot menu on the right of the relevant portal in the portal list
* Select **"View Details"** or **"Edit"** option
* Portal detail page opens
## Portal Overview
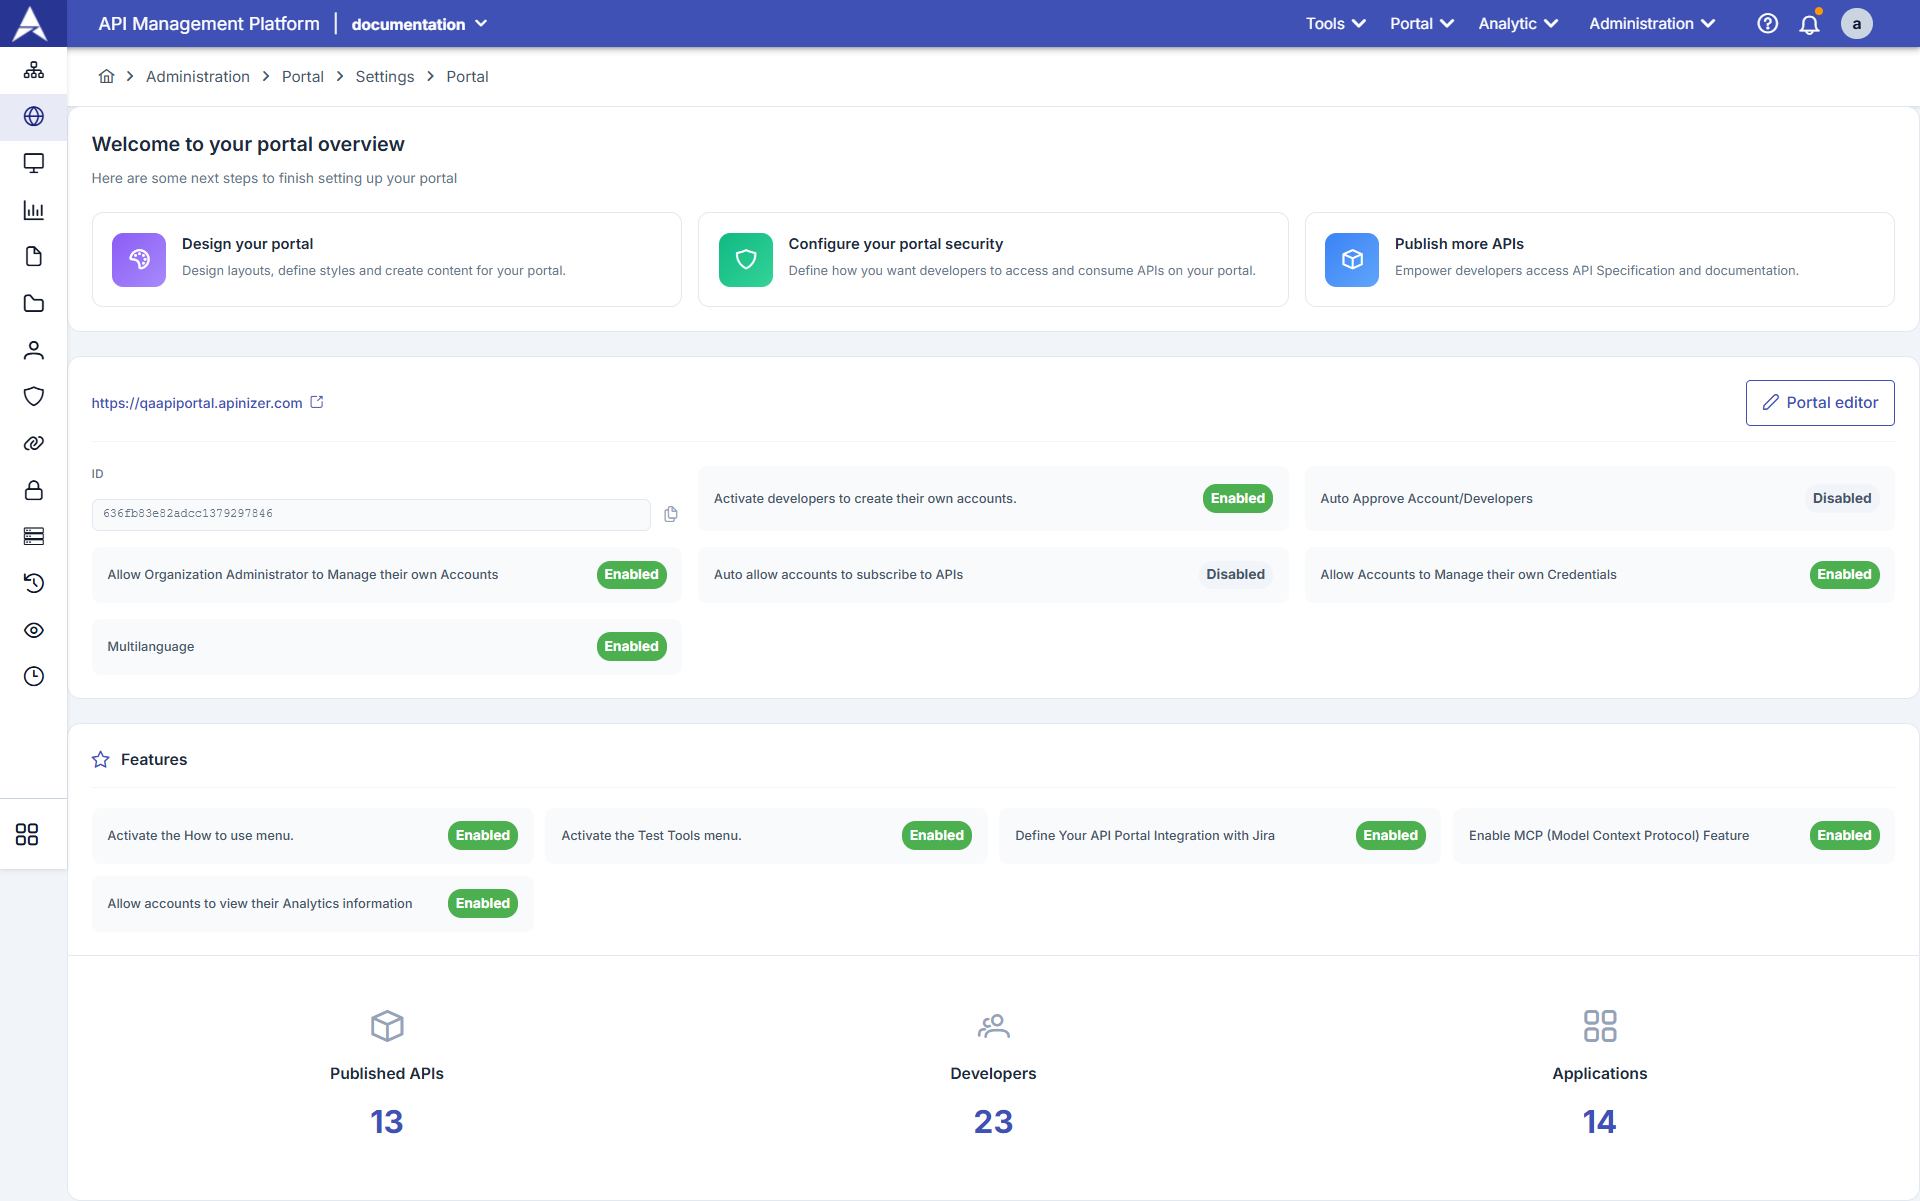
**Overview (Overview)** tab opens by default on the portal detail page. This page displays all configuration settings and statistics of the portal.
After the portal is created, a unique URL is automatically created for the portal. You can customize this URL from portal settings.
## Accessing Portal Detail Page
You can use one of the following methods to access the portal detail page:
* Click on one of the portals displayed in the portal list
* Portal detail page opens
* Click on the three-dot menu on the right of the relevant portal in the portal list
* Select **"View Details"** or **"Edit"** option
* Portal detail page opens
## Portal Overview
**Overview (Overview)** tab opens by default on the portal detail page. This page displays all configuration settings and statistics of the portal.
 ### Overview Sections
The Overview page contains the following information cards and sections:
**Portal Identity Information:**
* **Portal URL:** Full URL address used to access the portal
* **Portal ID:** Unique identifier automatically created by the system
* **Portal Status:** Active or Passive status
* **Creation Date:** Date and time when the portal was created
* **Last Update:** Date and time when the portal was last updated
You can click the copy icon next to the URL to copy the Portal URL.
**Security Configurations:**
* **Account Creation:** Permission for developers to create their own accounts (Active/Passive)
* **Auto Approval:** Automatic approval of new accounts (Active/Passive)
* **API Subscription Approval:** Automatic approval for API subscriptions (Active/Passive)
* **Credential Management:** Permission for users to manage their own API keys (Active/Passive)
* **Organization Administrator Permissions:** Account management permissions for organization administrators
Go to [Portal Settings](/en/api-portal/api-portal-settings) page to change these settings.
**Multi-Language Settings:**
* **Default Language:** Portal's default language (TR/EN)
* **Turkish Support:** Whether Turkish language option is active
* **English Support:** Whether English language option is active
* **Multi-Language Mode:** If both languages are active, multi-language mode is automatically activated
When multi-language mode is active, portal content can be displayed in both languages.
**Portal Features:**
* **How to Use Menu:** Whether "How to Use" menu is active
* **Test Tools (Try It Out):** Whether API test console is active
* **Jira Integration:** Whether Jira ticket creation feature is active
* **Analytics:** Whether usage statistics and reporting feature is active
* **API Documentation:** API documentation viewing feature
Use Portal Settings → Features tab to activate/deactivate features.
**Portal Usage Statistics:**
* **Published API Count:** Total number of API products published on the portal
* **Registered Developer Count:** Total number of developer/account registered on the portal
* **Active Developer Count:** Number of developers in active status
* **Created Application Count:** Total number of application registrations on the portal
* **Total API Call Count:** Total number of API calls made through the portal
* **Last 30 Days Calls:** Number of API calls made in the last 30 days
Statistics are updated in real-time and help you track portal usage.
You can be redirected to Portal Settings page by clicking on relevant sections to change settings on the Overview page. You can review the [Portal Settings](/en/api-portal/api-portal-settings) documentation for detailed information.
## Portal Editing
Follow the steps below to edit portal information:
* Click on the portal you want to edit from the portal list
* Portal detail page opens
* Click **"Edit"** or **"Configure"** button at the top of the page
* Alternatively, you can select **"Edit"** option from the three-dot menu on the right of the relevant portal in the portal list
In the opened edit form, you can update the following information:
* You can change the portal's display name
* This name appears in portal interface and email notifications
* Name change is reflected immediately
* You can change portal access level
* **Public:** Open to everyone
* **Internal:** Open only to authorized users
Changing visibility type may affect existing users' access.
* You can customize portal URL (if customization permission exists)
* URL format: `https://your-domain.com/portal-name`
When URL is changed, links to the old URL may not work.
* Review your changes
* Click **"Save"** or **"Update"** button
* Success message is shown and changes are saved
Portal name (Name) is a technical identifier and cannot be changed after creation. Only display name (Display Name) can be updated.
## Portal Status Management
You can manage the active or passive status of the portal. A passive portal cannot be accessed by users but is not deleted.
### Making Portal Active/Passive
* Click on the relevant portal from the portal list
* Portal detail page opens
To make portal passive:
* Click **"Deactivate"** or status toggle button at the top of the page
* Confirmation dialog opens
To make portal active again:
* Click **"Activate"** button
* Confirmation dialog opens
* Confirm the operation in the opened confirmation dialog
* Click **"Yes"** or **"Confirm"** button
* Portal status is updated
### Effects of Status Change
**Active Portal Features:**
* Users can access the portal
* APIs can be viewed and used
* New user registrations are accepted
* Email notifications are sent
* Analytics data is collected
**Passive Portal Features:**
* Users cannot access the portal (they get 404 error)
* Existing sessions are terminated
* New user registrations are not accepted
* Email notifications are not sent
* Analytics data is not collected
* Portal settings and content are preserved (not deleted)
Making portal passive immediately cuts access of existing users. Do this carefully.
## Portal Deletion
Follow the steps below to permanently delete the portal:
Portal deletion operation cannot be undone. The deleted portal and all its data (users, APIs, content, statistics) are permanently deleted.
* Click on the portal you want to delete from the portal list
* Portal detail page opens
* Click on **"Danger Zone"** tab at the bottom of the page
* Critical operations are located in this section
* Click **"Delete Portal"** or **"Remove Portal"** button
* Confirmation dialog opens
* You are asked to enter the portal name in the confirmation dialog
* Enter the portal name exactly (case sensitive)
* This step is to prevent accidental deletion
* Make sure you entered the portal name correctly
* Click **"Yes, Delete"** or **"Confirm Delete"** button
* Portal is permanently deleted
* You are redirected to portal list
### Effects of Deletion Operation
When portal is deleted, the following data is permanently deleted:
| Data Type | Description |
| ----------------------------- | ----------------------------------------------- |
| **Portal Configuration** | All portal settings and configurations |
| **User Accounts** | All developer accounts registered on the portal |
| **API Products** | All API products published on the portal |
| **Application Registrations** | All application registrations and subscriptions |
| **API Keys** | All created API keys (Client ID/Secret) |
| **Content** | Portal content, documentation pages |
| **Statistics** | All analytics data and usage statistics |
| **Files** | All files uploaded on the portal |
It is recommended to take time to backup important data or move to a different portal before deleting the portal.
## Portal Management
After creating the portal, you can perform the following management operations:
Customize portal appearance and theme
Manage APIs to be published on the portal
Manage developer accounts and permissions
Edit portal content
Configure access control and security policies
View portal usage statistics
## Configuring Portal Settings
After creating the portal, you need to configure basic settings for the portal to work properly.
### Accessing Portal Settings
* Click on the relevant portal from the portal list
* Portal detail page opens
* Click on **"Settings"** or **"Configuration"** tab at the top of the page
* Alternatively, you can access settings by clicking on relevant sections on the Overview page
### Basic Settings
Portal settings are organized in the following categories:
**Portal Basic Information:**
* Portal name and display name
* Portal URL configuration
* Default language setting
* Multi-language support (TR/EN)
* Portal description
Review [Portal Settings - General](/en/api-portal/api-portal-settings#general-settings) section for detailed information.
**Email Configuration:**
* Email server settings
* Sender email address
* Email templates (registration, approval, password reset, etc.)
* Email notification settings
Review [Portal Settings - Email](/en/api-portal/api-portal-settings#email-notifications) section for detailed information.
**Security Configurations:**
* Account creation permissions
* Auto approval settings
* API subscription approval processes
* Credential management permissions
* Organization administrator permissions
Review [Portal Settings - Security](/en/api-portal/api-portal-settings#security) section for detailed information.
**Portal Features:**
* How to Use menu
* Test tools (Try It Out)
* Jira integration
* Analytics feature
* Performance metrics
Review [Portal Settings - Features](/en/api-portal/api-portal-settings#features) section for detailed information.
**Legal Regulations:**
* Terms of Service
* Privacy Policy
* Legal file upload
Review [Portal Settings - Legal](/en/api-portal/api-portal-settings#legal) section for detailed information.
After changing portal settings, make sure to click the **"Save"** button to save changes. Unsaved changes will be lost.
## Portal Access and URL Management
### Accessing Portal URL
A unique URL is automatically created for each portal. You can access the portal using this URL.
* Go to Overview tab on portal detail page
* Full URL address is displayed in **"Portal URL"** section
* You can copy the URL by clicking the copy icon next to the URL
* Paste the copied URL into browser address bar
* Press Enter
* Portal home page opens
### Portal URL Format
Portal URLs are created in the following format:
```
https://your-domain.com/portal/{portal-name}
```
**Example:**
* Portal name: `partner-portal`
* Portal URL: `https://api.company.com/portal/partner-portal`
You can use the **"Custom Portal URL"** field from Portal Settings → General Settings section to customize portal URL.
### Portal Access Control
Portal access is controlled according to the portal's visibility type:
**Open to Everyone Portal:**
* Everyone can access the portal
* Can click "Sign Up" button to register
* Portal home page and API catalog are open to everyone
* Can view APIs but needs to register to use them
**Internal Use Portal:**
* Only authorized users can access
* Users must be added manually by administrator
* Registration button is not visible or disabled
* Portal content is only shown to logged in users
### Administrator Permissions
Portal administrators can perform the following operations:
| Permission | Description |
| ----------------------- | ---------------------------------------- |
| **Portal Settings** | View and edit portal general settings |
| **User Management** | View, approve, reject developer accounts |
| **API Management** | View, publish, unpublish API products |
| **Content Management** | Edit portal content, add documentation |
| **Analytics** | View portal usage statistics |
| **Theme Customization** | Customize portal appearance and theme |
Portal administrators cannot delete the portal or remove other administrators. These operations can only be performed by system administrators.
## Next Steps
After completing portal creation and basic configuration operations:
* Configure general settings (language, URL, email)
* Determine security settings (account creation, auto approval)
* Activate feature settings (Try It, Analytics, Jira)
* Upload legal files (Terms of Service, Privacy Policy)
* Set logo and color scheme
* Prepare home page content
* Customize portal theme
* Create API products to be published on the portal
* Prepare API documentation
* Configure pricing plans
* Publish APIs (Publish)
* Assign portal administrators
* Create developer accounts or start registration process
* Determine user roles and permissions
* Prepare portal home page content
* Create documentation pages
* Edit "How to Use" page
* Add help and support content
* Log in to portal with different user roles
* Test APIs
* Check email notifications
* Make sure all features are working
* After completing all configurations, activate the portal
* Share portal URL with users
* Invite developers to the portal
## Frequently Asked Questions
Yes, you can create as many portals as you want. Each portal works completely independently and has its own settings, users, and APIs.
**Usage Scenarios:**
* Separate portals for different departments
* Special portals for partner companies
* Separate portals for test and production environments
* Localized portals for different regions
Portal name (Name) is a technical identifier and cannot be changed after creation. However, display name (Display Name) can be changed at any time.
**Can be Changed:**
* Display Name
* Portal URL (if customization permission exists)
* Portal description
**Cannot be Changed:**
* Portal name (Name) - technical identifier
Yes, you can reactivate a passive portal at any time. When portal is made passive:
* All settings and content are preserved
* User accounts are not deleted
* APIs and documentation are preserved
* Portal works as before when reactivated
No, portal deletion operation cannot be undone. The deleted portal and all its data (users, APIs, content, statistics) are permanently deleted.
**Recommendations:**
* Backup important data before deleting portal
* Temporarily disable by making portal passive
* Evaluate all effects before performing deletion operation
Currently, portal copying feature is not available. However, you can create a similar portal using the following methods:
**Manual Copying:**
1. Create a new portal
2. Manually configure settings
3. Publish APIs again
4. Copy content
Portal copying feature may be added in future versions.
Yes, you can customize portal URL. You can specify a custom URL using the **"Custom Portal URL"** field from Portal Settings → General Settings section.
**Important Notes:**
* Links to old URL may not work when URL is changed
* URL format must be in valid domain format
* URL change may also require DNS settings
Portal administrators can perform the following operations:
**What They Can Do:**
* View and edit portal settings
* Manage user accounts (approve, reject)
* Manage API products (publish, unpublish)
* Edit portal content
* View analytics data
* Theme customization
**What They Cannot Do:**
* Delete portal
* Remove other administrators
* Change system-level settings
**Public Portal (Open to Everyone):**
* Everyone can access the portal
* Registration button is visible
* Anyone can register (with automatic or manual approval)
* Suitable for general use
**Internal Portal (Internal Use):**
* Only authorized users can access
* Registration button is not visible or disabled
* Users are added manually by administrator
* Suitable for corporate internal use
Since each portal works completely independently, you can create separate portals for different departments or projects to provide isolated environments. This way, each portal can be managed independently with its own users, APIs, and content.
### Overview Sections
The Overview page contains the following information cards and sections:
**Portal Identity Information:**
* **Portal URL:** Full URL address used to access the portal
* **Portal ID:** Unique identifier automatically created by the system
* **Portal Status:** Active or Passive status
* **Creation Date:** Date and time when the portal was created
* **Last Update:** Date and time when the portal was last updated
You can click the copy icon next to the URL to copy the Portal URL.
**Security Configurations:**
* **Account Creation:** Permission for developers to create their own accounts (Active/Passive)
* **Auto Approval:** Automatic approval of new accounts (Active/Passive)
* **API Subscription Approval:** Automatic approval for API subscriptions (Active/Passive)
* **Credential Management:** Permission for users to manage their own API keys (Active/Passive)
* **Organization Administrator Permissions:** Account management permissions for organization administrators
Go to [Portal Settings](/en/api-portal/api-portal-settings) page to change these settings.
**Multi-Language Settings:**
* **Default Language:** Portal's default language (TR/EN)
* **Turkish Support:** Whether Turkish language option is active
* **English Support:** Whether English language option is active
* **Multi-Language Mode:** If both languages are active, multi-language mode is automatically activated
When multi-language mode is active, portal content can be displayed in both languages.
**Portal Features:**
* **How to Use Menu:** Whether "How to Use" menu is active
* **Test Tools (Try It Out):** Whether API test console is active
* **Jira Integration:** Whether Jira ticket creation feature is active
* **Analytics:** Whether usage statistics and reporting feature is active
* **API Documentation:** API documentation viewing feature
Use Portal Settings → Features tab to activate/deactivate features.
**Portal Usage Statistics:**
* **Published API Count:** Total number of API products published on the portal
* **Registered Developer Count:** Total number of developer/account registered on the portal
* **Active Developer Count:** Number of developers in active status
* **Created Application Count:** Total number of application registrations on the portal
* **Total API Call Count:** Total number of API calls made through the portal
* **Last 30 Days Calls:** Number of API calls made in the last 30 days
Statistics are updated in real-time and help you track portal usage.
You can be redirected to Portal Settings page by clicking on relevant sections to change settings on the Overview page. You can review the [Portal Settings](/en/api-portal/api-portal-settings) documentation for detailed information.
## Portal Editing
Follow the steps below to edit portal information:
* Click on the portal you want to edit from the portal list
* Portal detail page opens
* Click **"Edit"** or **"Configure"** button at the top of the page
* Alternatively, you can select **"Edit"** option from the three-dot menu on the right of the relevant portal in the portal list
In the opened edit form, you can update the following information:
* You can change the portal's display name
* This name appears in portal interface and email notifications
* Name change is reflected immediately
* You can change portal access level
* **Public:** Open to everyone
* **Internal:** Open only to authorized users
Changing visibility type may affect existing users' access.
* You can customize portal URL (if customization permission exists)
* URL format: `https://your-domain.com/portal-name`
When URL is changed, links to the old URL may not work.
* Review your changes
* Click **"Save"** or **"Update"** button
* Success message is shown and changes are saved
Portal name (Name) is a technical identifier and cannot be changed after creation. Only display name (Display Name) can be updated.
## Portal Status Management
You can manage the active or passive status of the portal. A passive portal cannot be accessed by users but is not deleted.
### Making Portal Active/Passive
* Click on the relevant portal from the portal list
* Portal detail page opens
To make portal passive:
* Click **"Deactivate"** or status toggle button at the top of the page
* Confirmation dialog opens
To make portal active again:
* Click **"Activate"** button
* Confirmation dialog opens
* Confirm the operation in the opened confirmation dialog
* Click **"Yes"** or **"Confirm"** button
* Portal status is updated
### Effects of Status Change
**Active Portal Features:**
* Users can access the portal
* APIs can be viewed and used
* New user registrations are accepted
* Email notifications are sent
* Analytics data is collected
**Passive Portal Features:**
* Users cannot access the portal (they get 404 error)
* Existing sessions are terminated
* New user registrations are not accepted
* Email notifications are not sent
* Analytics data is not collected
* Portal settings and content are preserved (not deleted)
Making portal passive immediately cuts access of existing users. Do this carefully.
## Portal Deletion
Follow the steps below to permanently delete the portal:
Portal deletion operation cannot be undone. The deleted portal and all its data (users, APIs, content, statistics) are permanently deleted.
* Click on the portal you want to delete from the portal list
* Portal detail page opens
* Click on **"Danger Zone"** tab at the bottom of the page
* Critical operations are located in this section
* Click **"Delete Portal"** or **"Remove Portal"** button
* Confirmation dialog opens
* You are asked to enter the portal name in the confirmation dialog
* Enter the portal name exactly (case sensitive)
* This step is to prevent accidental deletion
* Make sure you entered the portal name correctly
* Click **"Yes, Delete"** or **"Confirm Delete"** button
* Portal is permanently deleted
* You are redirected to portal list
### Effects of Deletion Operation
When portal is deleted, the following data is permanently deleted:
| Data Type | Description |
| ----------------------------- | ----------------------------------------------- |
| **Portal Configuration** | All portal settings and configurations |
| **User Accounts** | All developer accounts registered on the portal |
| **API Products** | All API products published on the portal |
| **Application Registrations** | All application registrations and subscriptions |
| **API Keys** | All created API keys (Client ID/Secret) |
| **Content** | Portal content, documentation pages |
| **Statistics** | All analytics data and usage statistics |
| **Files** | All files uploaded on the portal |
It is recommended to take time to backup important data or move to a different portal before deleting the portal.
## Portal Management
After creating the portal, you can perform the following management operations:
Customize portal appearance and theme
Manage APIs to be published on the portal
Manage developer accounts and permissions
Edit portal content
Configure access control and security policies
View portal usage statistics
## Configuring Portal Settings
After creating the portal, you need to configure basic settings for the portal to work properly.
### Accessing Portal Settings
* Click on the relevant portal from the portal list
* Portal detail page opens
* Click on **"Settings"** or **"Configuration"** tab at the top of the page
* Alternatively, you can access settings by clicking on relevant sections on the Overview page
### Basic Settings
Portal settings are organized in the following categories:
**Portal Basic Information:**
* Portal name and display name
* Portal URL configuration
* Default language setting
* Multi-language support (TR/EN)
* Portal description
Review [Portal Settings - General](/en/api-portal/api-portal-settings#general-settings) section for detailed information.
**Email Configuration:**
* Email server settings
* Sender email address
* Email templates (registration, approval, password reset, etc.)
* Email notification settings
Review [Portal Settings - Email](/en/api-portal/api-portal-settings#email-notifications) section for detailed information.
**Security Configurations:**
* Account creation permissions
* Auto approval settings
* API subscription approval processes
* Credential management permissions
* Organization administrator permissions
Review [Portal Settings - Security](/en/api-portal/api-portal-settings#security) section for detailed information.
**Portal Features:**
* How to Use menu
* Test tools (Try It Out)
* Jira integration
* Analytics feature
* Performance metrics
Review [Portal Settings - Features](/en/api-portal/api-portal-settings#features) section for detailed information.
**Legal Regulations:**
* Terms of Service
* Privacy Policy
* Legal file upload
Review [Portal Settings - Legal](/en/api-portal/api-portal-settings#legal) section for detailed information.
After changing portal settings, make sure to click the **"Save"** button to save changes. Unsaved changes will be lost.
## Portal Access and URL Management
### Accessing Portal URL
A unique URL is automatically created for each portal. You can access the portal using this URL.
* Go to Overview tab on portal detail page
* Full URL address is displayed in **"Portal URL"** section
* You can copy the URL by clicking the copy icon next to the URL
* Paste the copied URL into browser address bar
* Press Enter
* Portal home page opens
### Portal URL Format
Portal URLs are created in the following format:
```
https://your-domain.com/portal/{portal-name}
```
**Example:**
* Portal name: `partner-portal`
* Portal URL: `https://api.company.com/portal/partner-portal`
You can use the **"Custom Portal URL"** field from Portal Settings → General Settings section to customize portal URL.
### Portal Access Control
Portal access is controlled according to the portal's visibility type:
**Open to Everyone Portal:**
* Everyone can access the portal
* Can click "Sign Up" button to register
* Portal home page and API catalog are open to everyone
* Can view APIs but needs to register to use them
**Internal Use Portal:**
* Only authorized users can access
* Users must be added manually by administrator
* Registration button is not visible or disabled
* Portal content is only shown to logged in users
### Administrator Permissions
Portal administrators can perform the following operations:
| Permission | Description |
| ----------------------- | ---------------------------------------- |
| **Portal Settings** | View and edit portal general settings |
| **User Management** | View, approve, reject developer accounts |
| **API Management** | View, publish, unpublish API products |
| **Content Management** | Edit portal content, add documentation |
| **Analytics** | View portal usage statistics |
| **Theme Customization** | Customize portal appearance and theme |
Portal administrators cannot delete the portal or remove other administrators. These operations can only be performed by system administrators.
## Next Steps
After completing portal creation and basic configuration operations:
* Configure general settings (language, URL, email)
* Determine security settings (account creation, auto approval)
* Activate feature settings (Try It, Analytics, Jira)
* Upload legal files (Terms of Service, Privacy Policy)
* Set logo and color scheme
* Prepare home page content
* Customize portal theme
* Create API products to be published on the portal
* Prepare API documentation
* Configure pricing plans
* Publish APIs (Publish)
* Assign portal administrators
* Create developer accounts or start registration process
* Determine user roles and permissions
* Prepare portal home page content
* Create documentation pages
* Edit "How to Use" page
* Add help and support content
* Log in to portal with different user roles
* Test APIs
* Check email notifications
* Make sure all features are working
* After completing all configurations, activate the portal
* Share portal URL with users
* Invite developers to the portal
## Frequently Asked Questions
Yes, you can create as many portals as you want. Each portal works completely independently and has its own settings, users, and APIs.
**Usage Scenarios:**
* Separate portals for different departments
* Special portals for partner companies
* Separate portals for test and production environments
* Localized portals for different regions
Portal name (Name) is a technical identifier and cannot be changed after creation. However, display name (Display Name) can be changed at any time.
**Can be Changed:**
* Display Name
* Portal URL (if customization permission exists)
* Portal description
**Cannot be Changed:**
* Portal name (Name) - technical identifier
Yes, you can reactivate a passive portal at any time. When portal is made passive:
* All settings and content are preserved
* User accounts are not deleted
* APIs and documentation are preserved
* Portal works as before when reactivated
No, portal deletion operation cannot be undone. The deleted portal and all its data (users, APIs, content, statistics) are permanently deleted.
**Recommendations:**
* Backup important data before deleting portal
* Temporarily disable by making portal passive
* Evaluate all effects before performing deletion operation
Currently, portal copying feature is not available. However, you can create a similar portal using the following methods:
**Manual Copying:**
1. Create a new portal
2. Manually configure settings
3. Publish APIs again
4. Copy content
Portal copying feature may be added in future versions.
Yes, you can customize portal URL. You can specify a custom URL using the **"Custom Portal URL"** field from Portal Settings → General Settings section.
**Important Notes:**
* Links to old URL may not work when URL is changed
* URL format must be in valid domain format
* URL change may also require DNS settings
Portal administrators can perform the following operations:
**What They Can Do:**
* View and edit portal settings
* Manage user accounts (approve, reject)
* Manage API products (publish, unpublish)
* Edit portal content
* View analytics data
* Theme customization
**What They Cannot Do:**
* Delete portal
* Remove other administrators
* Change system-level settings
**Public Portal (Open to Everyone):**
* Everyone can access the portal
* Registration button is visible
* Anyone can register (with automatic or manual approval)
* Suitable for general use
**Internal Portal (Internal Use):**
* Only authorized users can access
* Registration button is not visible or disabled
* Users are added manually by administrator
* Suitable for corporate internal use
Since each portal works completely independently, you can create separate portals for different departments or projects to provide isolated environments. This way, each portal can be managed independently with its own users, APIs, and content.