> ## Documentation Index
> Fetch the complete documentation index at: https://docs.apinizer.com/llms.txt
> Use this file to discover all available pages before exploring further.
# API Product Categories
> Categorizes API products by category in Apinizer. Enables portal users to easily find APIs by their topics or usage areas and facilitates organized grouping, filtering, and management of API products.
## Category Management
On the Categories screen:
* Existing categories are listed,
* Filtering can be done by category name through the search box,
* Editing or deletion operations can be performed on each category row.
 ### List Screen Fields
| Field | Description |
| ------------------------ | ------------------------------------------------------------------------------------------------------------------------------------------------------------------------------------------------------------------------------------------------ |
| **Name** | The English name that will be displayed for the category in the system. Categories can be selected by this name when creating or listing API Products. |
| **Name (TR) (Name(TR))** | If multi-language support is enabled in portal settings, this field is also displayed. The Turkish equivalent of the category is written here. If the user views the portal in Turkish, the category name is shown from the value in this field. |
When both Turkish Language Option and English Language Option are enabled in Portal settings, the system automatically switches to Multilanguage mode.
If the Multilanguage feature is enabled from [Portal Settings](/en/api-portal/api-portal-settings), form fields are displayed in both English and Turkish, and separate data entry can be made for each language.
## Creating a New Category
Used to define a new category for API Products. A new category record is created by filling the fields on the form. When the required information is completed, the category is saved to the system by clicking the **Save** button.
### List Screen Fields
| Field | Description |
| ------------------------ | ------------------------------------------------------------------------------------------------------------------------------------------------------------------------------------------------------------------------------------------------ |
| **Name** | The English name that will be displayed for the category in the system. Categories can be selected by this name when creating or listing API Products. |
| **Name (TR) (Name(TR))** | If multi-language support is enabled in portal settings, this field is also displayed. The Turkish equivalent of the category is written here. If the user views the portal in Turkish, the category name is shown from the value in this field. |
When both Turkish Language Option and English Language Option are enabled in Portal settings, the system automatically switches to Multilanguage mode.
If the Multilanguage feature is enabled from [Portal Settings](/en/api-portal/api-portal-settings), form fields are displayed in both English and Turkish, and separate data entry can be made for each language.
## Creating a New Category
Used to define a new category for API Products. A new category record is created by filling the fields on the form. When the required information is completed, the category is saved to the system by clicking the **Save** button.
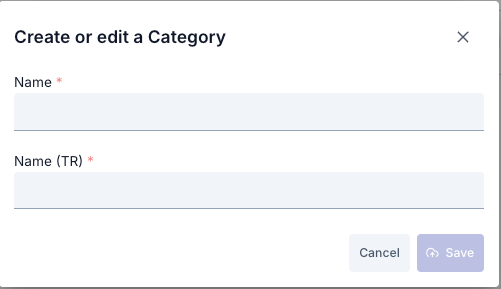 Fields used for category creation configuration are shown in the table below.
Expand the **Portal Management** heading from the left menu.
Click on **API Products → Categories** option.
Click the **New Category** button in the top right.
**api-product-category-update** form opens as modal/panel.
Write the category name in the **Name** field (example: Payments).
Add a description in the **Description** field (optional) that will help users understand this category.
If there are sorting or icon fields on the form, fill them according to how you want it to be shown in the catalog.
Open the **Related API Products** multi-select field.
Select the API products you want to include in this category.
Check selections; each selection is automatically added to the list.
Make sure required fields are filled.
Click the **Save** button. Request is sent to **POST /api/api-product-categories** endpoint (PUT on update).
## Usage of Created Categories
Can be selected from the "Category" field in API Product creation or editing screen.
An API Product is classified to belong to one of the defined categories.
This way:
* API Developer Portal users can easily find APIs by filtering them by specific categories.
* Organization administrators can report APIs by topical or functional areas.
* Category-based statistics, access counts, or subscription distributions on the Portal become more meaningful.
For example:
* APIs under Education category: Can include services for educational institutions or certification systems.
* APIs under Finance category: Can cover financial operations such as banking, payment, accounting.
* Store category: Can group APIs related to e-commerce or inventory management.
You can visit the relevant link to use created categories in [API Products](/en/api-portal/api-product).
## Appearance in Portal Interface
Categories you create in Manager are automatically listed in tree structure on the left side of the portal's API catalog page. Users can click category headers to see related API products.
Fields used for category creation configuration are shown in the table below.
Expand the **Portal Management** heading from the left menu.
Click on **API Products → Categories** option.
Click the **New Category** button in the top right.
**api-product-category-update** form opens as modal/panel.
Write the category name in the **Name** field (example: Payments).
Add a description in the **Description** field (optional) that will help users understand this category.
If there are sorting or icon fields on the form, fill them according to how you want it to be shown in the catalog.
Open the **Related API Products** multi-select field.
Select the API products you want to include in this category.
Check selections; each selection is automatically added to the list.
Make sure required fields are filled.
Click the **Save** button. Request is sent to **POST /api/api-product-categories** endpoint (PUT on update).
## Usage of Created Categories
Can be selected from the "Category" field in API Product creation or editing screen.
An API Product is classified to belong to one of the defined categories.
This way:
* API Developer Portal users can easily find APIs by filtering them by specific categories.
* Organization administrators can report APIs by topical or functional areas.
* Category-based statistics, access counts, or subscription distributions on the Portal become more meaningful.
For example:
* APIs under Education category: Can include services for educational institutions or certification systems.
* APIs under Finance category: Can cover financial operations such as banking, payment, accounting.
* Store category: Can group APIs related to e-commerce or inventory management.
You can visit the relevant link to use created categories in [API Products](/en/api-portal/api-product).
## Appearance in Portal Interface
Categories you create in Manager are automatically listed in tree structure on the left side of the portal's API catalog page. Users can click category headers to see related API products.
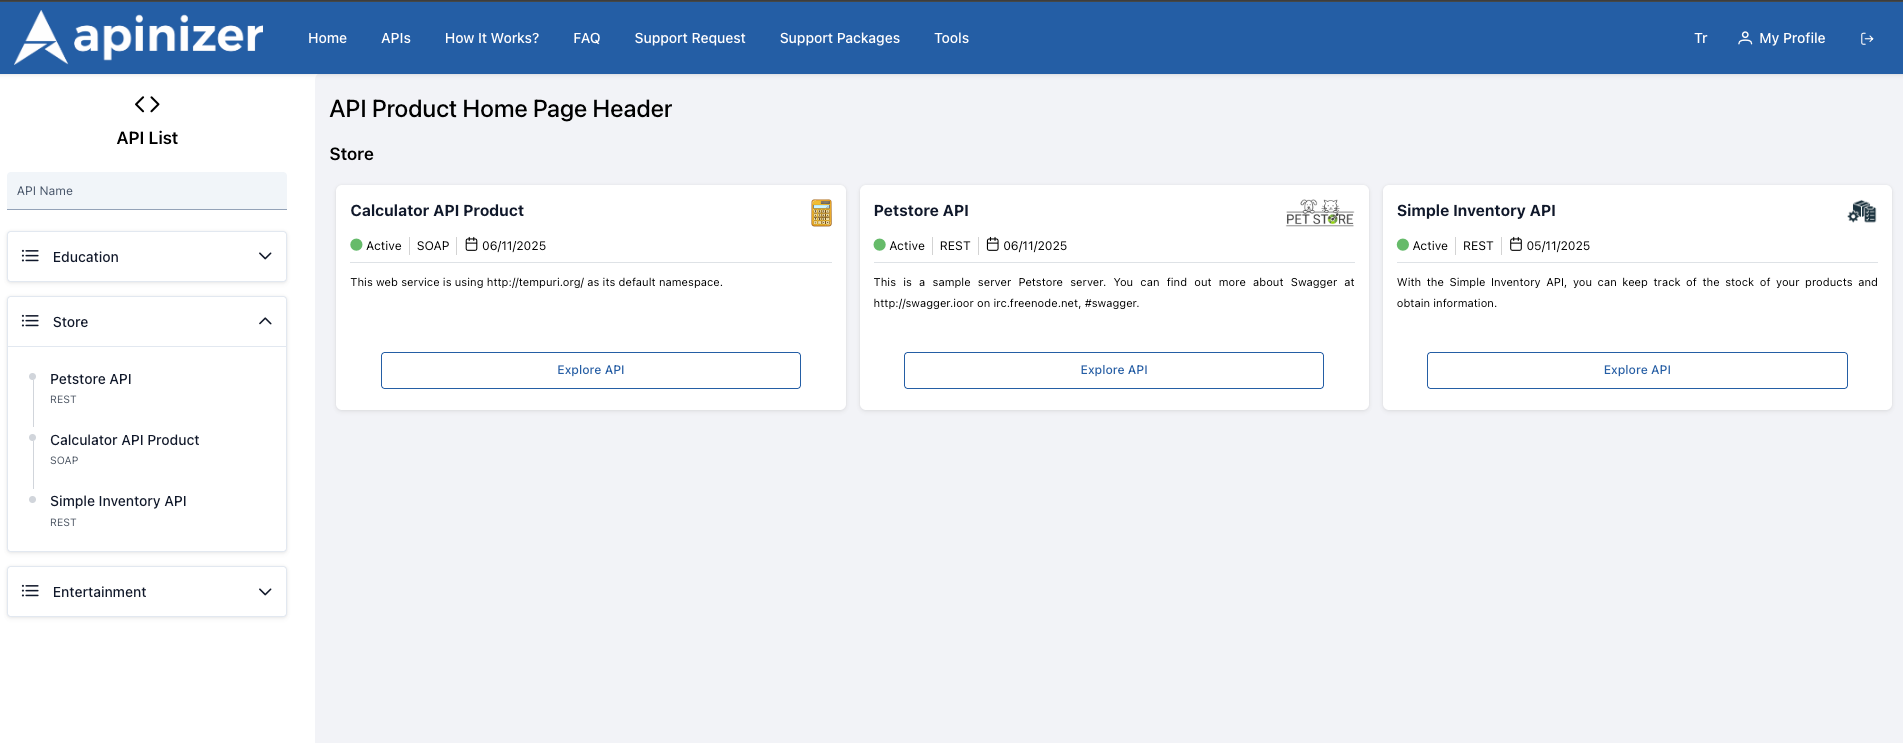 * **Left Navigation:** Main categories like "Store", "Education" are shown as expandable/collapsible headers in the left panel on the Portal. Each category you define in Manager appears here with the same name.
* **API Card Area:** When a category is selected, API cards linked to that category are shown on the right. Card title, short description, protocol label, and "Explore API" button come from API product information in Manager.
* **Instant Update:** When category name, description, or API relationship is changed in Manager, the new structure is immediately visible when the portal page is refreshed; no additional deploy/publish step is needed.
* **Multi-Language Support:** If you change the portal language, category headers in the left menu are shown with their translations. For multi-language portals, make sure you fill each language field in Manager.
### How Does Data Flow Work in Portal Application?
**Manager → Portal Synchronization**
When the `APIs` page is opened on API Portal, the catalog component in the portal application runs and starts requesting current category information.
The component calls services that provide active categories in Manager and API products linked to these categories. This way, all current data you saved is transferred to the portal side.
The tree structure on the left (category → API names) is automatically created using the incoming category list. The hierarchy in Manager is reflected one-to-one on the screen.
API cards belonging to the selected category are shown on the right; information on cards (logo, description, Active label, protocol) is automatically retrieved from API product records.
Every change you make in category or API relationship in Manager is displayed with the new service response when the portal page is opened again or refreshed; no additional publishing step is needed.
* **Left Navigation:** Main categories like "Store", "Education" are shown as expandable/collapsible headers in the left panel on the Portal. Each category you define in Manager appears here with the same name.
* **API Card Area:** When a category is selected, API cards linked to that category are shown on the right. Card title, short description, protocol label, and "Explore API" button come from API product information in Manager.
* **Instant Update:** When category name, description, or API relationship is changed in Manager, the new structure is immediately visible when the portal page is refreshed; no additional deploy/publish step is needed.
* **Multi-Language Support:** If you change the portal language, category headers in the left menu are shown with their translations. For multi-language portals, make sure you fill each language field in Manager.
### How Does Data Flow Work in Portal Application?
**Manager → Portal Synchronization**
When the `APIs` page is opened on API Portal, the catalog component in the portal application runs and starts requesting current category information.
The component calls services that provide active categories in Manager and API products linked to these categories. This way, all current data you saved is transferred to the portal side.
The tree structure on the left (category → API names) is automatically created using the incoming category list. The hierarchy in Manager is reflected one-to-one on the screen.
API cards belonging to the selected category are shown on the right; information on cards (logo, description, Active label, protocol) is automatically retrieved from API product records.
Every change you make in category or API relationship in Manager is displayed with the new service response when the portal page is opened again or refreshed; no additional publishing step is needed.