> ## Documentation Index
> Fetch the complete documentation index at: https://docs.apinizer.com/llms.txt
> Use this file to discover all available pages before exploring further.
# API Product
> Products that can be created and published in Apinizer to offer your APIs to end users through the portal. They bring together one or more APIs with different pricing plans, documentation, and visibility settings to present them to portal users and enable API monetization.
Enables packaging and presentation of APIs to be published on the portal
You can monetize APIs with Free, Subscription, Metered, and Tiered plans
Shares API documentation and usage examples
Manages Public, Private, and Authorized Organizations visibility settings
Automatically manages user subscriptions and API access permissions
## Creating a New API Product
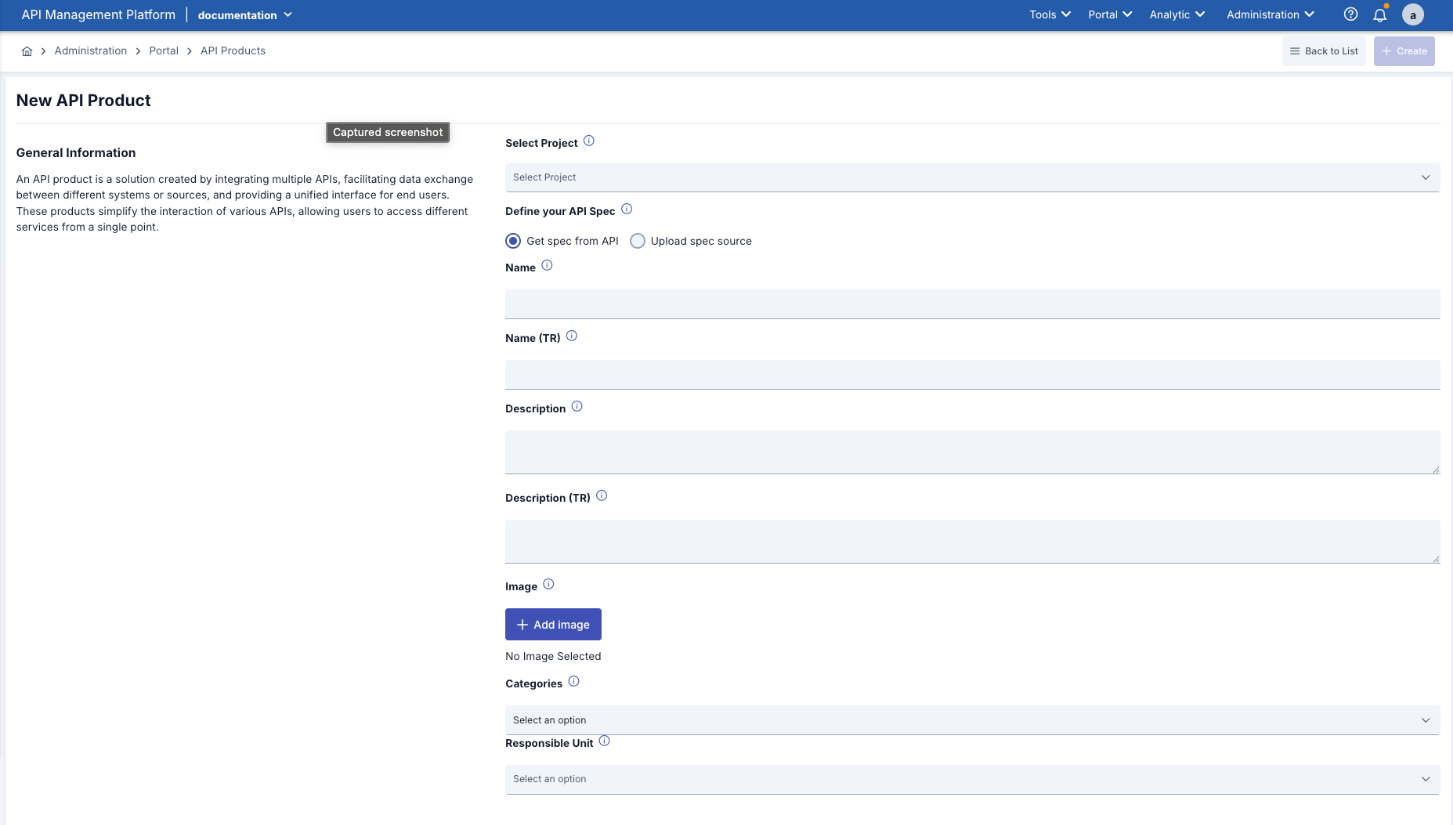 * Go to Administration → Portal → API Products from the left menu
* Click the **\[+ New API Product]** button in the top right
* Select the project to which the API Product will be linked
* Admin project is usually selected by default
Two options are provided:
* **Get spec from API:** Spec is automatically retrieved from the API (OpenAPI/Swagger)
* **Upload spec source:** Spec file can be uploaded manually
* Unique name of the API Product
* Example: "Payment API", "SMS Gateway API"
This name is visible on the Portal and should be meaningful
* Turkish name
* Used if multi-language support is available
* Detailed description of the API Product
* Supports Markdown format
* Shown to users on the Portal
* Turkish description
* API Product image
* **Format:** PNG, JPG, GIF
* **Maximum Size:** 2 MB
* **Recommended Size:** 400x300 px
* Visible on API Product card on the Portal
* Categories to which the API Product belongs
* Multiple categories can be selected
* Used for filtering on the Portal
You can visit the relevant link to add or manage [API Product Categories](/en/api-portal/api-product-categories).
* Responsible unit/department
* Used for support and communication
* Example: "API Development Team", "Payment Systems"
* Click the **"+ Create"** button in the top right
**System Checks:**
1. Is the Name field filled?
2. Is the Name unique? (Is there another API Product with the same name?)
3. Is a category selected?
**Successful Creation:**
* Success message is displayed
* You are redirected to the API Product editing page
* Tabs (API Specification, Files, Documentation, Visibility and Plan) now become visible
## Post-Creation Configuration
After creating an API Product, it is recommended to complete the following steps:
| Operation | Description |
| ---------------------------------------------- | ------------------------------------------------------------------------------------------------------------ |
| **API Specification Configuration (Required)** | Determine which API Proxy or Proxy Group will be used
* Go to Administration → Portal → API Products from the left menu
* Click the **\[+ New API Product]** button in the top right
* Select the project to which the API Product will be linked
* Admin project is usually selected by default
Two options are provided:
* **Get spec from API:** Spec is automatically retrieved from the API (OpenAPI/Swagger)
* **Upload spec source:** Spec file can be uploaded manually
* Unique name of the API Product
* Example: "Payment API", "SMS Gateway API"
This name is visible on the Portal and should be meaningful
* Turkish name
* Used if multi-language support is available
* Detailed description of the API Product
* Supports Markdown format
* Shown to users on the Portal
* Turkish description
* API Product image
* **Format:** PNG, JPG, GIF
* **Maximum Size:** 2 MB
* **Recommended Size:** 400x300 px
* Visible on API Product card on the Portal
* Categories to which the API Product belongs
* Multiple categories can be selected
* Used for filtering on the Portal
You can visit the relevant link to add or manage [API Product Categories](/en/api-portal/api-product-categories).
* Responsible unit/department
* Used for support and communication
* Example: "API Development Team", "Payment Systems"
* Click the **"+ Create"** button in the top right
**System Checks:**
1. Is the Name field filled?
2. Is the Name unique? (Is there another API Product with the same name?)
3. Is a category selected?
**Successful Creation:**
* Success message is displayed
* You are redirected to the API Product editing page
* Tabs (API Specification, Files, Documentation, Visibility and Plan) now become visible
## Post-Creation Configuration
After creating an API Product, it is recommended to complete the following steps:
| Operation | Description |
| ---------------------------------------------- | ------------------------------------------------------------------------------------------------------------ |
| **API Specification Configuration (Required)** | Determine which API Proxy or Proxy Group will be used
Select Environment
Configure API Spec source |
| **Add Documentation (Recommended)** | Create documentation pages for users
Add usage examples |
| **Visibility and Plan Settings (Required)** | Determine visibility type (Public/Private/Authorized)
Create pricing plans |
| **Publishing (Final Step)** | After all configurations are complete, **Publish** |
## API Product Listing and Viewing
 **Access:**
* Manager → Administration → Portal → API Products
**View Options:**
**1. Grid View (Card View)**
* Default view
* Each API Product is shown as a card
* Image, name, description, and status information are visible
**2. List View (List View)**
* Table format view
* More details are visible
* Sorting can be done
**Available Filters:**
**1. Search by API Product**
* Search by API Product name
* Real-time search (filters as you type)
**2. Search by API Proxies**
* Filters products using a specific API Proxy
* API Proxy is selected from dropdown
**3. Search by API Proxy Groups**
* Filters products using a specific Proxy Group
* Proxy Group is selected from dropdown
**4. Search by Status**
* **Published:** Published products
* **Unpublished:** Unpublished (draft) products
* **All:** All
**Sorting Options:**
* Name (A-Z, Z-A)
* Created Date (New → Old, Old → New)
* Status (Published → Unpublished)
**How to Sort:**
* Click column headers
* Sort direction changes with each click (ASC/DESC)
## API Product Detail View
**Access:**
* Manager → Administration → Portal → API Products
**View Options:**
**1. Grid View (Card View)**
* Default view
* Each API Product is shown as a card
* Image, name, description, and status information are visible
**2. List View (List View)**
* Table format view
* More details are visible
* Sorting can be done
**Available Filters:**
**1. Search by API Product**
* Search by API Product name
* Real-time search (filters as you type)
**2. Search by API Proxies**
* Filters products using a specific API Proxy
* API Proxy is selected from dropdown
**3. Search by API Proxy Groups**
* Filters products using a specific Proxy Group
* Proxy Group is selected from dropdown
**4. Search by Status**
* **Published:** Published products
* **Unpublished:** Unpublished (draft) products
* **All:** All
**Sorting Options:**
* Name (A-Z, Z-A)
* Created Date (New → Old, Old → New)
* Status (Published → Unpublished)
**How to Sort:**
* Click column headers
* Sort direction changes with each click (ASC/DESC)
## API Product Detail View
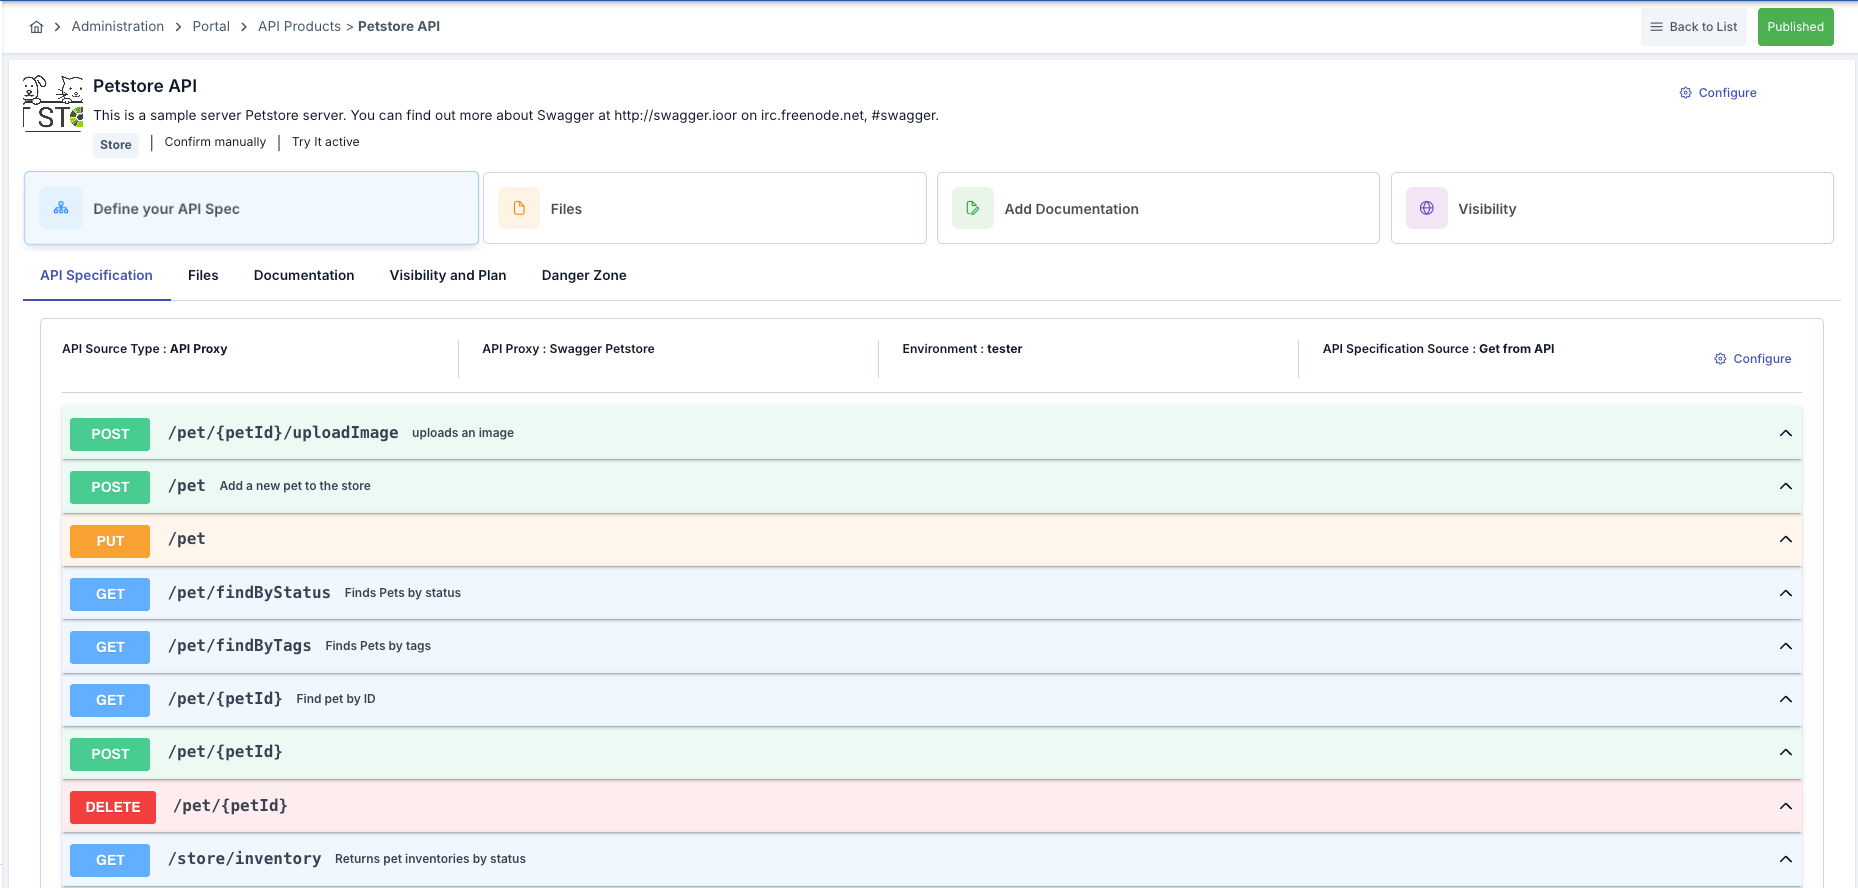 **Method 1:** Click from list
* Click on a product in the API Products list
**Method 2:** Edit button
* Select "Edit" from the three-dot menu
**Method 3:** Direct URL
* `/admin/api-product/{id}/edit`
**Top Section:**
**1. Title and Image**
* API Product image (large icon on the left)
* API Product name
* API Product title/description
**2. Quick Information**
* **Store:** Whether it will be shown in Store on Portal
* **Automatically approve:** Auto-approval status
* **Try It active:** Whether Try It feature is active
**3. Action Buttons**
* **Configure:** Edit general settings
* **Back to List:** Return to list page
* **Published/Unpublished:** Publication status (toggle button)
**4. Information Cards**
4 cards with summary information:
* **Define your API Spec:** API Spec source
* **Files:** Number of files
* **Add Documentation:** Number of documentation pages
* **Visibility:** Visibility type
**1. API Specification** *(Default active tab)*
* API source information
* Environment information
* API endpoint list
**2. Files**
* Uploaded files
* Add/remove files
**3. Documentation**
* Custom documentation pages
* Add/edit pages
**4. Visibility and Plan**
* Visibility settings
* Pricing plans
* Authorized Organizations
**5. Danger Zone**
* Critical operations
* Delete API Product
## API Specification Configuration
**What is API Specification?**
**Definition:** Configuration that specifies which API the API Product represents and how it will be used.
**Core Components:**
1. **API Source Type:** API Proxy or Proxy Group
2. **API Proxy/Group:** Which API will be used
3. **Environment:** Which environment (test, production, etc.)
4. **API Specification Source:** Where spec will be retrieved from (automatic from API or manual upload)
**Method 1:** Click from list
* Click on a product in the API Products list
**Method 2:** Edit button
* Select "Edit" from the three-dot menu
**Method 3:** Direct URL
* `/admin/api-product/{id}/edit`
**Top Section:**
**1. Title and Image**
* API Product image (large icon on the left)
* API Product name
* API Product title/description
**2. Quick Information**
* **Store:** Whether it will be shown in Store on Portal
* **Automatically approve:** Auto-approval status
* **Try It active:** Whether Try It feature is active
**3. Action Buttons**
* **Configure:** Edit general settings
* **Back to List:** Return to list page
* **Published/Unpublished:** Publication status (toggle button)
**4. Information Cards**
4 cards with summary information:
* **Define your API Spec:** API Spec source
* **Files:** Number of files
* **Add Documentation:** Number of documentation pages
* **Visibility:** Visibility type
**1. API Specification** *(Default active tab)*
* API source information
* Environment information
* API endpoint list
**2. Files**
* Uploaded files
* Add/remove files
**3. Documentation**
* Custom documentation pages
* Add/edit pages
**4. Visibility and Plan**
* Visibility settings
* Pricing plans
* Authorized Organizations
**5. Danger Zone**
* Critical operations
* Delete API Product
## API Specification Configuration
**What is API Specification?**
**Definition:** Configuration that specifies which API the API Product represents and how it will be used.
**Core Components:**
1. **API Source Type:** API Proxy or Proxy Group
2. **API Proxy/Group:** Which API will be used
3. **Environment:** Which environment (test, production, etc.)
4. **API Specification Source:** Where spec will be retrieved from (automatic from API or manual upload)
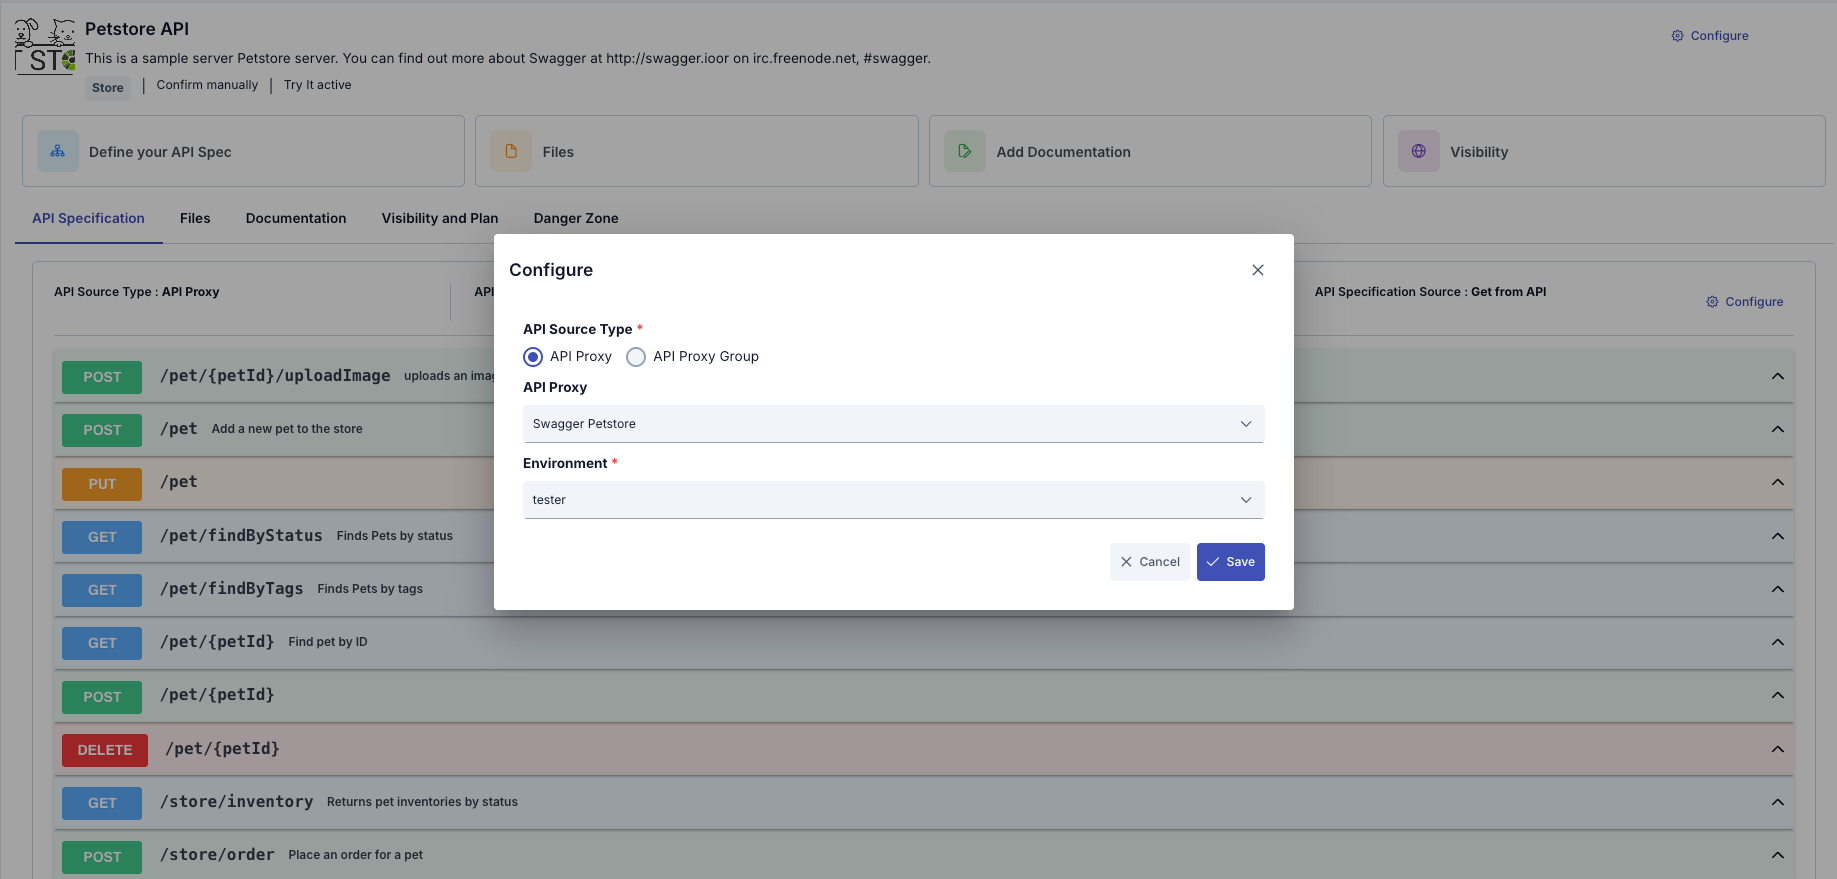 API Product detail page → **API Specification**
If not yet configured: "Define your API Spec" card
If configured: API information and operations list
Click the "Configure" button (on the right, on the card)
"API Configuration" dialog opens
A single API Proxy is used
* Groups multiple API Proxies
* For more complex structures
**API Proxy Selection:**
1. "API Proxy" should be selected as API Source Type
2. Select an API from the API Proxy dropdown
**API Proxy Group Selection:**
1. "Proxy Group" should be selected as API Source Type
2. Select a group from the API Proxy Group dropdown
3. Combined spec of all APIs in the group is used
API Proxy and Proxy Group **cannot be used together.** You must select only one. After making a selection, the environments list is automatically loaded.
* Environment dropdown is automatically populated
* Environments where the selected API Proxy/Group is deployed are listed
* Select an environment
Only deployed environments are listed. If the API has not been deployed yet, it must first be deployed from API Manager. Portal users will use the API in the environment you selected.
* OpenAPI/Swagger spec is automatically retrieved from the API
* Real-time current spec is used
* Changes made to the API are automatically reflected
**When to Use:**
* If your API has OpenAPI/Swagger spec
* If you don't want to update the spec manually
* Spec file is uploaded manually (JSON/YAML)
* Static spec is used
* Updates are done manually
**When to Use:**
* If the API has no spec
* If you want to use a custom spec
* If you want to customize by editing the spec
**How to Upload:**
1. Select the "Upload spec source" option
2. Click the **"+ Add Spec File"** button
3. Select file:
* **Format:** JSON or YAML
* **Maximum Size:** 8 MB
* **Supported Spec:** OpenAPI 2.0, OpenAPI 3.0, Swagger
4. (Optional) If multi-language support is available, also upload Turkish spec
Click the **"Save"** or **"Update"** button
## Files Management
**What is Files?**
**Definition:** Additional files provided to users along with the API Product.
**Usage Areas:**
* SDK files (ZIP)
* Sample code files
* Postman collection files
* PDF guides
* Certificate files
* Test data
API Product detail page → **API Specification**
If not yet configured: "Define your API Spec" card
If configured: API information and operations list
Click the "Configure" button (on the right, on the card)
"API Configuration" dialog opens
A single API Proxy is used
* Groups multiple API Proxies
* For more complex structures
**API Proxy Selection:**
1. "API Proxy" should be selected as API Source Type
2. Select an API from the API Proxy dropdown
**API Proxy Group Selection:**
1. "Proxy Group" should be selected as API Source Type
2. Select a group from the API Proxy Group dropdown
3. Combined spec of all APIs in the group is used
API Proxy and Proxy Group **cannot be used together.** You must select only one. After making a selection, the environments list is automatically loaded.
* Environment dropdown is automatically populated
* Environments where the selected API Proxy/Group is deployed are listed
* Select an environment
Only deployed environments are listed. If the API has not been deployed yet, it must first be deployed from API Manager. Portal users will use the API in the environment you selected.
* OpenAPI/Swagger spec is automatically retrieved from the API
* Real-time current spec is used
* Changes made to the API are automatically reflected
**When to Use:**
* If your API has OpenAPI/Swagger spec
* If you don't want to update the spec manually
* Spec file is uploaded manually (JSON/YAML)
* Static spec is used
* Updates are done manually
**When to Use:**
* If the API has no spec
* If you want to use a custom spec
* If you want to customize by editing the spec
**How to Upload:**
1. Select the "Upload spec source" option
2. Click the **"+ Add Spec File"** button
3. Select file:
* **Format:** JSON or YAML
* **Maximum Size:** 8 MB
* **Supported Spec:** OpenAPI 2.0, OpenAPI 3.0, Swagger
4. (Optional) If multi-language support is available, also upload Turkish spec
Click the **"Save"** or **"Update"** button
## Files Management
**What is Files?**
**Definition:** Additional files provided to users along with the API Product.
**Usage Areas:**
* SDK files (ZIP)
* Sample code files
* Postman collection files
* PDF guides
* Certificate files
* Test data
 API Product detail page → **Files**
Click the **"+ Add File"** button
"Add File" dialog opens
**Name** *(Required)*
* File name (display name)
* Example: "Java SDK", "Postman Collection", "API Guide"
**File** *(Required)*
* File to upload
* **Maximum Size:** Varies according to platform settings
* **Supported Formats:** PDF, ZIP, JSON, XML, TXT, etc.
**Description**
* File description
* What it contains
* How to use it
Click the **"Save"** button
1. Go to Files tab on API Product page
2. Find the file you want to download
3. Click "Download" button
4. File is downloaded
1. Find the file in Files list
2. Select "Edit" from the three-dot menu
3. Make changes
4. Click "Save" button
1. Find the file in Files list
2. Select "Delete" from the three-dot menu
3. Say "Yes" in confirmation dialog
Deletion cannot be undone
## Documentation Management
**What is Documentation?**
**Definition:** Custom documentation pages provided along with the API Product.
**Difference from API Specification:**
* **API Specification:** Automatically generated, endpoint-based technical documentation
* **Documentation:** Manually created pages with custom content
**Usage Areas:**
* **Getting Started** (Getting Started Guide)
* **Use Cases** (Usage Scenarios)
* **Best Practices** (Best Practices)
* **Troubleshooting** (Troubleshooting)
* **Migration Guides** (Migration Guides)
* **FAQ** (Frequently Asked Questions)
* **Changelog** (Change History)
API Product detail page → **Files**
Click the **"+ Add File"** button
"Add File" dialog opens
**Name** *(Required)*
* File name (display name)
* Example: "Java SDK", "Postman Collection", "API Guide"
**File** *(Required)*
* File to upload
* **Maximum Size:** Varies according to platform settings
* **Supported Formats:** PDF, ZIP, JSON, XML, TXT, etc.
**Description**
* File description
* What it contains
* How to use it
Click the **"Save"** button
1. Go to Files tab on API Product page
2. Find the file you want to download
3. Click "Download" button
4. File is downloaded
1. Find the file in Files list
2. Select "Edit" from the three-dot menu
3. Make changes
4. Click "Save" button
1. Find the file in Files list
2. Select "Delete" from the three-dot menu
3. Say "Yes" in confirmation dialog
Deletion cannot be undone
## Documentation Management
**What is Documentation?**
**Definition:** Custom documentation pages provided along with the API Product.
**Difference from API Specification:**
* **API Specification:** Automatically generated, endpoint-based technical documentation
* **Documentation:** Manually created pages with custom content
**Usage Areas:**
* **Getting Started** (Getting Started Guide)
* **Use Cases** (Usage Scenarios)
* **Best Practices** (Best Practices)
* **Troubleshooting** (Troubleshooting)
* **Migration Guides** (Migration Guides)
* **FAQ** (Frequently Asked Questions)
* **Changelog** (Change History)
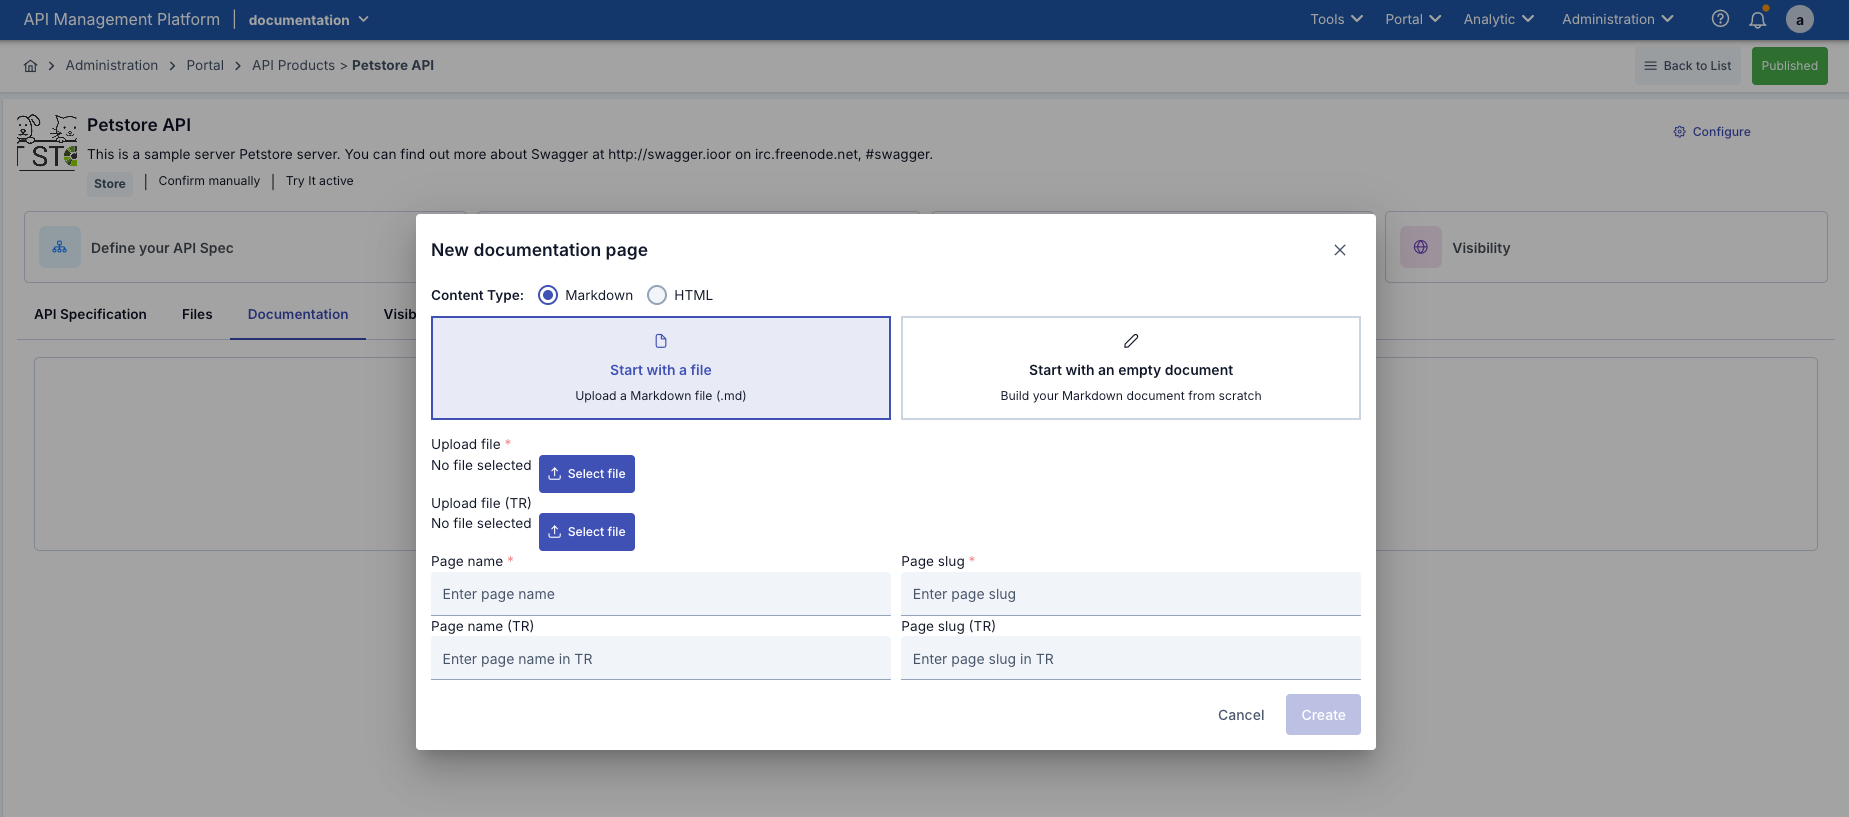 API Product detail page → Documentation tab
Click the **"+ Add Page"** button
"Add Documentation Page" dialog opens
**Name** *(Required)*
* Page name
* Visible in menu on Portal
* Example: "Getting Started", "Authentication Guide"
**Slug** *(Required)*
* Short name to be used in URL
* Automatically generated (from name)
* Should not contain special characters
* Example: "getting-started", "authentication-guide"
**Content** *(Required)*
* Page content
* **Supported Formats:**
* **Markdown:** Recommended
* **HTML:** For rich content
Click the **"Save"** button
1. Find the page in Documentation tab
2. Select "Edit" from the three-dot menu
3. Make changes
4. Click "Save" button
1. Find the page in Documentation tab
2. Select "Delete" from the three-dot menu
3. Say "Yes" in confirmation dialog
## Visibility and Plan Management
### Visibility
**What is Visibility?**
**Definition:** Determines who can see and access the API Product on the Portal.
* All users on the Portal can see it
* Anyone can subscribe
* Listed in API Catalog
**When to Use:**
* For general APIs
* Public services
* Marketing-oriented APIs
* Only administrators can see it
* Normal users cannot see it
* Private invitation required
**When to Use:**
* Beta APIs
* Internal use APIs
* APIs in testing phase
* Only selected organizations can see it
* Organization members can subscribe
* Restricted access
**When to Use:**
* Partner APIs
* B2B integrations
* Enterprise APIs
API Product detail page → Documentation tab
Click the **"+ Add Page"** button
"Add Documentation Page" dialog opens
**Name** *(Required)*
* Page name
* Visible in menu on Portal
* Example: "Getting Started", "Authentication Guide"
**Slug** *(Required)*
* Short name to be used in URL
* Automatically generated (from name)
* Should not contain special characters
* Example: "getting-started", "authentication-guide"
**Content** *(Required)*
* Page content
* **Supported Formats:**
* **Markdown:** Recommended
* **HTML:** For rich content
Click the **"Save"** button
1. Find the page in Documentation tab
2. Select "Edit" from the three-dot menu
3. Make changes
4. Click "Save" button
1. Find the page in Documentation tab
2. Select "Delete" from the three-dot menu
3. Say "Yes" in confirmation dialog
## Visibility and Plan Management
### Visibility
**What is Visibility?**
**Definition:** Determines who can see and access the API Product on the Portal.
* All users on the Portal can see it
* Anyone can subscribe
* Listed in API Catalog
**When to Use:**
* For general APIs
* Public services
* Marketing-oriented APIs
* Only administrators can see it
* Normal users cannot see it
* Private invitation required
**When to Use:**
* Beta APIs
* Internal use APIs
* APIs in testing phase
* Only selected organizations can see it
* Organization members can subscribe
* Restricted access
**When to Use:**
* Partner APIs
* B2B integrations
* Enterprise APIs
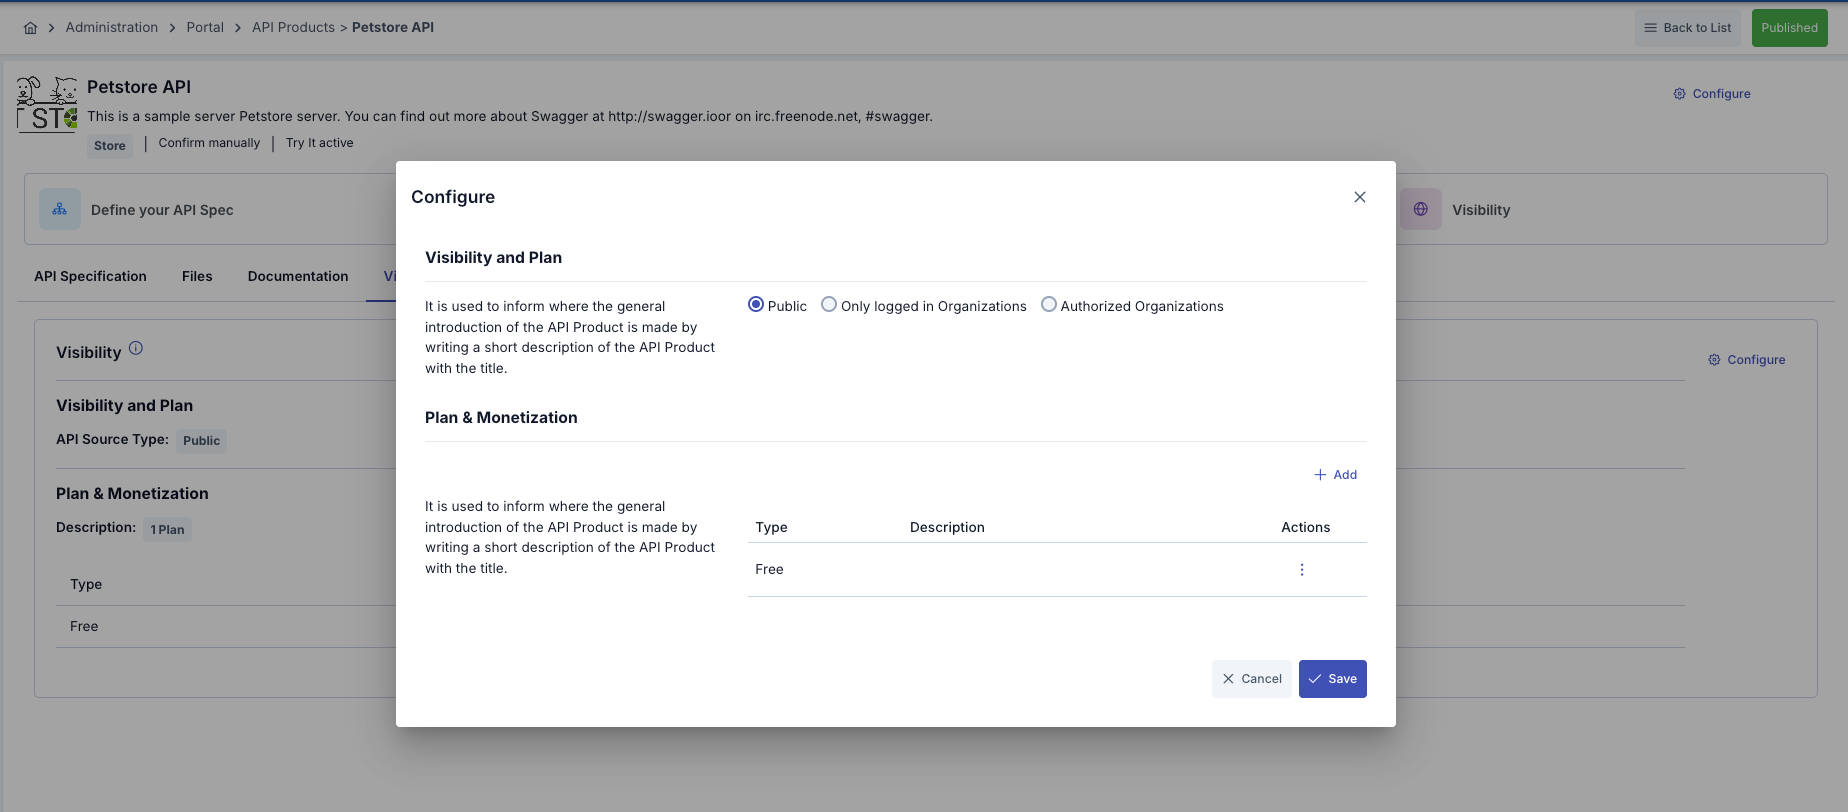 API Product detail page → **Visibility and Plan** tab
Click the **"Configure"** button (on Visibility card)
"Configure Visibility" dialog opens
1. Select "PUBLIC" option
2. No other setting needed
3. Click "Save" button
1. Select "PRIVATE" option
2. No other setting needed
3. Click "Save" button
1. Select "AUTHORIZED\_ORGANIZATIONS" option
2. Click "Save" button
3. **"+ Add Organization"** button appears on main page
4. Select organizations with this button
*(Only for AUTHORIZED\_ORGANIZATIONS)*
You can visit the [organizations](/en/admin/identity-management/organizations) link to add or edit new organizations.
**Operation to Perform:**
1. Click the **"+ Add Organization"** button
2. Organization selection dialog opens
**Organization Selection:**
1. Select organizations from list (checkbox)
2. Select/deselect all with **"Select All"**
3. Click **"Add"** button
**Selected Organizations:**
* Listed in Visibility and Plan tab
* For each organization:
* Name
* Email
* Status (Active/Inactive)
* Remove button (X)
**Remove Organization:**
1. Click **X** button on organization row
2. Say "Yes" in confirmation dialog
3. Organization is removed from list
### Plan Management
**What is Plan?**
**Definition:** Different pricing and limit options for API usage.
**Why Create Plans:**
* To appeal to different user segments
* To control usage limits
| Plan Type | Features |
| ----------------------------------------- | ------------------------------------------------------------------------------------------------------------------------ |
| **FREE PLAN (Free Plan)** | Free usage
API Product detail page → **Visibility and Plan** tab
Click the **"Configure"** button (on Visibility card)
"Configure Visibility" dialog opens
1. Select "PUBLIC" option
2. No other setting needed
3. Click "Save" button
1. Select "PRIVATE" option
2. No other setting needed
3. Click "Save" button
1. Select "AUTHORIZED\_ORGANIZATIONS" option
2. Click "Save" button
3. **"+ Add Organization"** button appears on main page
4. Select organizations with this button
*(Only for AUTHORIZED\_ORGANIZATIONS)*
You can visit the [organizations](/en/admin/identity-management/organizations) link to add or edit new organizations.
**Operation to Perform:**
1. Click the **"+ Add Organization"** button
2. Organization selection dialog opens
**Organization Selection:**
1. Select organizations from list (checkbox)
2. Select/deselect all with **"Select All"**
3. Click **"Add"** button
**Selected Organizations:**
* Listed in Visibility and Plan tab
* For each organization:
* Name
* Email
* Status (Active/Inactive)
* Remove button (X)
**Remove Organization:**
1. Click **X** button on organization row
2. Say "Yes" in confirmation dialog
3. Organization is removed from list
### Plan Management
**What is Plan?**
**Definition:** Different pricing and limit options for API usage.
**Why Create Plans:**
* To appeal to different user segments
* To control usage limits
| Plan Type | Features |
| ----------------------------------------- | ------------------------------------------------------------------------------------------------------------------------ |
| **FREE PLAN (Free Plan)** | Free usage
Within certain limits
May include Throttling and/or Quota |
| **SUBSCRIPTION PLAN (Subscription Plan)** | Periodic fixed fee (monthly/annual)
Within certain usage limits
Can choose whether to continue on limit exceed |
| **METERED PLAN (Metered Plan)** | Usage-based pricing
Fixed fee per API call
Pay-as-you-go model |
| **TIERED PLAN (Tiered Plan)** | Unit price changes as usage increases
Different prices for different usage ranges
Volume discount |
Visibility and Plan tab → **"+ Add Plan"** button
Select plan type from dropdown:
* Free
* Subscription
* Metered
* Tiered
Form fields appear according to selected plan type
**Enable Throttling** *(Optional)*
* Check the checkbox
* **Throttling Count:** Enter number (e.g., 10)
* **Throttling Interval:** Select time interval (Per Second, Per Minute)
**Enable Quota** *(Optional)*
* Check the checkbox
* **Quota Count:** Enter number (e.g., 1000)
* **Quota Interval:** Select time interval (Per Hour, Per Day, Per Month)
**Fee** *(Required)*
* Enter subscription fee (e.g., 50)
**Currency** *(Required)*
* Select currency (USD, EUR, TRY)
**Billing Period** *(Required)*
* Select billing period (Monthly, Annually)
**Throttling** *(Optional)*
* Same as Free Plan
**Quota** *(Optional)*
* Same as Free Plan
**Continue on Exceed** *(Optional)*
* Checkbox: Should it continue when quota is exceeded?
* If yes, enter **Fee on Exceed**
**Fee** *(Required)*
* Fee per call (e.g., 0.01)
**Currency** *(Required)*
* Currency
**Billing Period** *(Required)*
* Billing period
**Billing Type** *(Required)*
* Volume Based or Transaction Based
**Currency** *(Required)*
* Currency
**Billing Period** *(Required)*
* Billing period
**Tiers** *(Required)*
* Add tier with **"+ Add Tier"** button
* For each tier:
* **Calls From:** Automatically filled
* **Calls To:** Enter end count
* **Fee:** Unit price of this tier
**Continue on Exceed** *(Optional)*
* Continue after last tier?
**Fee on Exceed** *(Optional)*
* Price after last tier
Click the **"Save"** button
* Plan validation is performed
* Plan is saved
* Plan is added to plan list
## Deleting API Product
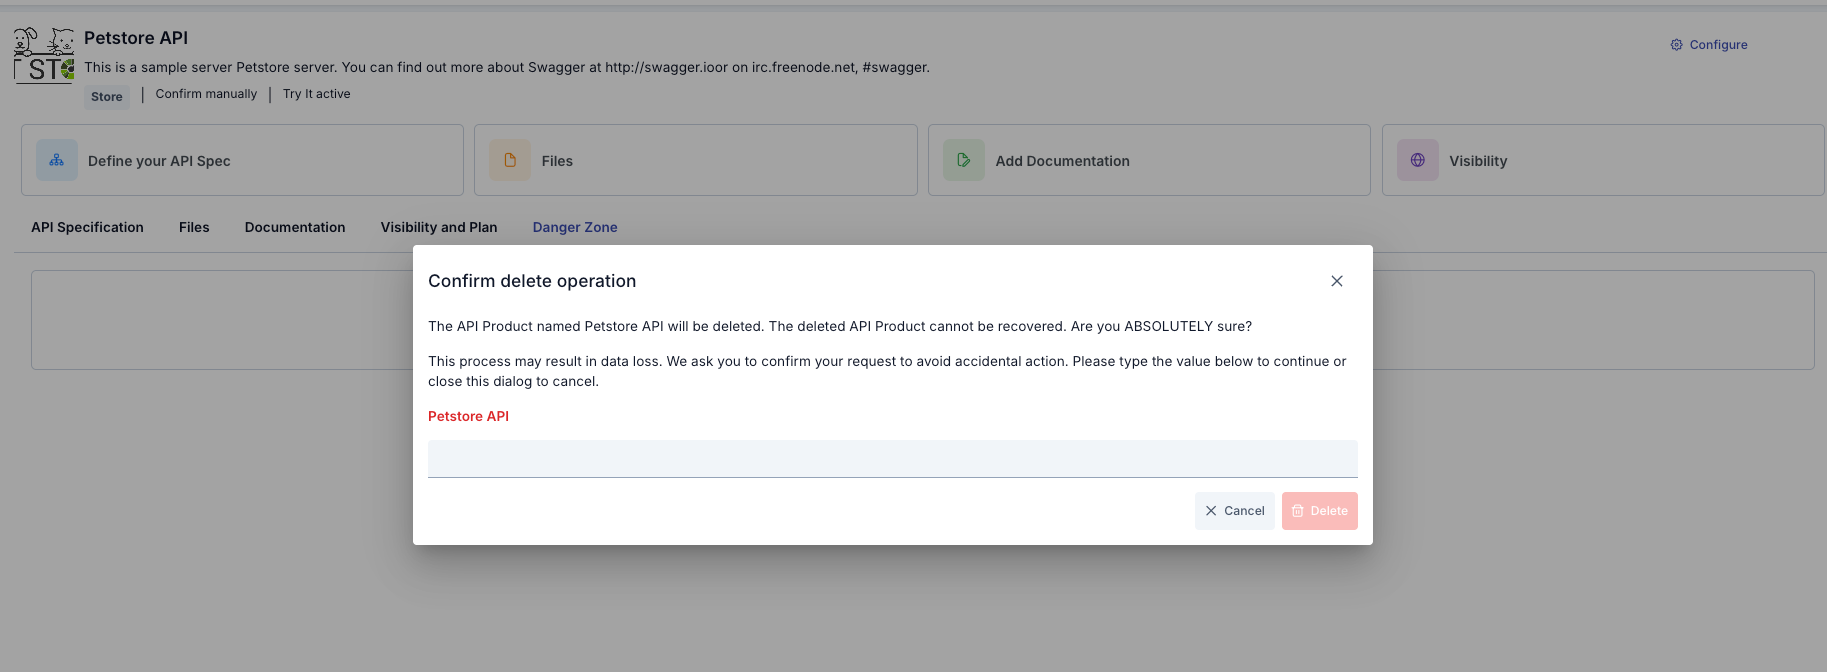 API Product detail page → **Danger Zone** tab
Click the **"Delete API Product"** button
Confirmation dialog opens
Click the **"Yes, Delete"** button
* All active subscriptions are cancelled
* User access permissions are removed
* Files are deleted
* Documentation pages are deleted
* Plans are deleted
* API Product record is deleted
## Publishing and Unpublishing API Product
| Operation | Step 1 | Step 2 | Step 3 |
| ---------------------------- | ----------------------------------------------------------------------------------------------- | ------------------------------------------------ | --------------------------------------------------------------------------------------------------------- |
| **Publishing (Publish)** | Click Publish Button
API Product detail page → **Danger Zone** tab
Click the **"Delete API Product"** button
Confirmation dialog opens
Click the **"Yes, Delete"** button
* All active subscriptions are cancelled
* User access permissions are removed
* Files are deleted
* Documentation pages are deleted
* Plans are deleted
* API Product record is deleted
## Publishing and Unpublishing API Product
| Operation | Step 1 | Step 2 | Step 3 |
| ---------------------------- | ----------------------------------------------------------------------------------------------- | ------------------------------------------------ | --------------------------------------------------------------------------------------------------------- |
| **Publishing (Publish)** | Click Publish Button
API Product detail page → Top right → **"Publish"** button (green) | **Confirm**
Click **"Yes, Publish"** button | Publishing
`published` status is set to `true`.
Status badge becomes **"Published"** (green) |
| **Unpublishing (Unpublish)** | Click Unpublish Button
API Product detail page → Top right → **"Unpublish"** button (gray) | Confirm
Click **"Yes, Unpublish"** button | Unpublishing
`published` status is set to `false`
Status badge becomes **"Unpublished"** (gray) |
## Appearance in API Portal Interface
### Overview
API Product is the face of API packages published in Apinizer API Manager, presented to end users and applications through the API Portal.
Each product comes with visibility settings, multiple pricing plans (Free, Subscription, Metered, Tiered), documentation, files, trial (Try It), and analytics capabilities.
Portal users can review these products, subscribe to plans, make calls through the Try It console, and manage their subscriptions.
### Roles and Prerequisites
* **Portal Manager / Portal Business**: Sees all products and administrative options. Can also use advanced dialogs (e.g., API product selection).
* **Standard Portal User**: Sees products visible to them (Public or organization they are authorized for).
* To **start a subscription**:
* You must be logged in with your Portal account.
* You must have at least one **Portal App** definition (you can create one from the detail page if you don't).
* Product content (plan, documentation, files) is prepared in API Manager; it is only consumed on the Portal side.
### API Product List Page
 **Access:**
* Menu: **Portal → API Products**.
* The spot text at the top of the page can be customized by the administrator from portal settings
**Left Panel (Category Tree)**
* Categories are listed as PrimeNG panels. You can click each category header to see the API products within it.
* The search box filters both the category tree and the card list on the right; debounced search is performed as you type.
**Right Panel (Card List)**
* Product cards for each category are listed in grid layout.
* Card content:
* Product name and optional image.
* Publication status (green/pink icon), API type, last update date.
* First 300 characters of description; long texts can be viewed in full with tooltip.
* "Explore API" button redirects to product detail page.
* Category selection can be reset with the clear button to return to "All".
### API Product Detail Page
**Access:**
* Menu: **Portal → API Products**.
* The spot text at the top of the page can be customized by the administrator from portal settings
**Left Panel (Category Tree)**
* Categories are listed as PrimeNG panels. You can click each category header to see the API products within it.
* The search box filters both the category tree and the card list on the right; debounced search is performed as you type.
**Right Panel (Card List)**
* Product cards for each category are listed in grid layout.
* Card content:
* Product name and optional image.
* Publication status (green/pink icon), API type, last update date.
* First 300 characters of description; long texts can be viewed in full with tooltip.
* "Explore API" button redirects to product detail page.
* Category selection can be reset with the clear button to return to "All".
### API Product Detail Page
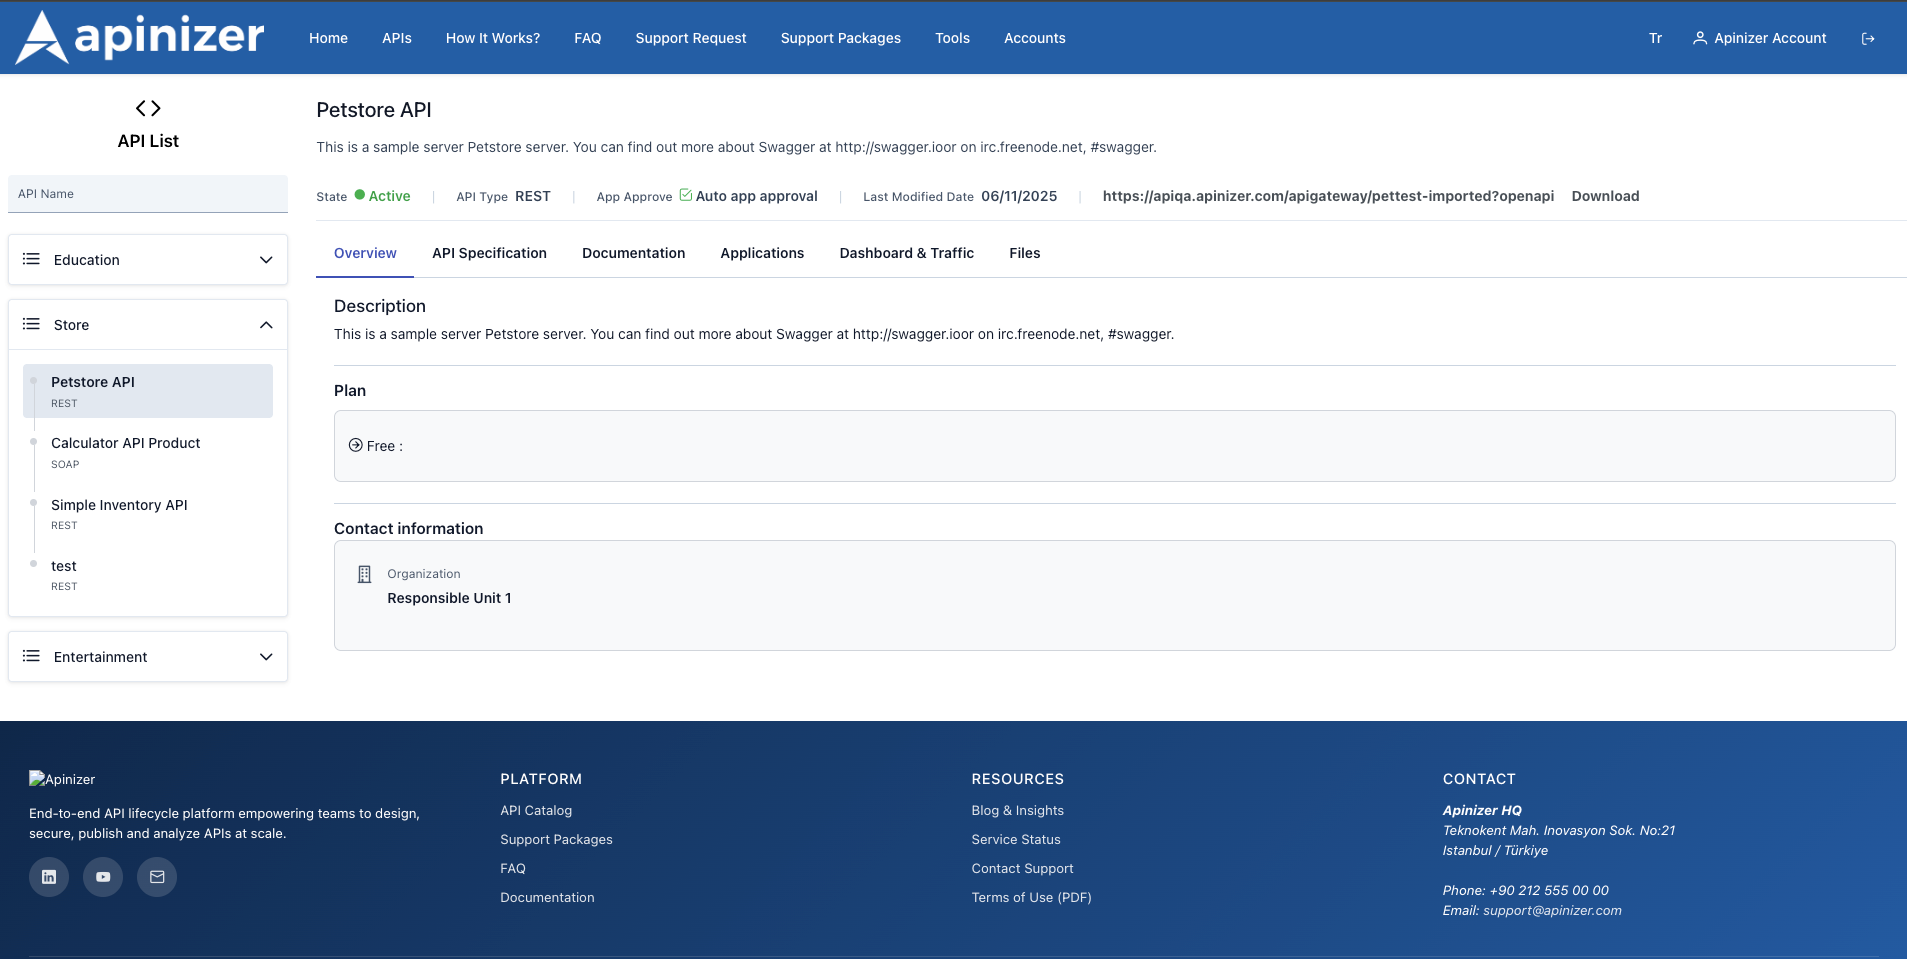 * The category tree is again on the left panel; you can click to switch to another product without leaving the page.
* At the top, product name, short description, publication status (Active/Passive), API type, auto-approval information, and last change date are shown.
* "Access URL" link (OpenAPI or WSDL) provides direct access; the "Download" button next to it downloads the spec file.
| Tab | Description/Function | View |
| ----------------- | -------------------------------------------------------------------------------------------------------------------------------------------------------------------------------------------------------------------------------------------------------------------------------------------------------------------------------------------------- | ----------------------------------------------------------------------------------------------------------------------------------------------------------------------------------------------------------------------------------------------------------------------------------------------------------------------------------------------------------------------------------------------------------------------------------------------------------------------------------------------------------------------------------------------------------------------------------------------------------------------------------------------------------------------------------------------------------------------------------------------------------------------------------------------------------------------------------------------------------------------------------------------------------------------------------------------------------------------------------------------------------------------------------------------------------------------------------------------------------------------------------------------------------------------------------------------------------------------------------------------------------------------------------------------------------------------------------------------------------------------------------------------------------------------------------------------------------------------------------------------------------------------------------------------------------------------------------------- |
| Overview | - Rich-formatted product description (`getDescription()` sanitized).
* The category tree is again on the left panel; you can click to switch to another product without leaving the page.
* At the top, product name, short description, publication status (Active/Passive), API type, auto-approval information, and last change date are shown.
* "Access URL" link (OpenAPI or WSDL) provides direct access; the "Download" button next to it downloads the spec file.
| Tab | Description/Function | View |
| ----------------- | -------------------------------------------------------------------------------------------------------------------------------------------------------------------------------------------------------------------------------------------------------------------------------------------------------------------------------------------------- | ----------------------------------------------------------------------------------------------------------------------------------------------------------------------------------------------------------------------------------------------------------------------------------------------------------------------------------------------------------------------------------------------------------------------------------------------------------------------------------------------------------------------------------------------------------------------------------------------------------------------------------------------------------------------------------------------------------------------------------------------------------------------------------------------------------------------------------------------------------------------------------------------------------------------------------------------------------------------------------------------------------------------------------------------------------------------------------------------------------------------------------------------------------------------------------------------------------------------------------------------------------------------------------------------------------------------------------------------------------------------------------------------------------------------------------------------------------------------------------------------------------------------------------------------------------------------------------------- |
| Overview | - Rich-formatted product description (`getDescription()` sanitized).
- List of all plan cards (Free/Subscription/Metered/Tiered).
- Responsible unit information if available (name, contact person, email, and external link). | 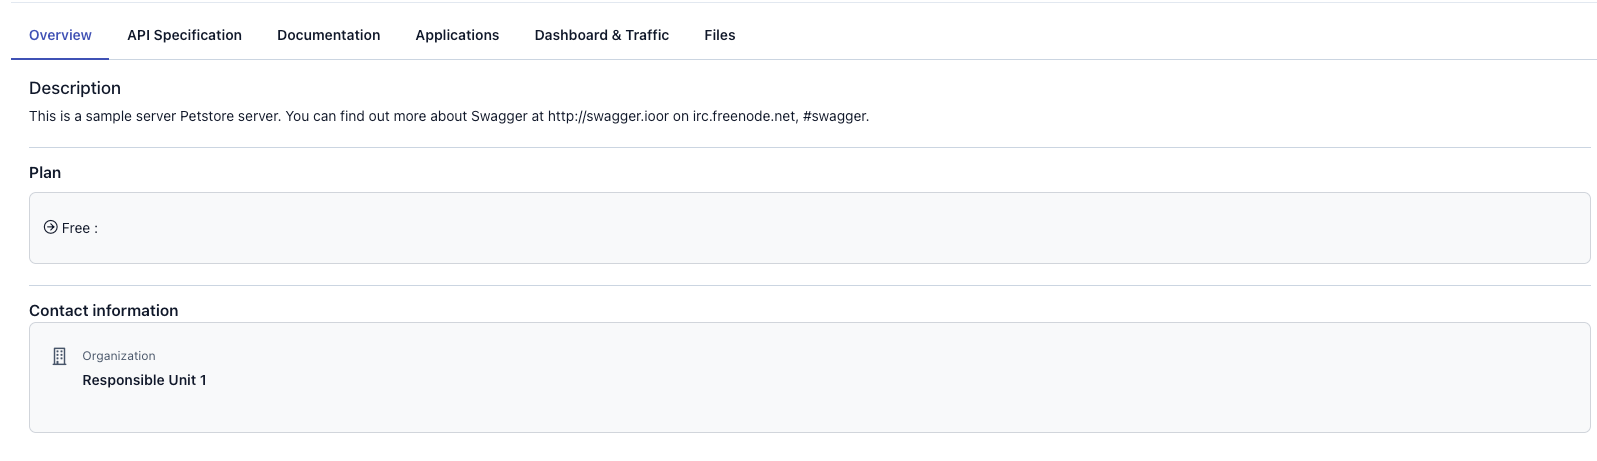 |
| API Specification | - Authentication summary (Auth type, username/password header fields, JWT parameters).
|
| API Specification | - Authentication summary (Auth type, username/password header fields, JWT parameters).
- Endpoint list in Accordions structure; parameter table, request/response contents, examples.
- Code examples (Shell, Python, JavaScript, Go, Java, C#, Node, Ruby) and copy buttons.
- Live testing with "Authorize" and "Try It" actions. | 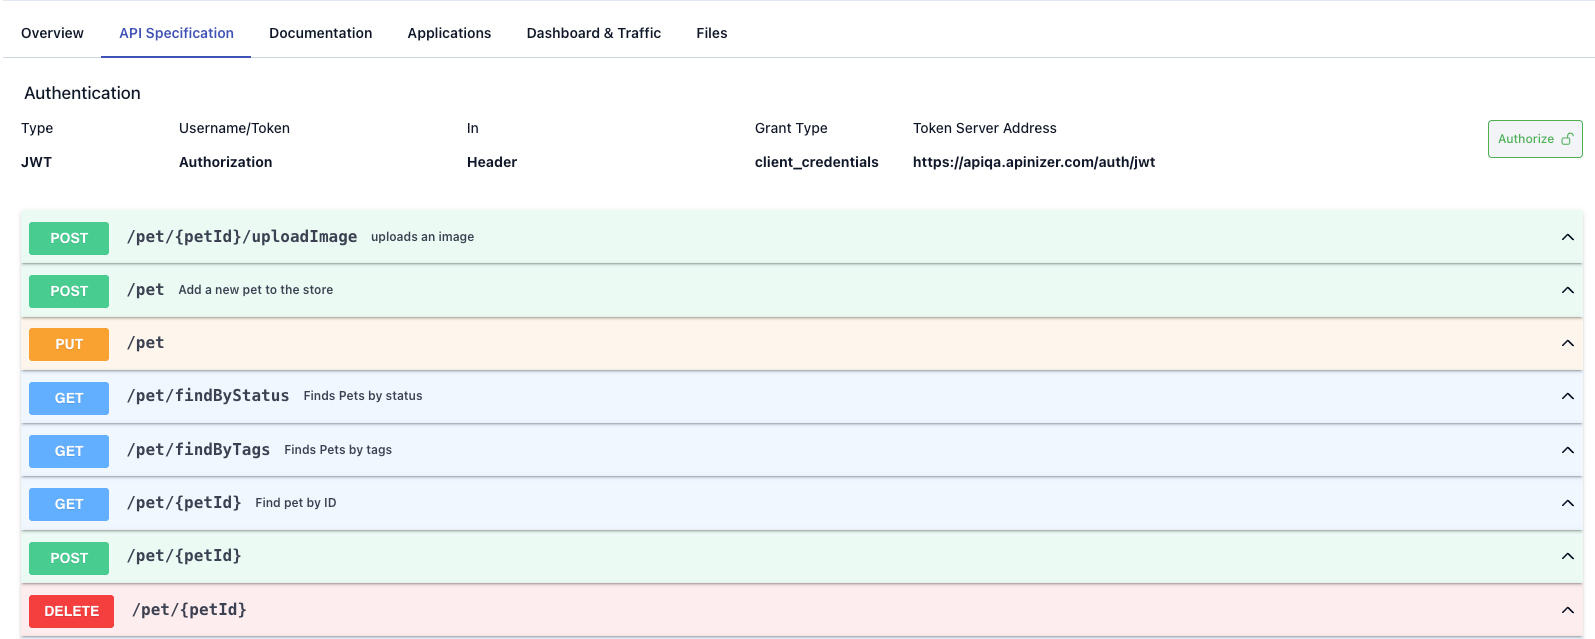 |
| Documentation | - Published portal documentation pages are shown as markdown/HTML.
|
| Documentation | - Published portal documentation pages are shown as markdown/HTML.
- If product is unpublished, a lock icon warning appears. | 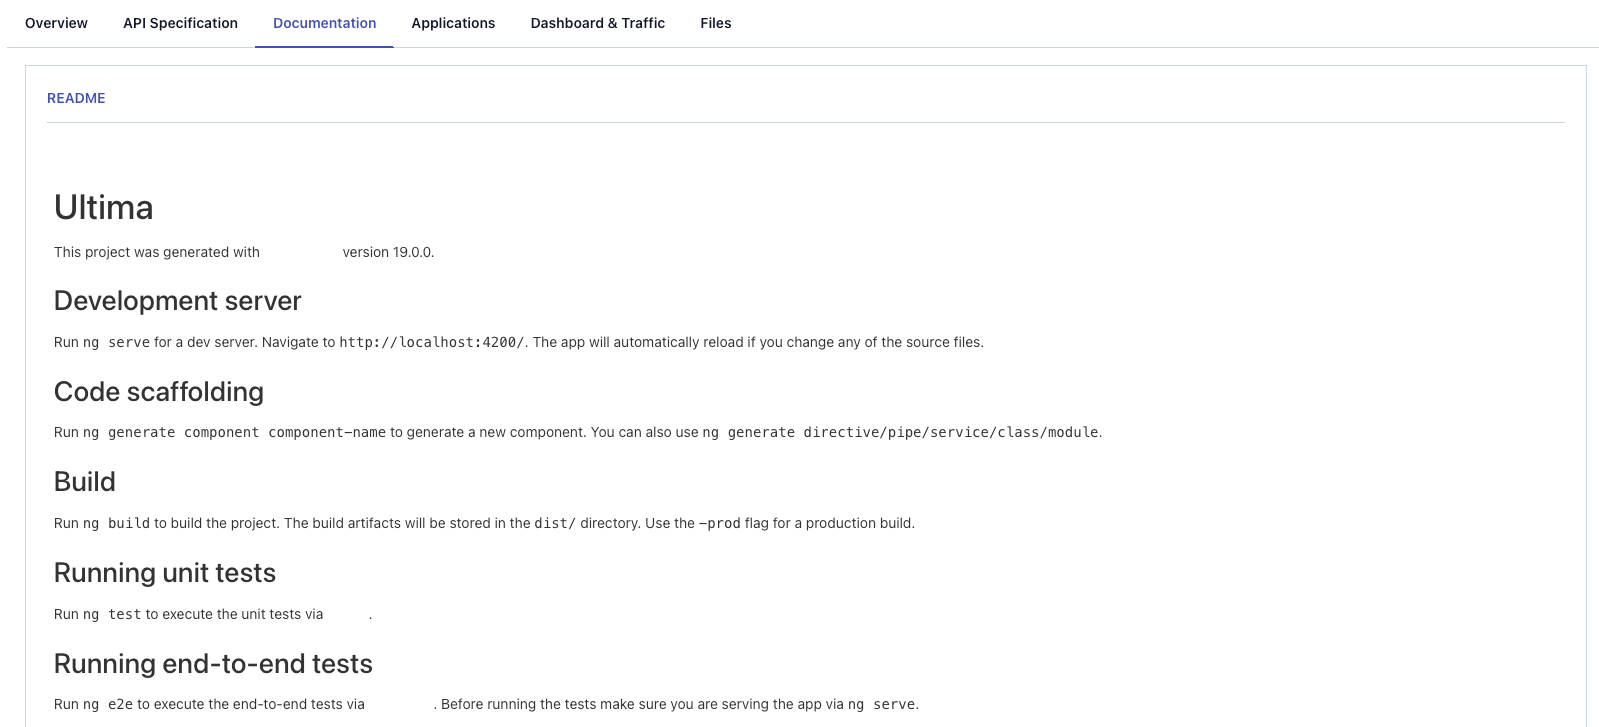 |
| Applications | - Lists which Portal Apps are subscribed to which plans.
|
| Applications | - Lists which Portal Apps are subscribed to which plans.
- Each subscription row summarizes the plan's throttling/quota/price information.
- Pending, rejected, or active subscription statuses are shown with icons.
- New subscription can be started from the same area or "Unsubscribe" can be done if appropriate. |  |
| Analytics | *(If Analytics is enabled in Portal settings and user is logged in)*
|
| Analytics | *(If Analytics is enabled in Portal settings and user is logged in)*
- `jhi-api-product-analytics` component brings dashboard and traffic charts. | 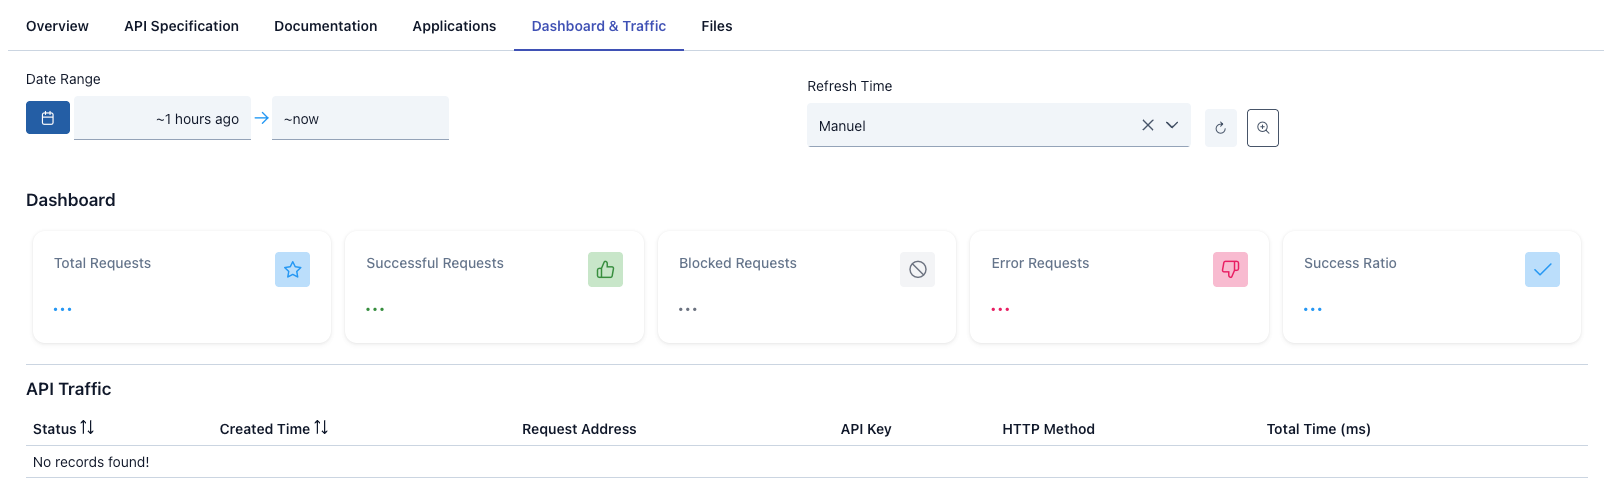 |
| Files | - File list linked to product is shown in table format; download buttons are available. |
|
| Files | - File list linked to product is shown in table format; download buttons are available. |  |
### API Specification and Test Console
**Authentication Summary**
* The authentication type required by the API (No Auth / Plain Text / Basic / JWT) is clearly shown.
* Plain Text: which header username/password will be sent in, which field will be retrieved from portal credential is specified.
* JWT: token server address, client information, and grant type information are listed.
**Authorize Dialog**
* For users not logged in, redirect to login page.
* Logged-in users can select existing credentials for plans they are subscribed to.
* Authorization headers (Basic, Bearer, etc.) are automatically prepared according to identity type and transferred to test console.
* If there is no credential linked to the relevant Portal App, a warning is received.
**Endpoint Accordions**
* For each endpoint:
* Summary and description fields.
* Parameter table (name, typeIn, requirement, example).
* Request body – schema and examples by media type.
* Response list – status code, media type, example.
* Try It button (if Try It is enabled).
**Test Console (Try It)**
* Endpoint dialog opens in expandable p-dialog.
* HTTP method can be changed from dropdown, URL parameters are dynamically updated.
* You can add/remove query/header/path parameters.
* Request body editor comes ready with JSON/XML example; test button sends request.
* Response editor is colored according to status code; `lbl-color-success` etc.
* WSDL download link for SOAP endpoints, OpenAPI can be downloaded for REST endpoints.
* Security tests can be performed with JSON signing and WS-Security dialogs (advanced level).
**Code Examples in API Specification Tab**
When we enter the detail of an API product on the Portal and open the API Specification tab, there is a section titled Code Examples at the end of each endpoint card. The purpose of this section is to show how endpoints will be called with ready templates in different programming languages and enable you to start running in a few seconds.
|
### API Specification and Test Console
**Authentication Summary**
* The authentication type required by the API (No Auth / Plain Text / Basic / JWT) is clearly shown.
* Plain Text: which header username/password will be sent in, which field will be retrieved from portal credential is specified.
* JWT: token server address, client information, and grant type information are listed.
**Authorize Dialog**
* For users not logged in, redirect to login page.
* Logged-in users can select existing credentials for plans they are subscribed to.
* Authorization headers (Basic, Bearer, etc.) are automatically prepared according to identity type and transferred to test console.
* If there is no credential linked to the relevant Portal App, a warning is received.
**Endpoint Accordions**
* For each endpoint:
* Summary and description fields.
* Parameter table (name, typeIn, requirement, example).
* Request body – schema and examples by media type.
* Response list – status code, media type, example.
* Try It button (if Try It is enabled).
**Test Console (Try It)**
* Endpoint dialog opens in expandable p-dialog.
* HTTP method can be changed from dropdown, URL parameters are dynamically updated.
* You can add/remove query/header/path parameters.
* Request body editor comes ready with JSON/XML example; test button sends request.
* Response editor is colored according to status code; `lbl-color-success` etc.
* WSDL download link for SOAP endpoints, OpenAPI can be downloaded for REST endpoints.
* Security tests can be performed with JSON signing and WS-Security dialogs (advanced level).
**Code Examples in API Specification Tab**
When we enter the detail of an API product on the Portal and open the API Specification tab, there is a section titled Code Examples at the end of each endpoint card. The purpose of this section is to show how endpoints will be called with ready templates in different programming languages and enable you to start running in a few seconds.
 **How It Works?**
| Step | Description |
| ------------------------- | -------------------------------------------------------------------------------------------------------------------------------------------------------------------------------------------------------------------------------------------------------------------------------------------------------------------------------------- |
| Select Endpoint | - Open **API Specification** tab in product detail.
**How It Works?**
| Step | Description |
| ------------------------- | -------------------------------------------------------------------------------------------------------------------------------------------------------------------------------------------------------------------------------------------------------------------------------------------------------------------------------------- |
| Select Endpoint | - Open **API Specification** tab in product detail.
- When you select an operation (GET/POST, etc.) from the left, the detail card opens.
- You will see the "Code Examples" area at the bottom of the card. |
| Select Language Tab | - Tabs are listed as Shell, Python, JavaScript, Go, Java, C#, Node, and Ruby.
- Click the language you want to use; example code for the selected language is automatically generated.
- The most common HTTP library recommended by Apinizer is used in each language (e.g., `requests` for Python, `HttpClient` for Java). |
| Review Code | - Code snippet comes ready with that endpoint's HTTP method, URL format, path parameters, query/header parameters, and example body if available.
- Parameters are filled according to examples in OpenAPI specification, so it is always compatible with documentation. |
| Copy with One Click | - You can copy the example to clipboard by pressing the copy icon in the top right of the code box.
- When successfully copied to clipboard, Portal shows a brief notification. |
| Adapt to Your Environment | - Code examples provide the basic skeleton.
- Add your authentication credentials if needed, change parameter values according to your needs, and paste into your application. |
**Why Should You Use It?**
* **Quick Start:** You get an answer to "How do I call this API?" in seconds.
* **Language Flexibility:** Different teams (Python, Java, Node, Go, etc.) instantly access examples suitable for their language.
* **Stays Current:** Since examples are generated from the API's OpenAPI specification, when the endpoint is updated, the code is automatically adapted.
* **Copy & Run:** Ready template speeds up the test or integration process.
### Documentation and Files
**Documentation Tab**
* Only visible on published products; lock icon information is shown for unpublished products.
* If there are multiple documents, a link list without tab structure is found between titles.
* Markdown contents are rendered with GitHub-style styles; HTML content is shown safely with `innerHTML`.
**Files Tab**
* File name, description, size are listed with `p-table`.
* Download button is found on each file row (`downloadFile`).
* If there are no files, an information message is shown.
### Analytics and Usage Tracking
* If `enableAnalytics` is enabled in Portal settings and user is logged in, Analytics tab is visible.
* Dashboard includes charts such as total calls, error distribution, most popular plans.
* Date range can be changed (EnumDateRangeUsedComponents.API\_DASHBOARD).
* This module is provided through `ApiProductAnalyticsCoreModule`.
## Portal–Manager Workflow
* The real source of API Product content is API Manager. Portal reads published content and presents it to end users.
* Operations that cannot be done on Portal:
* Changing plan text / price
* Updating documentation page
* Changing API visibility
* Enabling/disabling Try It settings
* These changes are made in API Manager; Portal pages are automatically updated.
* When Publish status is turned off in API Manager, the product automatically drops from Portal list.
## Frequently Asked Questions
**API Proxy:** Proxy/gateway in front of backend API, Contains technical configuration, Policies, routing, security settings, For developers/technical team
**API Product:** Product presented on Portal, Business-oriented packaging, Pricing, documentation, visibility, Prepared for end users.
* An API Product can contain one or more API Proxies
* An API Proxy can be used in multiple API Products
No, not necessary.
**Correct Approach:** Create one API Product, change by selecting Environments
**How It Works:**
* You select an environment in API Product (e.g., Production)
* Users use the API in that environment
* You can create another API Product for testing (optional)
Feature to test API directly on Portal
Interactive interface similar to Swagger UI
Testing API without writing code