> ## Documentation Index
> Fetch the complete documentation index at: https://docs.apinizer.com/llms.txt
> Use this file to discover all available pages before exploring further.
# Message Processing and Policy Application
> Message flow, policy pipeline, and Request, Response, Error pipelines show how messages are processed in an API Proxy. The Development tab is the tab where policies to be applied to request and response messages during message flow are formatted. The interface is designed to show this flow. This way, users can visually see which policies are applied in what order before a request message is sent to the Backend API, and which policies are applied in what order before the response message returned from the Backend API is sent to the client.
## Message Flow and Pipeline Structure
### Client and Backend API
The flow between the client and Backend API is shown with the following elements:
* An arrow symbolizing the request message going from the client to the Backend API
* An arrow symbolizing the response message going from the Backend API to the client
* Icons showing the policies applied on request or response messages and the application order
**Client**: Shown in the frame on the left side of the interface. It is the stakeholder that sends requests to the API Proxy. It starts the flow. The message from the client reaches the Backend API after policies are applied.
**Backend API**: The original API that is closed to direct access from the client and hidden from the client, receives requests from the API Proxy and returns responses to the API Proxy. Shown with the frame on the right side of the interface. The Backend API's response is sent to the client after policies are applied.
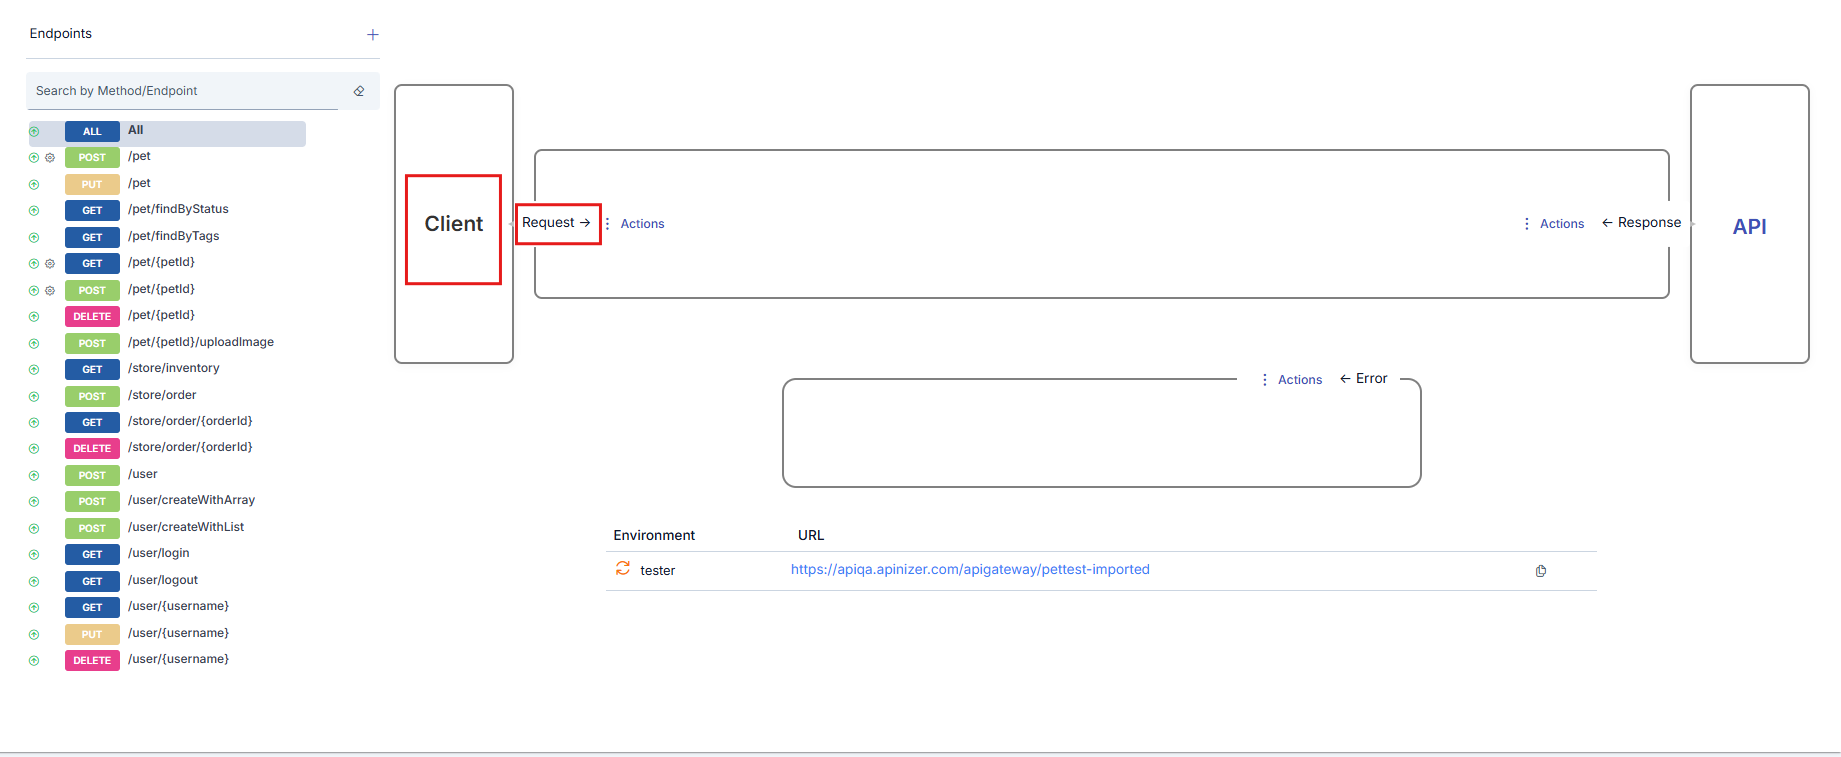
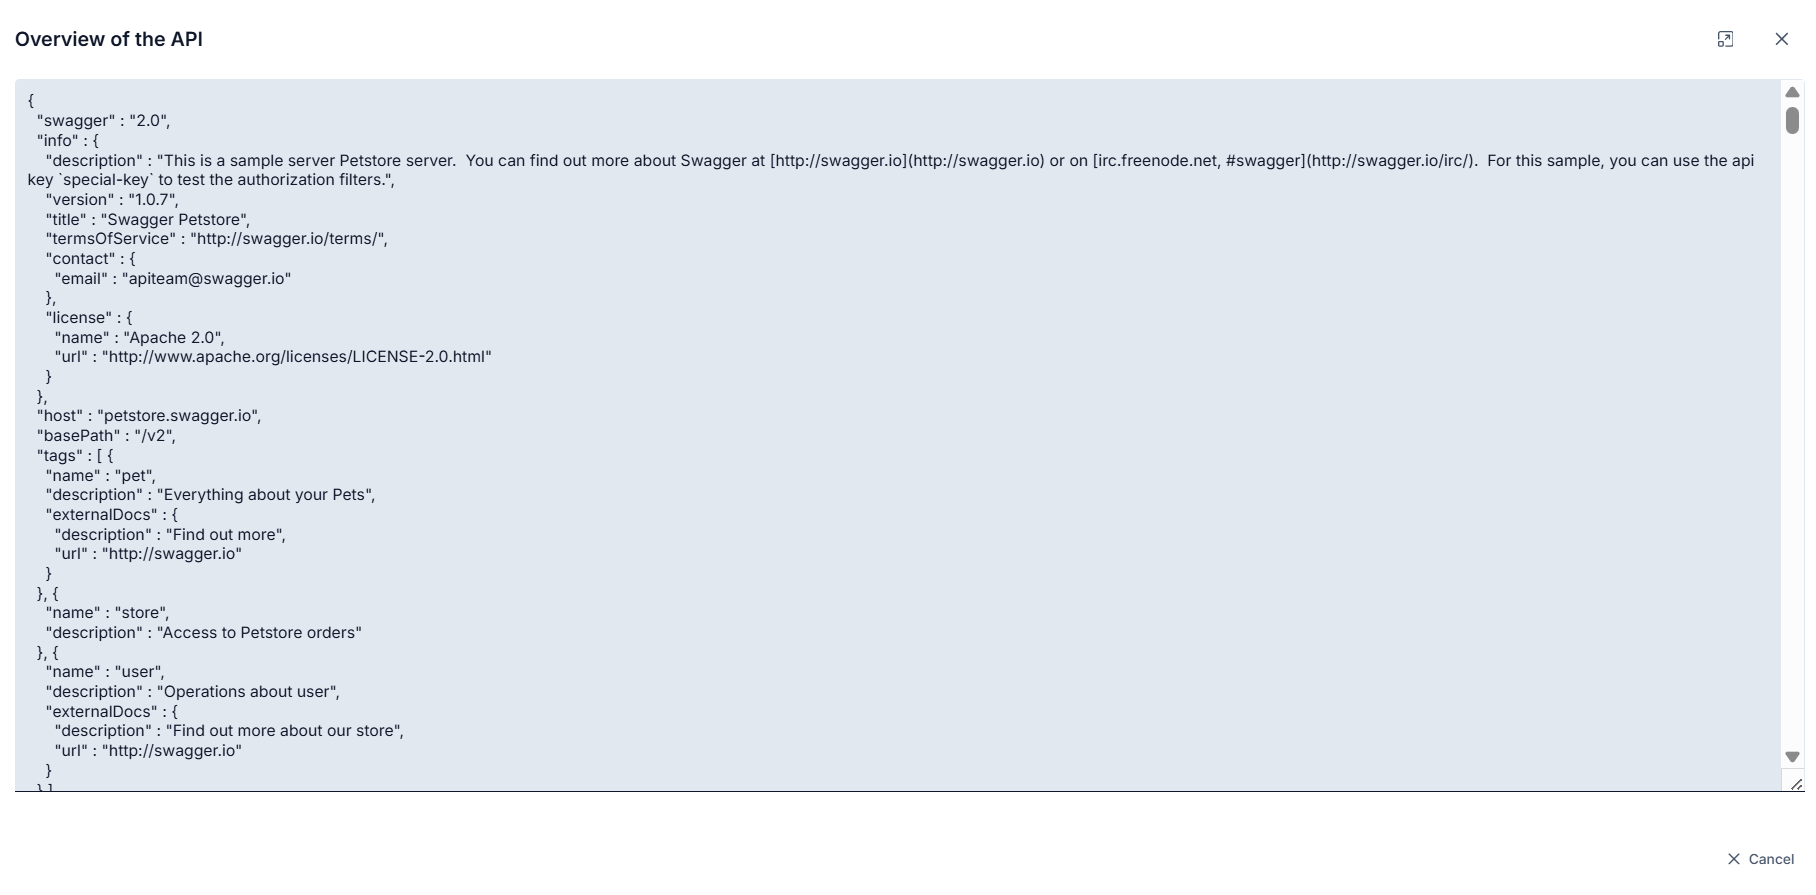
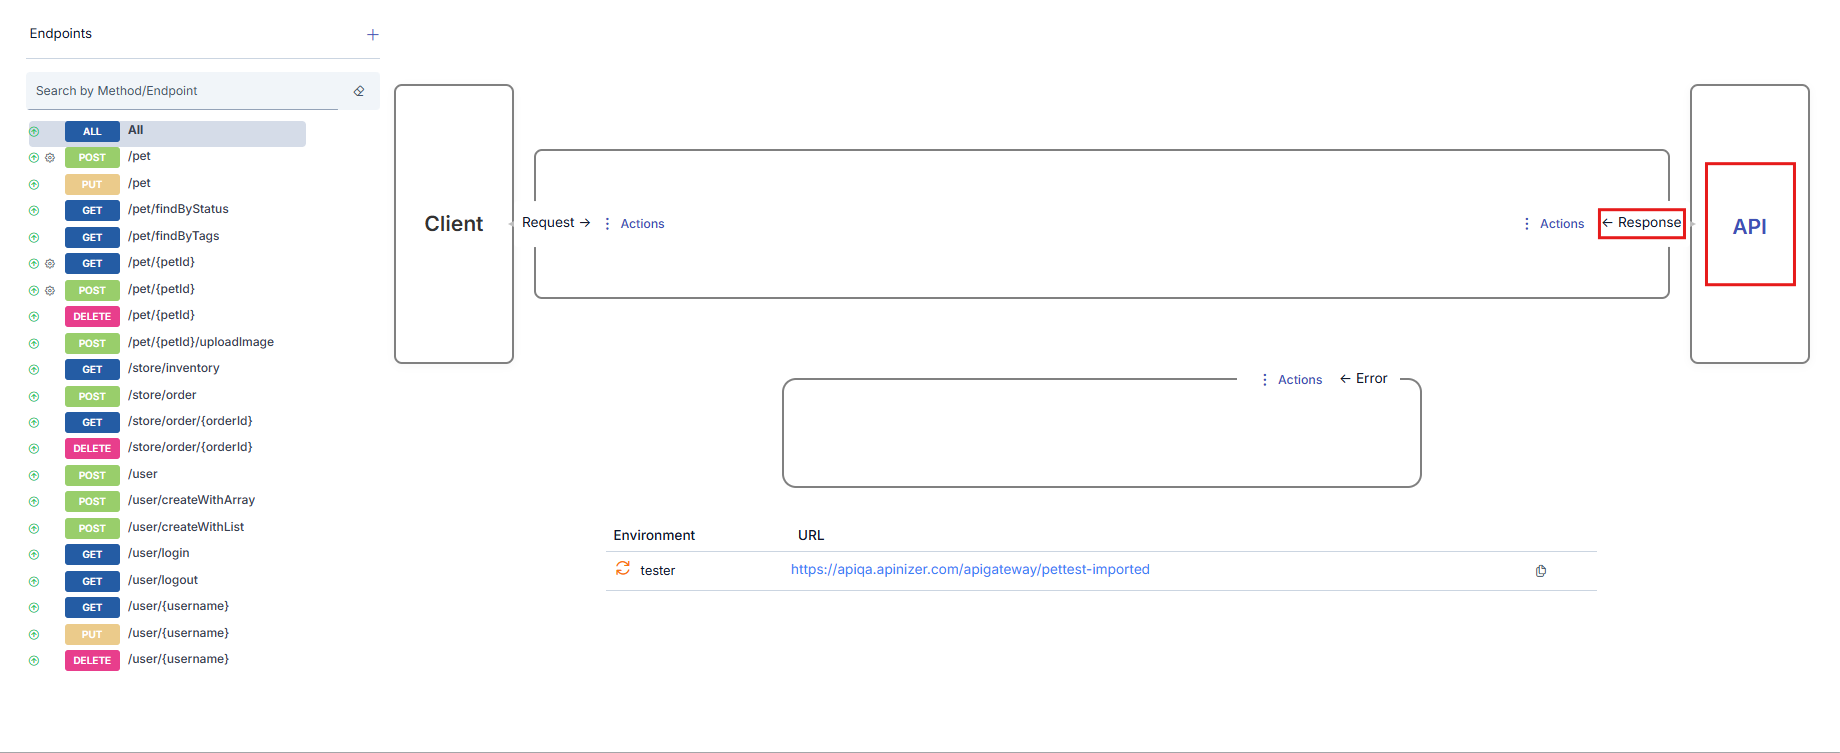 When the **API** link in the Backend API box is clicked, the Backend API's API Definition Document is displayed.
 Details of policies will not be covered in this section. For detailed information about policies, you can refer to the [What is Policy?](/en/concepts/core-concepts/what-is-policy) page.
## Request Pipeline
Request Pipeline is the pipeline where requests from clients are processed before being sent to the backend.
### Request Pipeline Flow
Request Pipeline consists of the following stages:
1. **Pre-flow Policies**: Security and validation
2. **Conditional Policies**: Conditional operations
3. **Routing Step**: Routing to backend
## Response Pipeline
Response Pipeline is the pipeline where responses from the backend are processed before being sent to the client.
### Response Pipeline Flow
Response flow is processed in the following order:
1. **Post-flow Policies (Response)**: Response transformation
2. **Conditional Policies**: Conditional operations
3. **Logging**: Operation record (Asynchronous)
4. **Client Response**: Response to client
## Error Pipeline
Error Pipeline is the pipeline where error conditions are processed. Error Pipeline comes into play when an error occurs in the Request or Response pipeline.
### Error Pipeline Flow
In error conditions, the following flow is followed:
1. **Fault Handler Policies**: Error handling policies
2. **Error Transformation**: Error message transformation
3. **Error Logging**: Error record
4. **Error Response**: Error response to client
### Policy Execution Order in Error Conditions
Policies to be executed in error conditions are added with the "Add Error Policy" option.
If there is an error at any point in the flow, the normal flow is interrupted and first, if available, the error response template is applied to the error message.
Then, policies added to the "Error Policies" line are executed **from right to left** in order.
## Conditional Policy Execution
Policies can be executed conditionally. Conditional policy execution enables applying different policies based on message content, header values, query parameters, IP address, time-based conditions, or system variables.
For detailed information about conditional policy execution, you can refer to the [Conditional Policy Execution](/en/concepts/core-concepts/conditional-policy-execution) page.
## Policy Management
Policies are configurations made to describe operations such as security, message filtering, validation, transformation or enrichment, partial business logic implementation, error management, etc., to be performed on request and response messages. The API Gateway executes the policies introduced to it with these configurations during the message flow between the Client and Backend API.
This section generally describes operations that can be performed on policies. To get detailed information about any policy, you can refer to the relevant policy documentation from the [What is Policy?](/en/concepts/core-concepts/what-is-policy) page.
### Policy Location and Execution Order
Policies can be added at 3 different points:
* API Proxy Group
* API Proxy
* Method/Endpoint
A policy added to an API Proxy Group is executed only if the request came through the API Proxy Group.
A policy added to an API Proxy is executed for all methods/endpoints of that API Proxy.
A policy added to a method/endpoint is executed only for that method/endpoint.
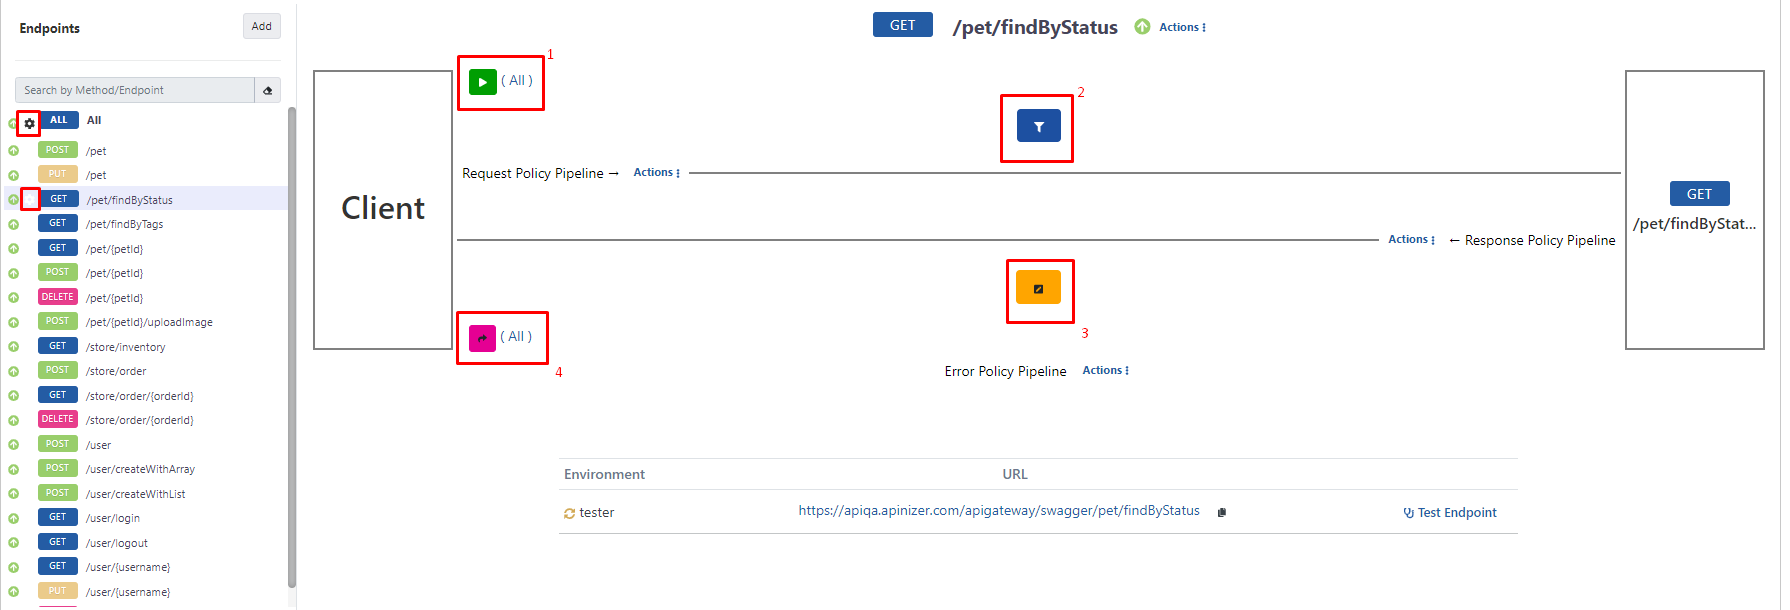
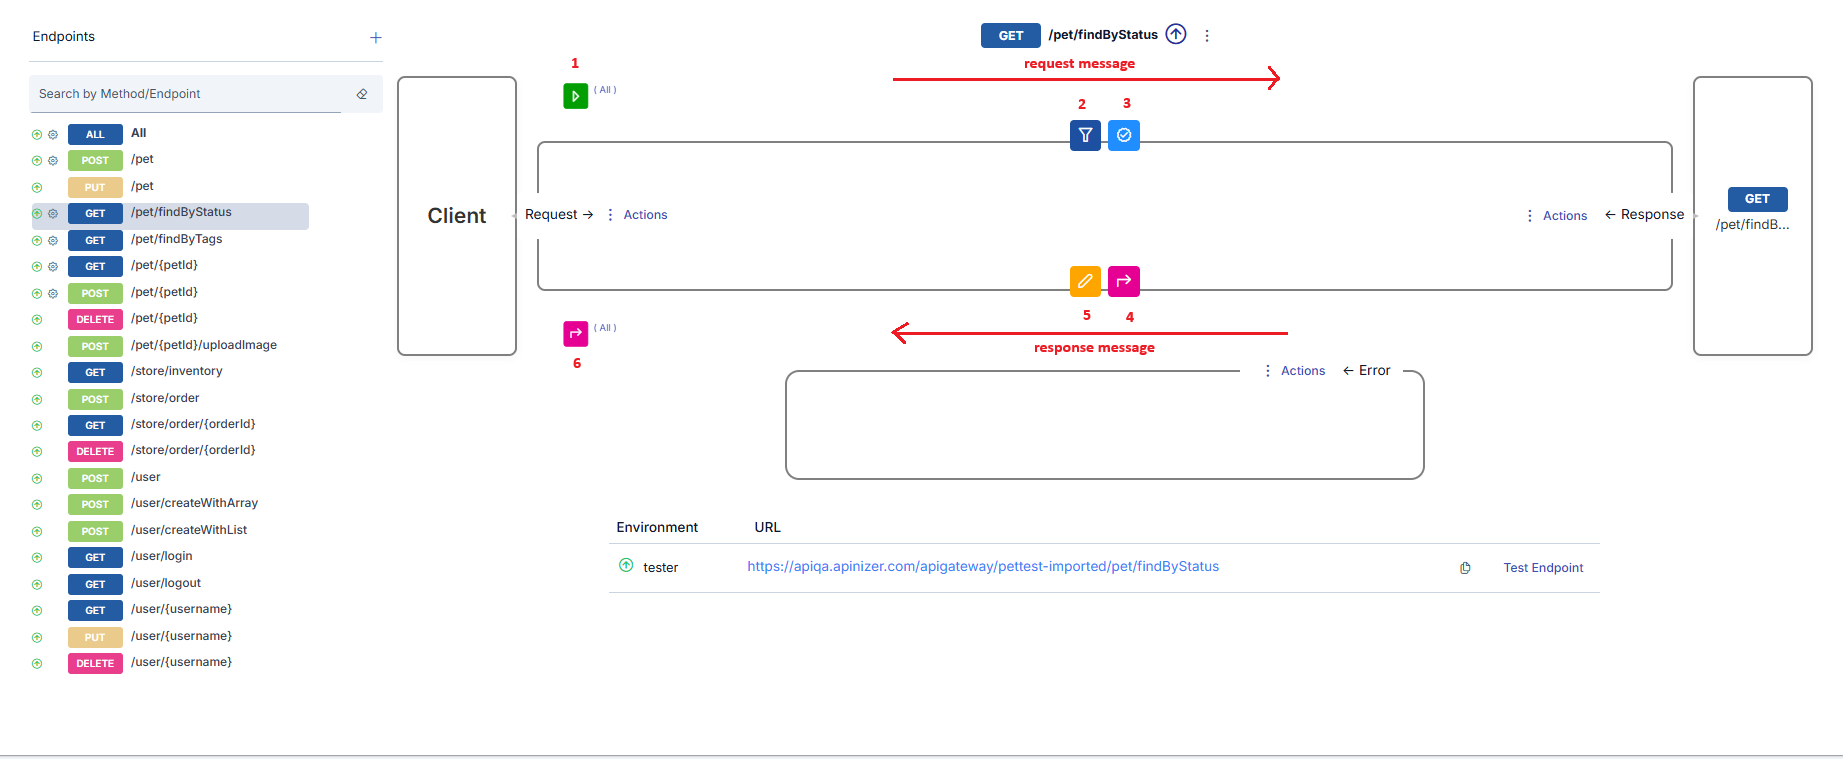
The following visual shows an example of policies added to all 3 points.
The visual shows that the API Proxy with the selected method/endpoint named **GET - findByStatus** is added to an API Proxy Group named **Proxy Group - 1**.
The marked areas are the places where policies are displayed depending on where they are added:
* The area marked with frame 1 shows policies added for all methods/endpoints of this API Proxy, valid for all methods/endpoints, and to be applied to request messages. The text **All** indicates this.
* The area marked with frame 2 shows policies valid for the selected method/endpoint and to be applied to request messages.
* The area marked with frame 3 shows policies valid for the selected method/endpoint and to be applied to response messages.
* The area marked with frame 4 shows policies added for all methods/endpoints of this API Proxy, valid for all methods/endpoints, and to be applied to response messages. The text **All** indicates this.
Details of policies will not be covered in this section. For detailed information about policies, you can refer to the [What is Policy?](/en/concepts/core-concepts/what-is-policy) page.
## Request Pipeline
Request Pipeline is the pipeline where requests from clients are processed before being sent to the backend.
### Request Pipeline Flow
Request Pipeline consists of the following stages:
1. **Pre-flow Policies**: Security and validation
2. **Conditional Policies**: Conditional operations
3. **Routing Step**: Routing to backend
## Response Pipeline
Response Pipeline is the pipeline where responses from the backend are processed before being sent to the client.
### Response Pipeline Flow
Response flow is processed in the following order:
1. **Post-flow Policies (Response)**: Response transformation
2. **Conditional Policies**: Conditional operations
3. **Logging**: Operation record (Asynchronous)
4. **Client Response**: Response to client
## Error Pipeline
Error Pipeline is the pipeline where error conditions are processed. Error Pipeline comes into play when an error occurs in the Request or Response pipeline.
### Error Pipeline Flow
In error conditions, the following flow is followed:
1. **Fault Handler Policies**: Error handling policies
2. **Error Transformation**: Error message transformation
3. **Error Logging**: Error record
4. **Error Response**: Error response to client
### Policy Execution Order in Error Conditions
Policies to be executed in error conditions are added with the "Add Error Policy" option.
If there is an error at any point in the flow, the normal flow is interrupted and first, if available, the error response template is applied to the error message.
Then, policies added to the "Error Policies" line are executed **from right to left** in order.
## Conditional Policy Execution
Policies can be executed conditionally. Conditional policy execution enables applying different policies based on message content, header values, query parameters, IP address, time-based conditions, or system variables.
For detailed information about conditional policy execution, you can refer to the [Conditional Policy Execution](/en/concepts/core-concepts/conditional-policy-execution) page.
## Policy Management
Policies are configurations made to describe operations such as security, message filtering, validation, transformation or enrichment, partial business logic implementation, error management, etc., to be performed on request and response messages. The API Gateway executes the policies introduced to it with these configurations during the message flow between the Client and Backend API.
This section generally describes operations that can be performed on policies. To get detailed information about any policy, you can refer to the relevant policy documentation from the [What is Policy?](/en/concepts/core-concepts/what-is-policy) page.
### Policy Location and Execution Order
Policies can be added at 3 different points:
* API Proxy Group
* API Proxy
* Method/Endpoint
A policy added to an API Proxy Group is executed only if the request came through the API Proxy Group.
A policy added to an API Proxy is executed for all methods/endpoints of that API Proxy.
A policy added to a method/endpoint is executed only for that method/endpoint.
The following visual shows an example of policies added to all 3 points.
The visual shows that the API Proxy with the selected method/endpoint named **GET - findByStatus** is added to an API Proxy Group named **Proxy Group - 1**.
The marked areas are the places where policies are displayed depending on where they are added:
* The area marked with frame 1 shows policies added for all methods/endpoints of this API Proxy, valid for all methods/endpoints, and to be applied to request messages. The text **All** indicates this.
* The area marked with frame 2 shows policies valid for the selected method/endpoint and to be applied to request messages.
* The area marked with frame 3 shows policies valid for the selected method/endpoint and to be applied to response messages.
* The area marked with frame 4 shows policies added for all methods/endpoints of this API Proxy, valid for all methods/endpoints, and to be applied to response messages. The text **All** indicates this.
 If this API Proxy is added to any API Proxy Group, policies exist in the added API Proxy Group, and the request came through the API Proxy Group, then those on the request line are applied, and then policies on the response line are also applied. However, these are not shown on this page.
If any policy is added for any method/endpoint of the API Proxy, a gear icon appears next to the method/endpoint.
If no specific method/endpoint of the API Proxy is selected (or **All** is selected), 2 regions appear as shown in the following visual.
If this API Proxy is added to any API Proxy Group, policies exist in the added API Proxy Group, and the request came through the API Proxy Group, then those on the request line are applied, and then policies on the response line are also applied. However, these are not shown on this page.
If any policy is added for any method/endpoint of the API Proxy, a gear icon appears next to the method/endpoint.
If no specific method/endpoint of the API Proxy is selected (or **All** is selected), 2 regions appear as shown in the following visual.
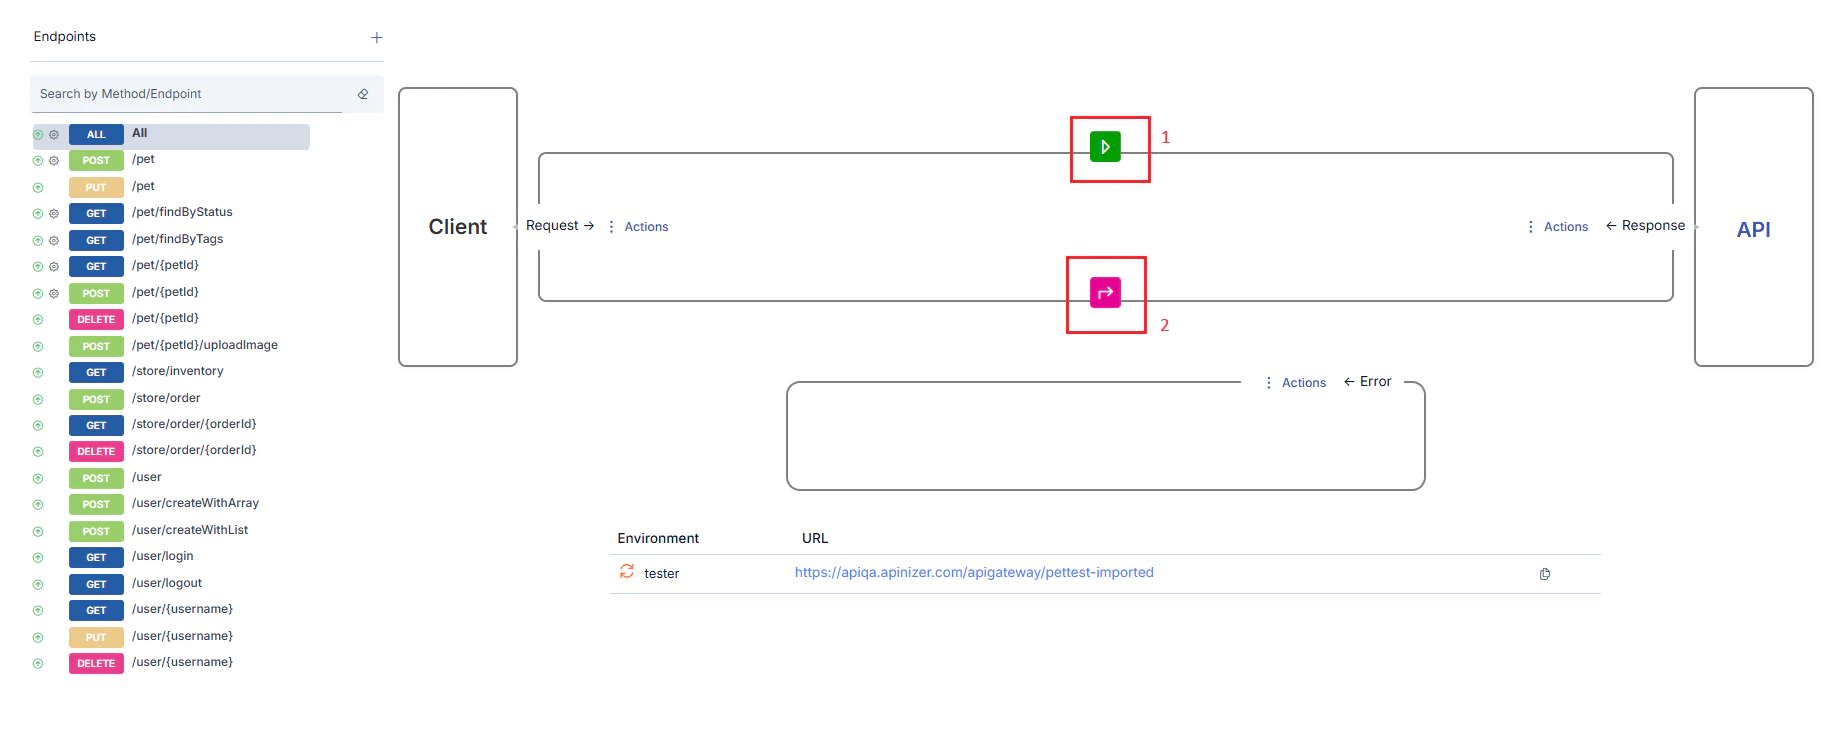 * The area marked with frame 1 shows policies added for all methods/endpoints of this API Proxy, valid for all methods/endpoints, and to be applied to request messages.
* The area marked with frame 2 shows policies added for all methods/endpoints of this API Proxy, valid for all methods/endpoints, and to be applied to response messages.
## Policy Execution Order
Policies are executed in the message flow order:
* For request messages: API Proxy Group → API Proxy → method/endpoint in order
* For response messages: method/endpoint → API Proxy → API Proxy Group in order
At each level, policies at that level are processed according to the message flow direction order.
The following visual summarizes this situation, showing the policy processing order numbered.
* The area marked with frame 1 shows policies added for all methods/endpoints of this API Proxy, valid for all methods/endpoints, and to be applied to request messages.
* The area marked with frame 2 shows policies added for all methods/endpoints of this API Proxy, valid for all methods/endpoints, and to be applied to response messages.
## Policy Execution Order
Policies are executed in the message flow order:
* For request messages: API Proxy Group → API Proxy → method/endpoint in order
* For response messages: method/endpoint → API Proxy → API Proxy Group in order
At each level, policies at that level are processed according to the message flow direction order.
The following visual summarizes this situation, showing the policy processing order numbered.
 ### Adding Policy to Flow
To add a policy:
The entity where the policy is to be added is selected. For example, for a policy to be applied to all methods/endpoints of an API Proxy, **All** is selected in that API Proxy's method/endpoint field.
The **➕ Add Policy** icon in the appropriate area is clicked according to whether the policy is to be added to request messages or response messages.
### Adding Policy to Flow
To add a policy:
The entity where the policy is to be added is selected. For example, for a policy to be applied to all methods/endpoints of an API Proxy, **All** is selected in that API Proxy's method/endpoint field.
The **➕ Add Policy** icon in the appropriate area is clicked according to whether the policy is to be added to request messages or response messages.
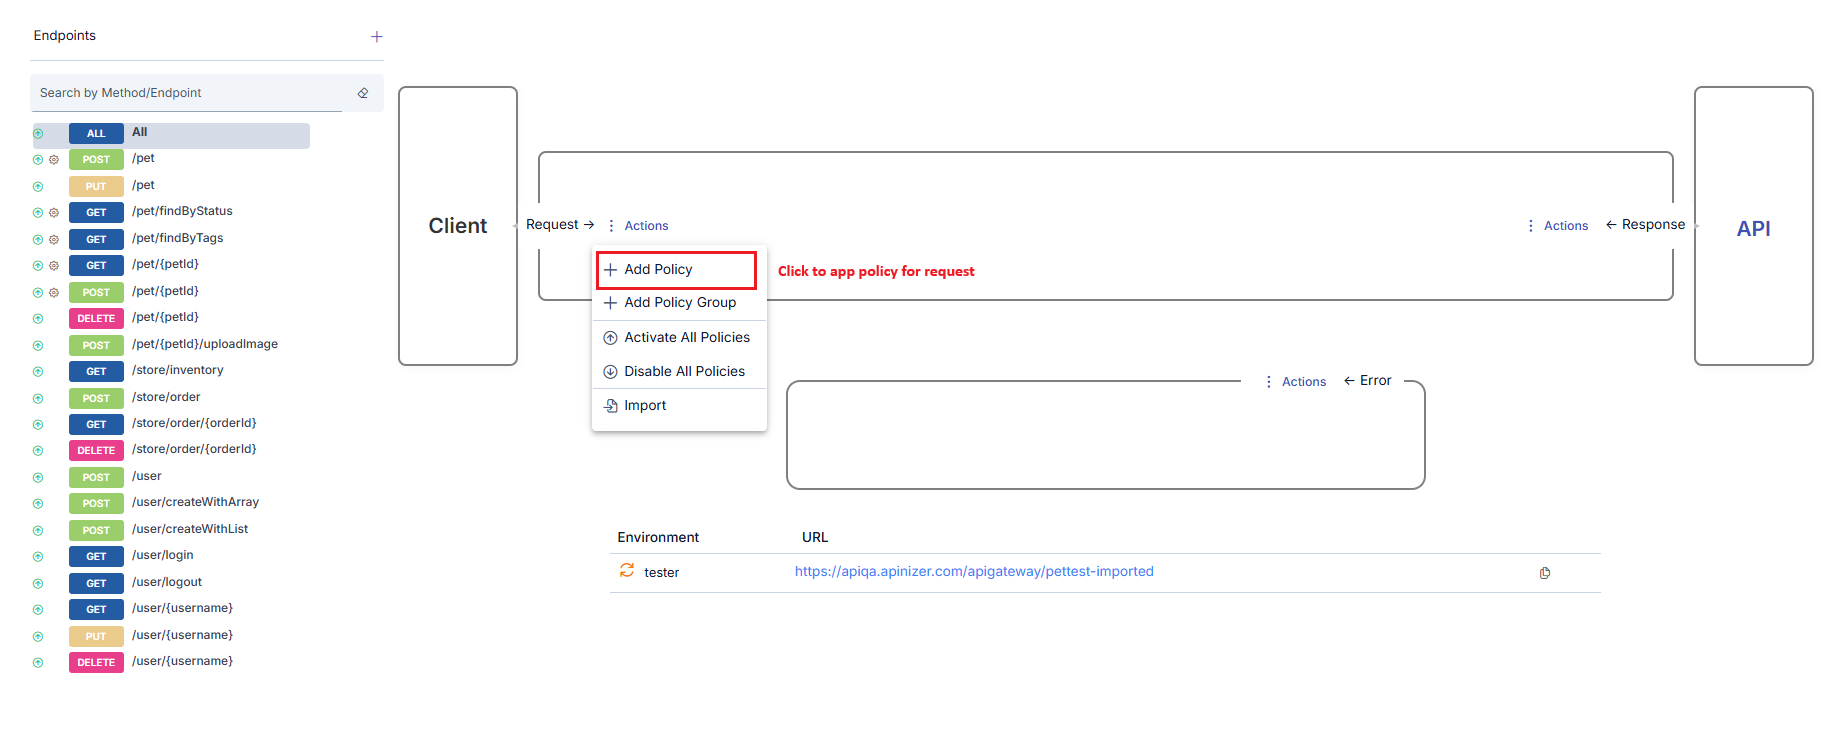 The type of policy to be added is selected from the opened window. Policy types shown in this window vary according to the active API Proxy's type and which area the policy is to be added to.
 When the policy to be added is selected, a window opens where configuration information for that policy can be entered. Policies can be added in different ways from this window:
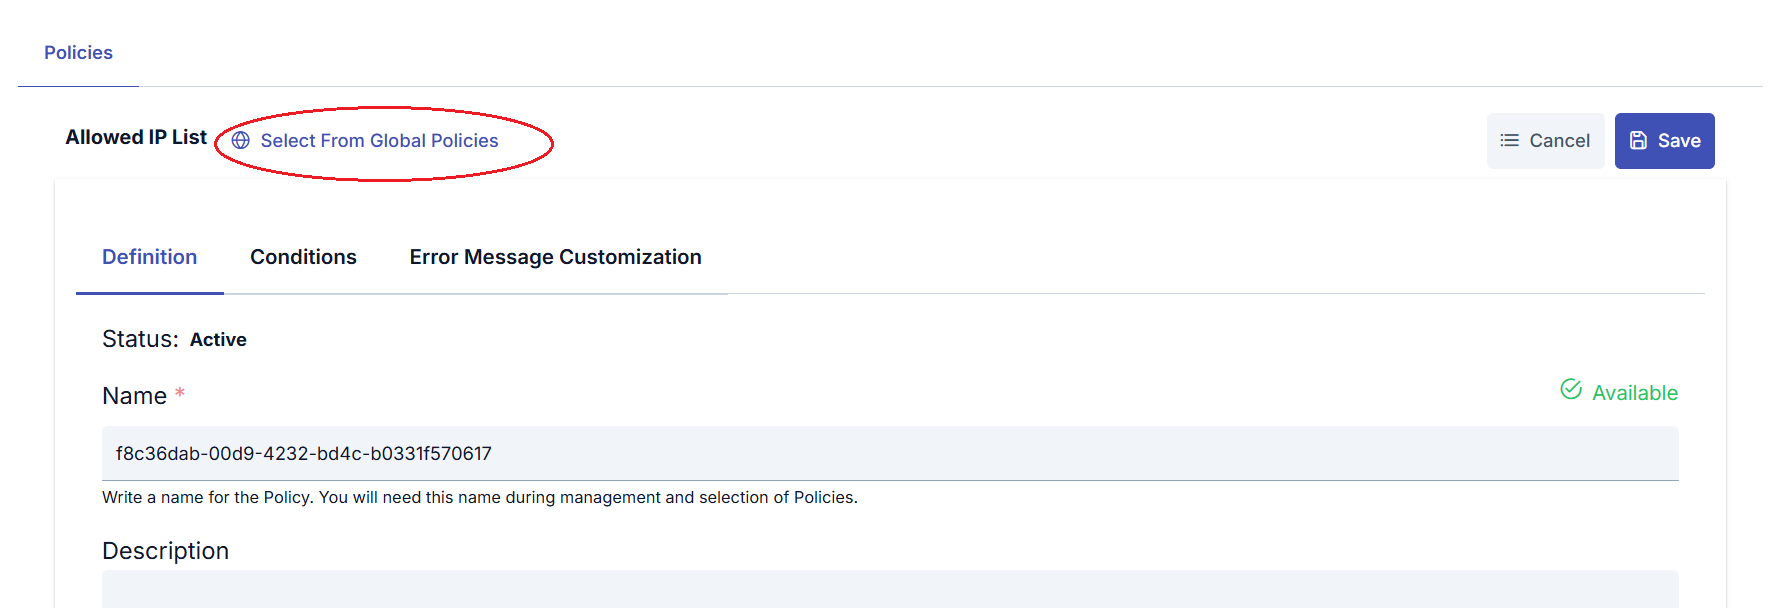
1. **To add an existing global policy**: In the policy window, click the **Select From Global Policies** link next to the policy type at the top. The appropriate policy is selected from the opened window and the process is completed.
When the policy to be added is selected, a window opens where configuration information for that policy can be entered. Policies can be added in different ways from this window:
1. **To add an existing global policy**: In the policy window, click the **Select From Global Policies** link next to the policy type at the top. The appropriate policy is selected from the opened window and the process is completed.
 2. **To create a local policy**: A local policy is created with the data entered in the opened window without any special operation.
### Updating Policy in Flow
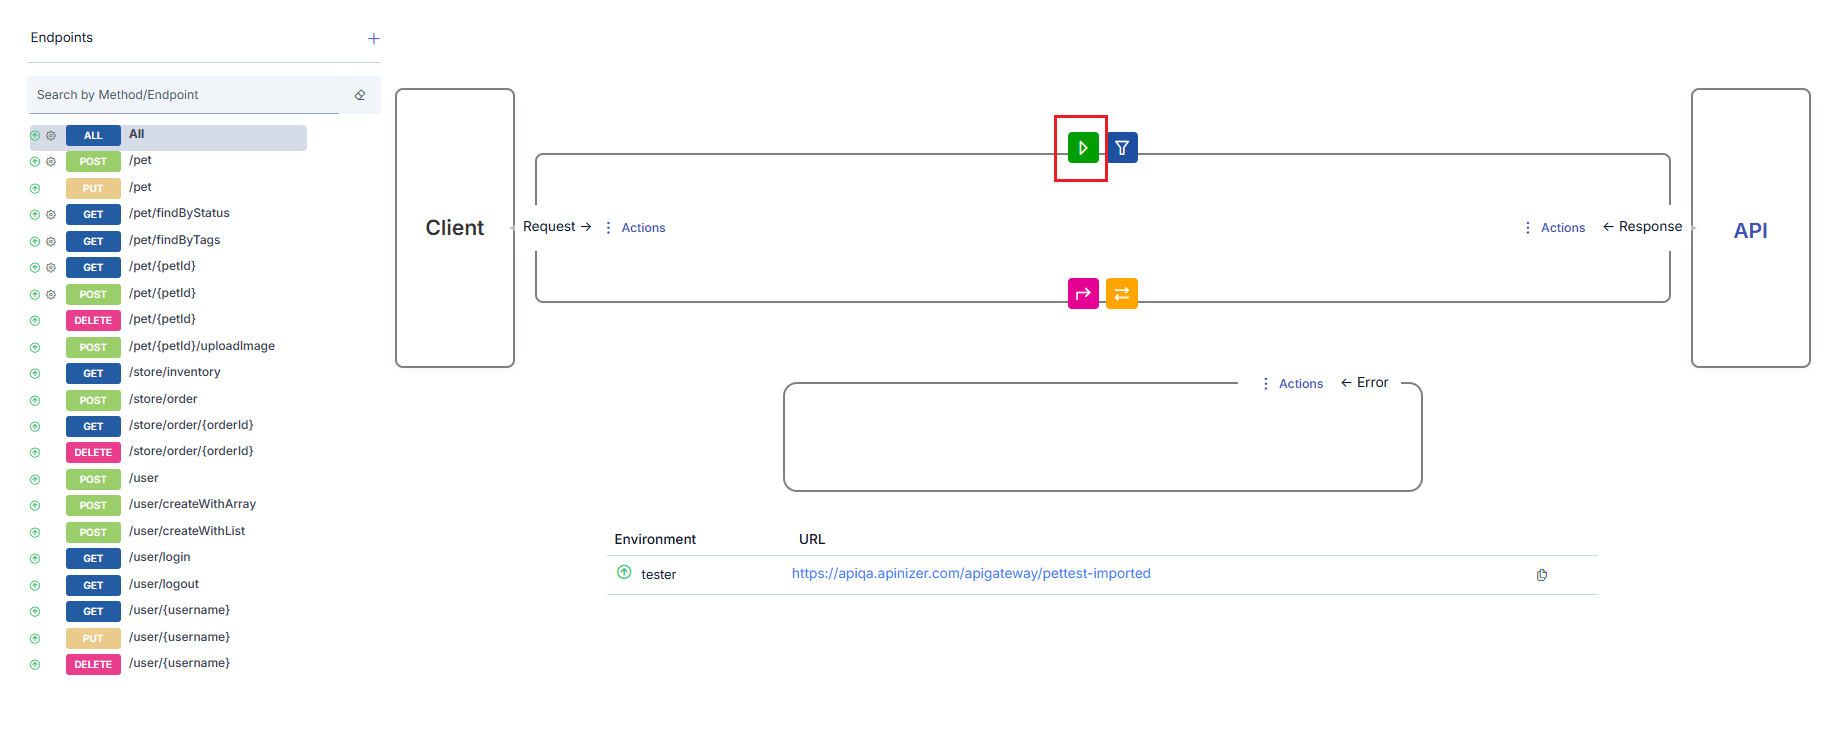
When an existing policy's icon is clicked, a window opens where that policy's information can be updated.
2. **To create a local policy**: A local policy is created with the data entered in the opened window without any special operation.
### Updating Policy in Flow
When an existing policy's icon is clicked, a window opens where that policy's information can be updated.
 ### Activating/Deactivating Selected Policy
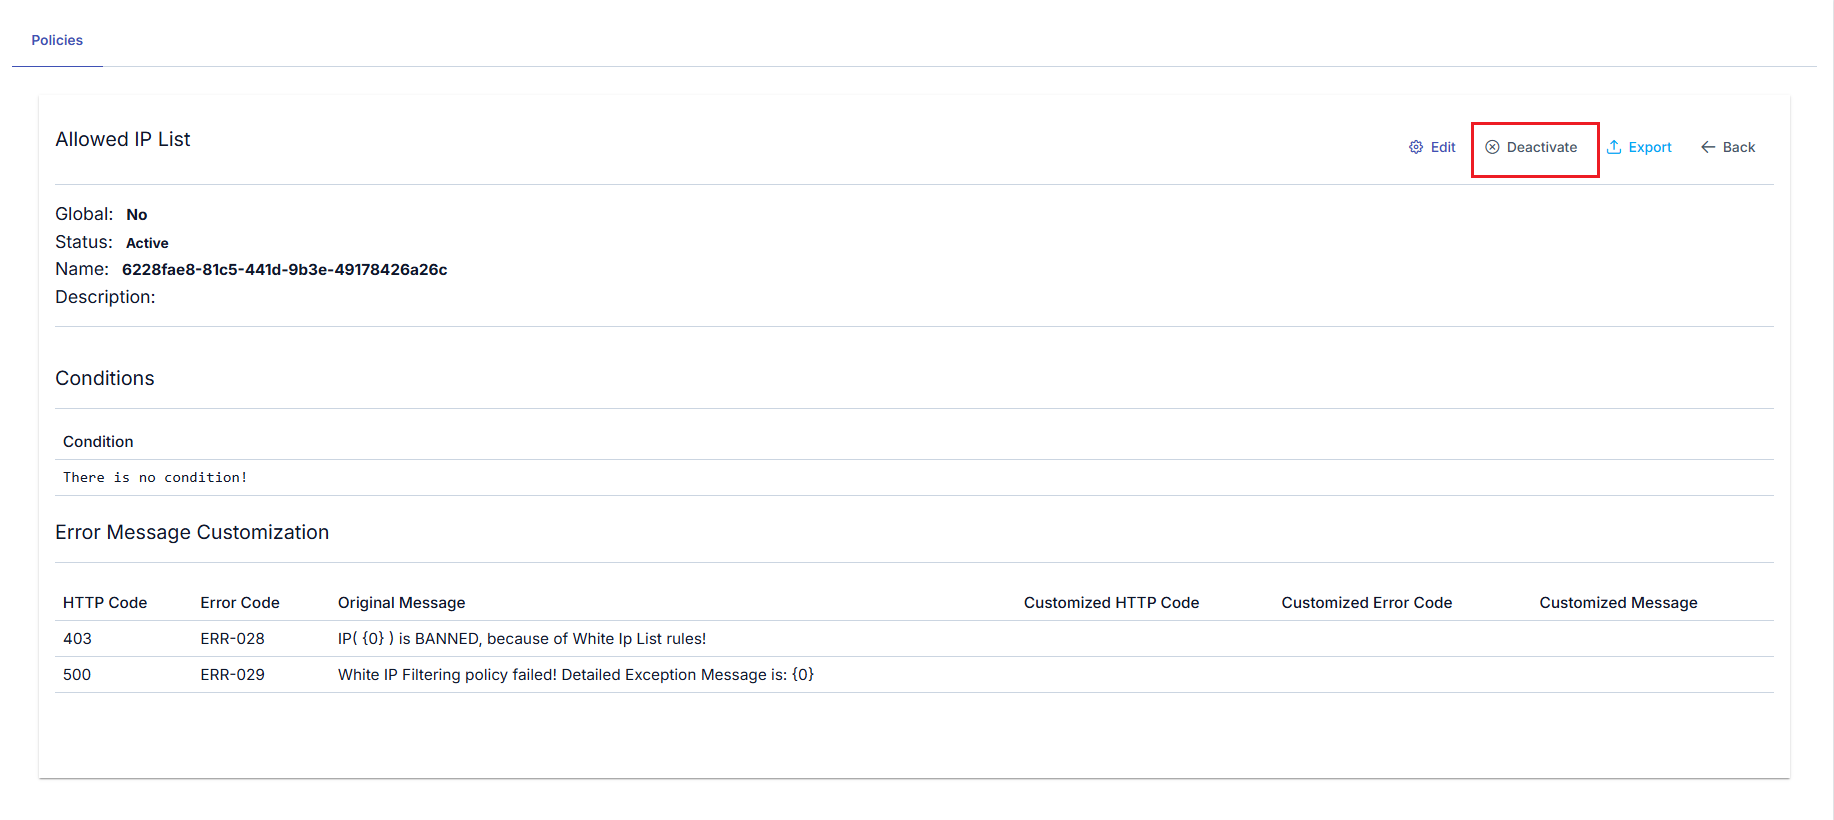
A policy can be temporarily removed from use without being deleted from the method/endpoint or API Proxy where it was added. For this, the policy is opened for update and the **Deactivate** button at the top of the opened window is clicked.
### Activating/Deactivating Selected Policy
A policy can be temporarily removed from use without being deleted from the method/endpoint or API Proxy where it was added. For this, the policy is opened for update and the **Deactivate** button at the top of the opened window is clicked.
 ### Activating/Deactivating All Policies
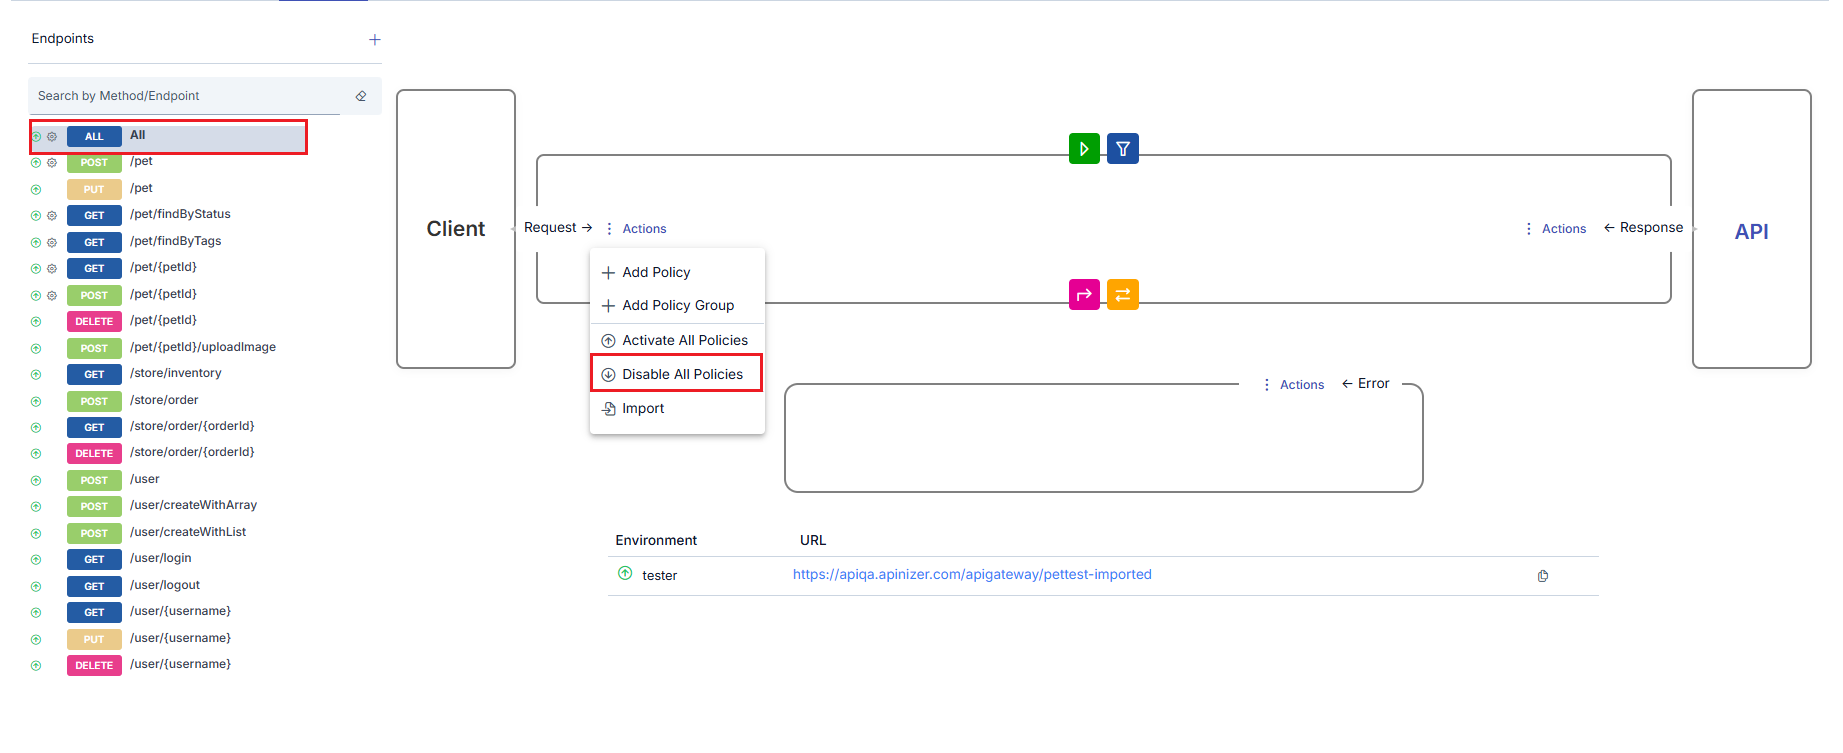
In the method/endpoint section, the **Disable All Policies** link appears at the bottom of the middle section. When this link is clicked, if **All** option is selected, all policies added to the API Proxy; if in any method, only all policies added within that method are disabled. Disabled policies can be reactivated individually from the policy update window later or collectively by clicking the **Activate All Policies** link.
### Activating/Deactivating All Policies
In the method/endpoint section, the **Disable All Policies** link appears at the bottom of the middle section. When this link is clicked, if **All** option is selected, all policies added to the API Proxy; if in any method, only all policies added within that method are disabled. Disabled policies can be reactivated individually from the policy update window later or collectively by clicking the **Activate All Policies** link.
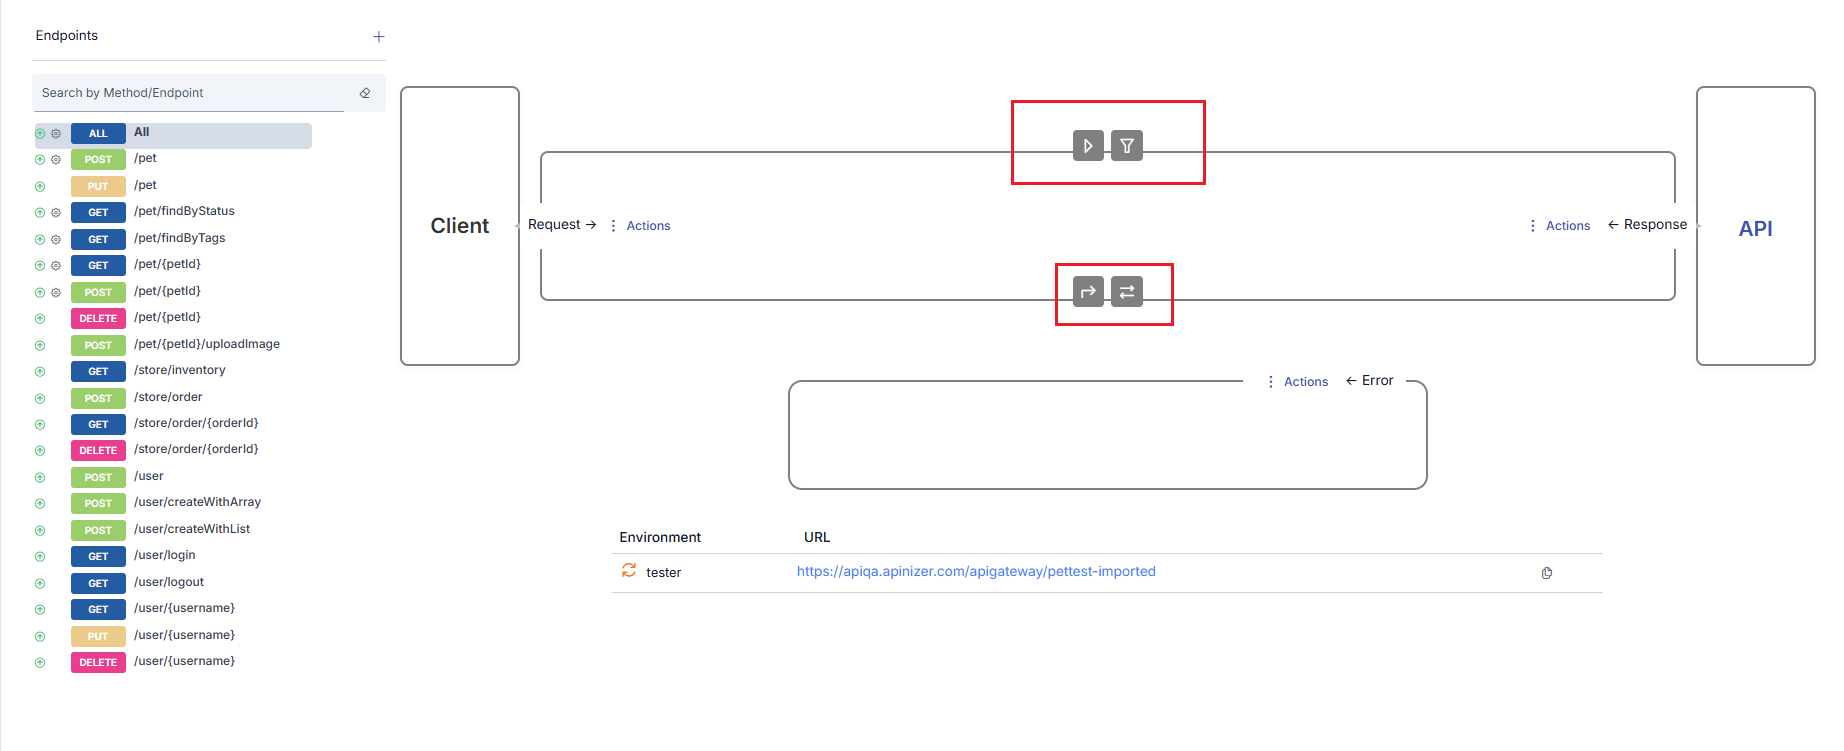
 When policies are disabled, the icons' colors change to a gray appearance.
 If the API Proxy is added to an API Proxy Group and policies are applied through this API Proxy Group, disabling all policies does not affect policies coming from the API Proxy Group, these policies remain active.
### Removing Policy from Flow
When the mouse is hovered over the policy to be deleted, an icon appears that will delete the policy. The policy can be deleted by clicking this icon.
If the API Proxy is added to an API Proxy Group and policies are applied through this API Proxy Group, disabling all policies does not affect policies coming from the API Proxy Group, these policies remain active.
### Removing Policy from Flow
When the mouse is hovered over the policy to be deleted, an icon appears that will delete the policy. The policy can be deleted by clicking this icon.
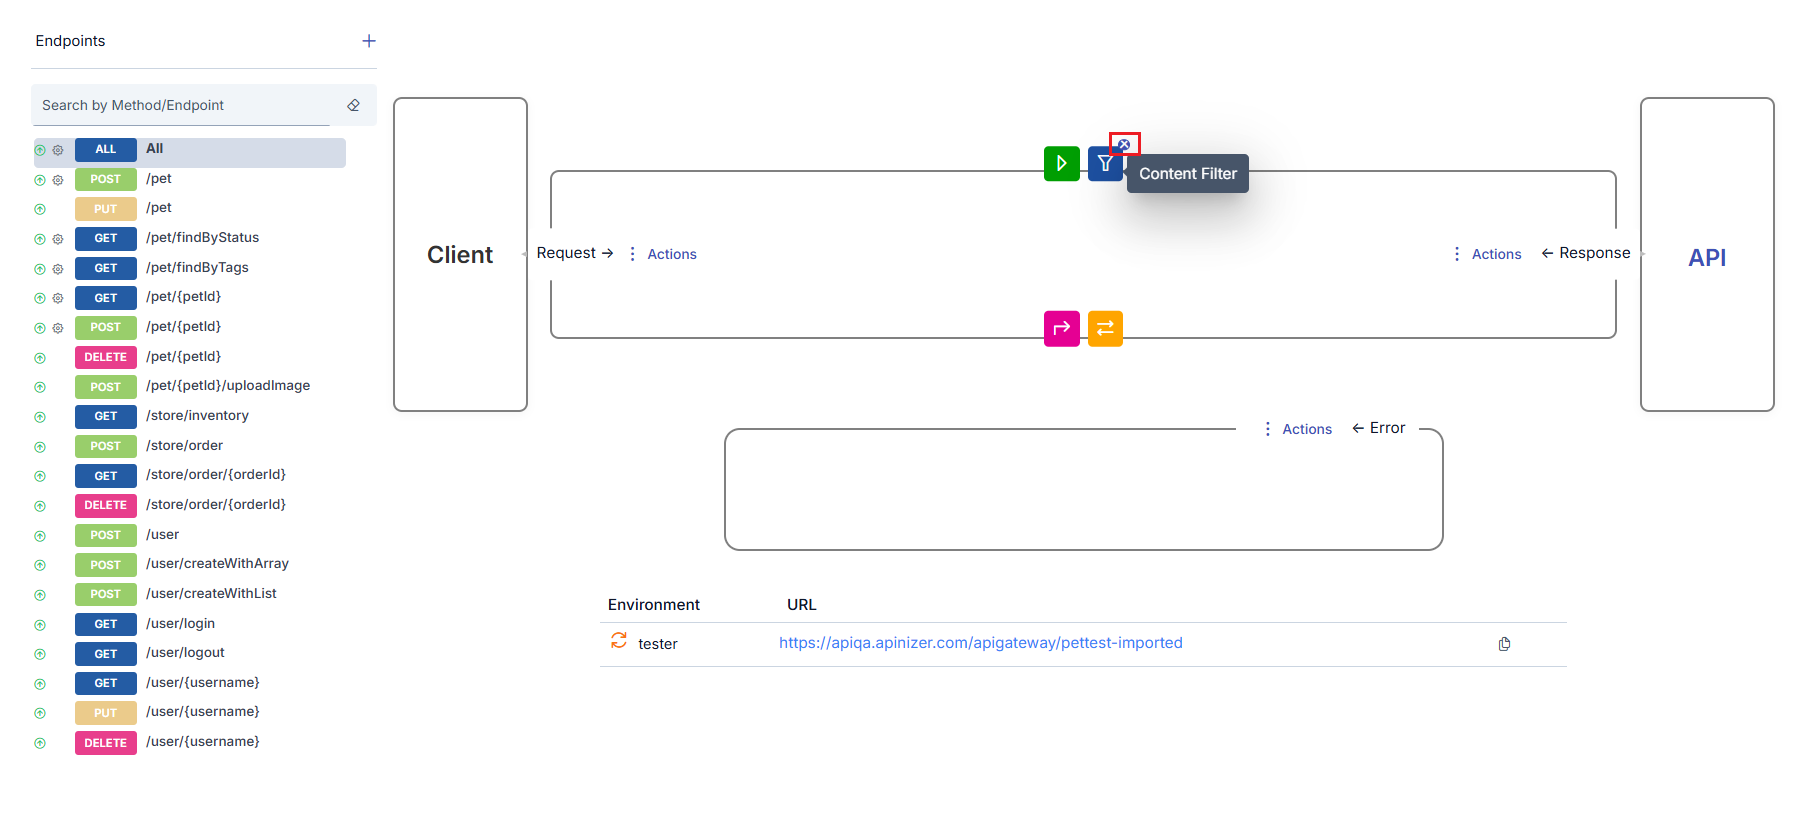 In policy deletion operations performed in the Development tab:
* If the policy is local, it is completely deleted
* If the policy is global, only its relationship with this method/endpoint or API Proxy is removed, the policy itself is not deleted. It can be added again later. If a global policy is to be completely deleted, the deletion operation must be performed from the [Policy Management](/en/develop/api-proxy-configuration/policy-management) interfaces.
## Policy Application Examples
### Example 1: Simple Message Processing
GET /api/v1/products
✓ Successful
✓ Successful
Request is sent to Backend API
✓ Successful
200 OK
### Example 2: Conditional Policy Application
POST /api/v1/products
✓ Successful
Based on Content-Type header:
In policy deletion operations performed in the Development tab:
* If the policy is local, it is completely deleted
* If the policy is global, only its relationship with this method/endpoint or API Proxy is removed, the policy itself is not deleted. It can be added again later. If a global policy is to be completely deleted, the deletion operation must be performed from the [Policy Management](/en/develop/api-proxy-configuration/policy-management) interfaces.
## Policy Application Examples
### Example 1: Simple Message Processing
GET /api/v1/products
✓ Successful
✓ Successful
Request is sent to Backend API
✓ Successful
200 OK
### Example 2: Conditional Policy Application
POST /api/v1/products
✓ Successful
Based on Content-Type header:
* If `application/json` → JSON Schema Validation ✓
* If `application/xml` → XML Schema Validation ✓
Request is sent to Backend API
✓ Successful
201 Created
### Example 3: Policy Application in Error Condition
GET /api/v1/products
✗ Token invalid
* Error Response Transformation
* Error Logging
401 Unauthorized
## Best Practices
* Run security policies first
* Leave heavy operations last
* Perform validation before transformation
* Optimize conditional policies
* Do data masking first
* Do transformation afterwards
* Leave logging last
* Consider performance
* Catch all errors
* Create user-friendly error messages
* Mask sensitive information
* Perform detailed logging
## Next Steps
Learn about the Policy concept
Learn about Routing and Upstream concepts
Learn about conditional policy execution