> ## Documentation Index
> Fetch the complete documentation index at: https://docs.apinizer.com/llms.txt
> Use this file to discover all available pages before exploring further.
# Spec Design Editor
> You can create new API Definition Documents (API Spec) by entering data through forms, import existing API Definition Documents, and update them. It supports OpenAPI 3.0.x and OpenAPI 2.x (Swagger) standards. You can use the API Definition Documents you create to create API Proxies.
## Spec Design Editor Concept
Spec Design Editor is the main tool used for creating, editing, and managing OpenAPI/Swagger specifications in API Designer's spec first approach. It creates new API Definition Documents (API Spec) by entering data through forms, imports and updates existing API Definition Documents. It supports OpenAPI 3.0.x and OpenAPI 2.x (Swagger) standards.
OpenAPI/Swagger specification is created first
API design starts with specification.
Data entry is made through forms
Creating and editing API Spec without writing code.
Existing API Specs can be imported
OpenAPI 3.0.x and Swagger 2.x support.
API Proxy is created from specification
Automatic API Proxy creation from API Spec.
For detailed explanation of information entered through the API Spec Editor, you can refer to the [OpenAPI Specification](https://swagger.io/specification/) address.
## Spec Design Editor Features
### OpenAPI/Swagger Specification
Creating and editing OpenAPI/Swagger specification in spec first approach:
* Creating empty API Spec
* Importing existing Spec
* URL or file upload
* Spec authorization support
* Defining Path (address)
* Determining HTTP method
* Operation management
* Parameter definitions
* Creating data model
* Importing shared data models
* Schema design
* Property management
### API Spec Management
Creation and management of API Definition Documents:
New API Spec is created
* Creating empty API
* Importing existing Spec
* Form-based editing
API Specs are edited and updated
* Overview management
* Endpoint and operation definitions
* Data model management
API Proxy is created from Spec
* Automatic API Proxy creation
* Using Spec as template
* Creating multiple API Proxies
## API Definition Document List
When the **Spec Design Editor** link is clicked from the main menu, the API Definition Document List is displayed.
 Filter fields are located at the top of the list. When filter fields are updated, the list content is also updated according to the filter.
## Creating API Definition Document
Used for designing a non-existent API or creating documentation for APIs developed with code-first approach that do not have any definition document.
A new API Definition Document can be created by clicking the **+ New (Create)** button in the upper right of the list interface.
Filter fields are located at the top of the list. When filter fields are updated, the list content is also updated according to the filter.
## Creating API Definition Document
Used for designing a non-existent API or creating documentation for APIs developed with code-first approach that do not have any definition document.
A new API Definition Document can be created by clicking the **+ New (Create)** button in the upper right of the list interface.
 There are two options when creating a new API Definition Document.
### Creating API Definition Document by Filling Form
When the new API Definition Document interface is opened, it is seen that **Blank API** option is selected by default among the two existing options.
There are two options when creating a new API Definition Document.
### Creating API Definition Document by Filling Form
When the new API Definition Document interface is opened, it is seen that **Blank API** option is selected by default among the two existing options.
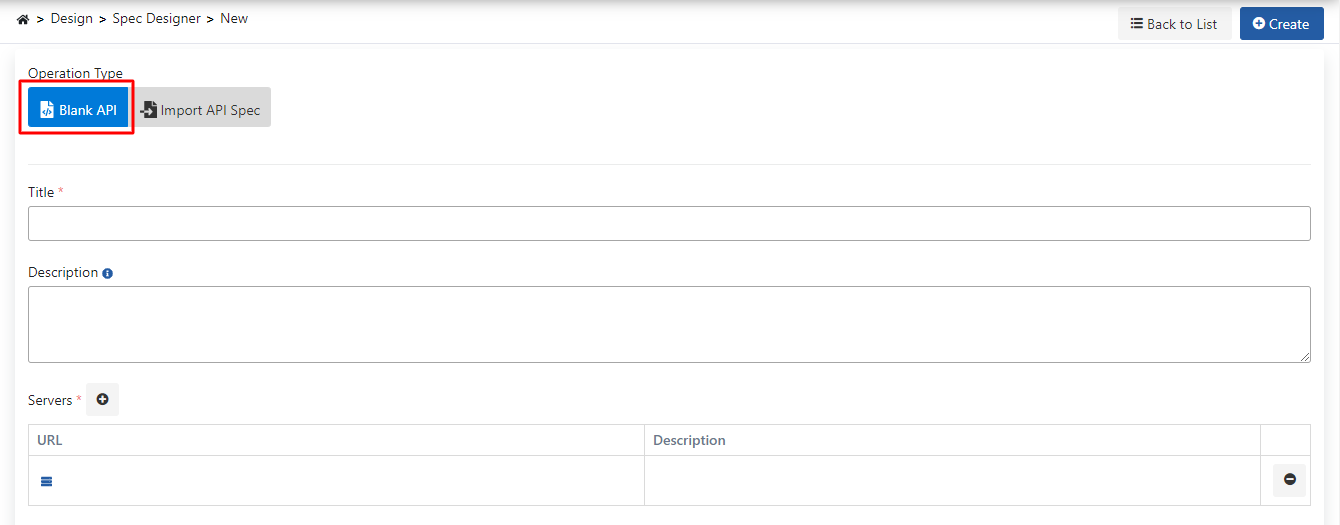 The fields used for the new API Definition Document interface are shown in the table below.
| Field | Description |
| ------------------------ | ---------------------------------------------------------------------------------------------------------------- |
| **Title** *(Title)* | The title/name of the API Definition File displayed in the list. Required and must be unique within the project. |
| **Description** | Description related to the API Definition File. Optional. |
| **Servers** *(Servers)* | List of servers that the API serves/will serve. |
| **Server - URL** | Address where the API can be accessed. Required. |
| **Server - Description** | Description related to this server. Optional. |
After filling the **Title (Title)** field and creating at least one server record in the **Servers (Servers)** section, the **Create** button in the upper right becomes clickable and the definition file can be saved by pressing this button. Operations that can be performed after the definition file is saved are explained in the [API Definition Document Update](#api-definition-document-update) section.
### Importing Existing API Definition Document
The second option that can be used to create a new API Definition Document is importing an existing API Definition Document. For this, the **Import API Spec** option is selected.
The fields used for the new API Definition Document interface are shown in the table below.
| Field | Description |
| ------------------------ | ---------------------------------------------------------------------------------------------------------------- |
| **Title** *(Title)* | The title/name of the API Definition File displayed in the list. Required and must be unique within the project. |
| **Description** | Description related to the API Definition File. Optional. |
| **Servers** *(Servers)* | List of servers that the API serves/will serve. |
| **Server - URL** | Address where the API can be accessed. Required. |
| **Server - Description** | Description related to this server. Optional. |
After filling the **Title (Title)** field and creating at least one server record in the **Servers (Servers)** section, the **Create** button in the upper right becomes clickable and the definition file can be saved by pressing this button. Operations that can be performed after the definition file is saved are explained in the [API Definition Document Update](#api-definition-document-update) section.
### Importing Existing API Definition Document
The second option that can be used to create a new API Definition Document is importing an existing API Definition Document. For this, the **Import API Spec** option is selected.
 Two standards are supported for import. These are [OpenAPI 3.0.x](https://swagger.io/specification/) and [OpenAPI 2.x (Swagger)](https://swagger.io/specification/v2/) standards.
There are **Enter URL** and **Upload File** options for importing a file compatible with the selected standard.
#### Use Spec Authorization
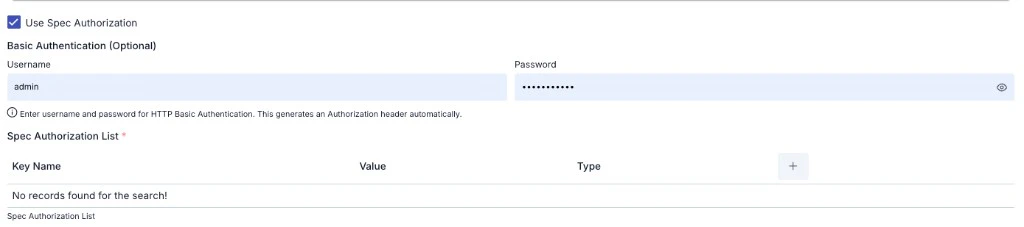
Some definition files check that the client is authorized to view their content. For this, authentication data must be sent in the HTTP request. If the definition file at the URL to be accessed is such a file, this box is checked and credentials are entered.
When **Use Spec Authorization** is checked, optional **Basic Authentication** fields and the **Spec Authorization List** table are shown; add authorization keys with Key Name, Value, and Type columns.
Two standards are supported for import. These are [OpenAPI 3.0.x](https://swagger.io/specification/) and [OpenAPI 2.x (Swagger)](https://swagger.io/specification/v2/) standards.
There are **Enter URL** and **Upload File** options for importing a file compatible with the selected standard.
#### Use Spec Authorization
Some definition files check that the client is authorized to view their content. For this, authentication data must be sent in the HTTP request. If the definition file at the URL to be accessed is such a file, this box is checked and credentials are entered.
When **Use Spec Authorization** is checked, optional **Basic Authentication** fields and the **Spec Authorization List** table are shown; add authorization keys with Key Name, Value, and Type columns.
 #### Entering URL
The address that can be accessed to the existing API Definition File is entered in the **URL** field and the **Parse** button is clicked.
#### File Upload
The upload button is clicked, the existing API Definition File is selected, and the **Parse** button is clicked.
In both methods, after the parsing operation, Title (Title), Description, and Servers (Servers) fields appear. Unlike creating an empty API, the values of these fields are taken from the imported API Definition File. After this stage, the **Create** button in the upper right becomes clickable and the definition file can be saved by pressing this button.
## API Definition Document Update
When a record's Title column value is clicked in the API Definition Document list or the menu button in the rightmost column of that record is clicked and **Edit** option is selected, the API Definition File update interface opens.
#### Entering URL
The address that can be accessed to the existing API Definition File is entered in the **URL** field and the **Parse** button is clicked.
#### File Upload
The upload button is clicked, the existing API Definition File is selected, and the **Parse** button is clicked.
In both methods, after the parsing operation, Title (Title), Description, and Servers (Servers) fields appear. Unlike creating an empty API, the values of these fields are taken from the imported API Definition File. After this stage, the **Create** button in the upper right becomes clickable and the definition file can be saved by pressing this button.
## API Definition Document Update
When a record's Title column value is clicked in the API Definition Document list or the menu button in the rightmost column of that record is clicked and **Edit** option is selected, the API Definition File update interface opens.
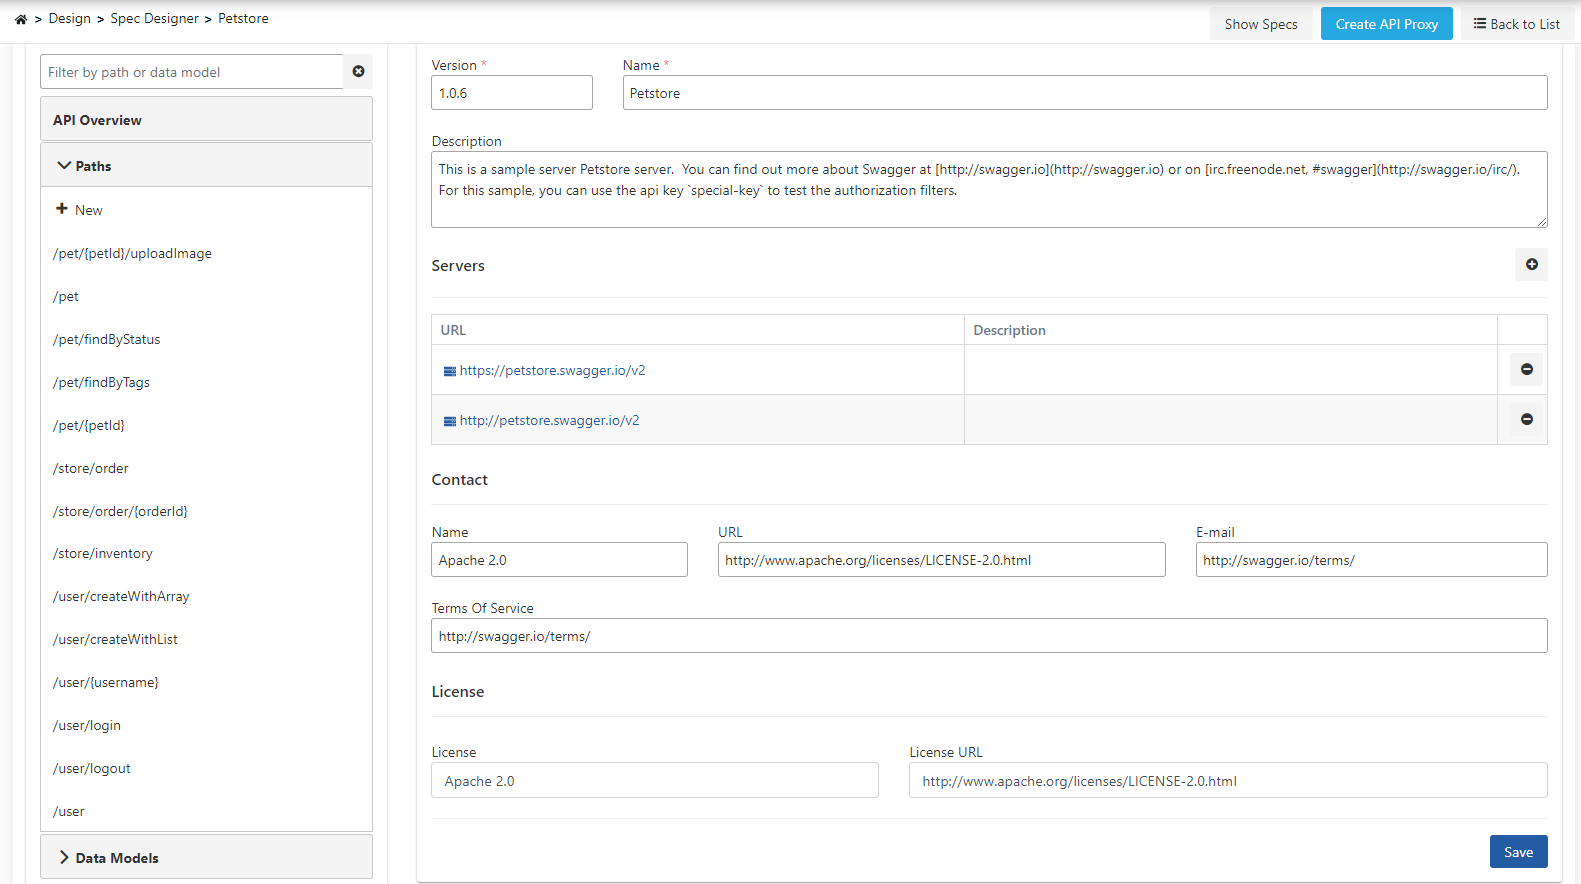
 The API Definition Document settings are shown in the following image:
 ### API Overview
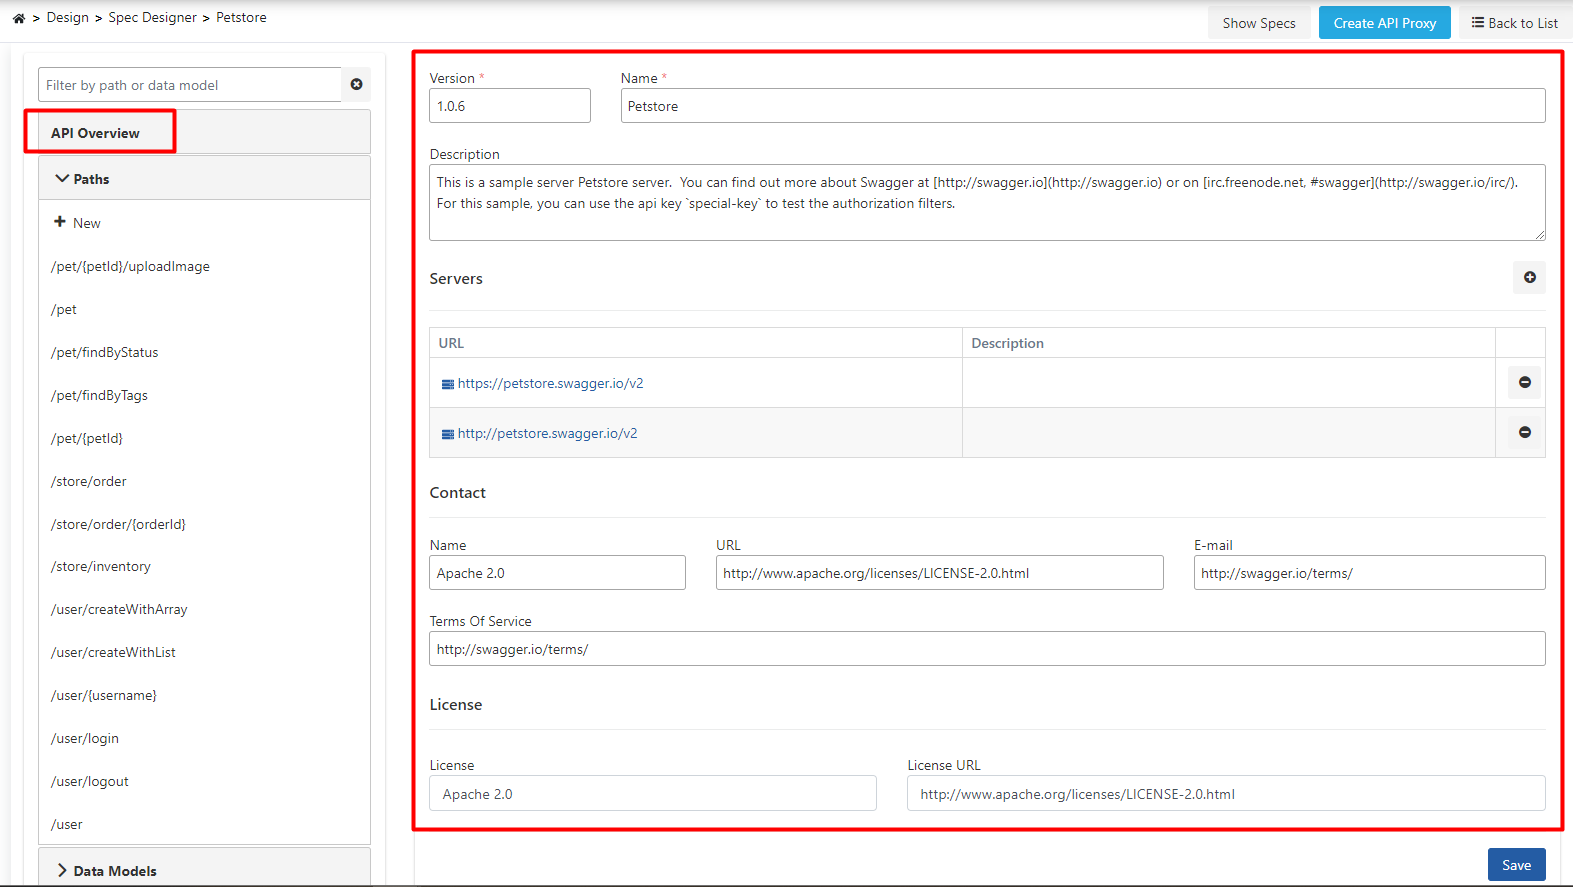
When the update interface is first opened, **API Overview** opens. The Overview link is on the left side of the interface.
### API Overview
When the update interface is first opened, **API Overview** opens. The Overview link is on the left side of the interface.
 ### Paths
Right below the Overview link, there is the **Paths** section.
### Paths
Right below the Overview link, there is the **Paths** section.
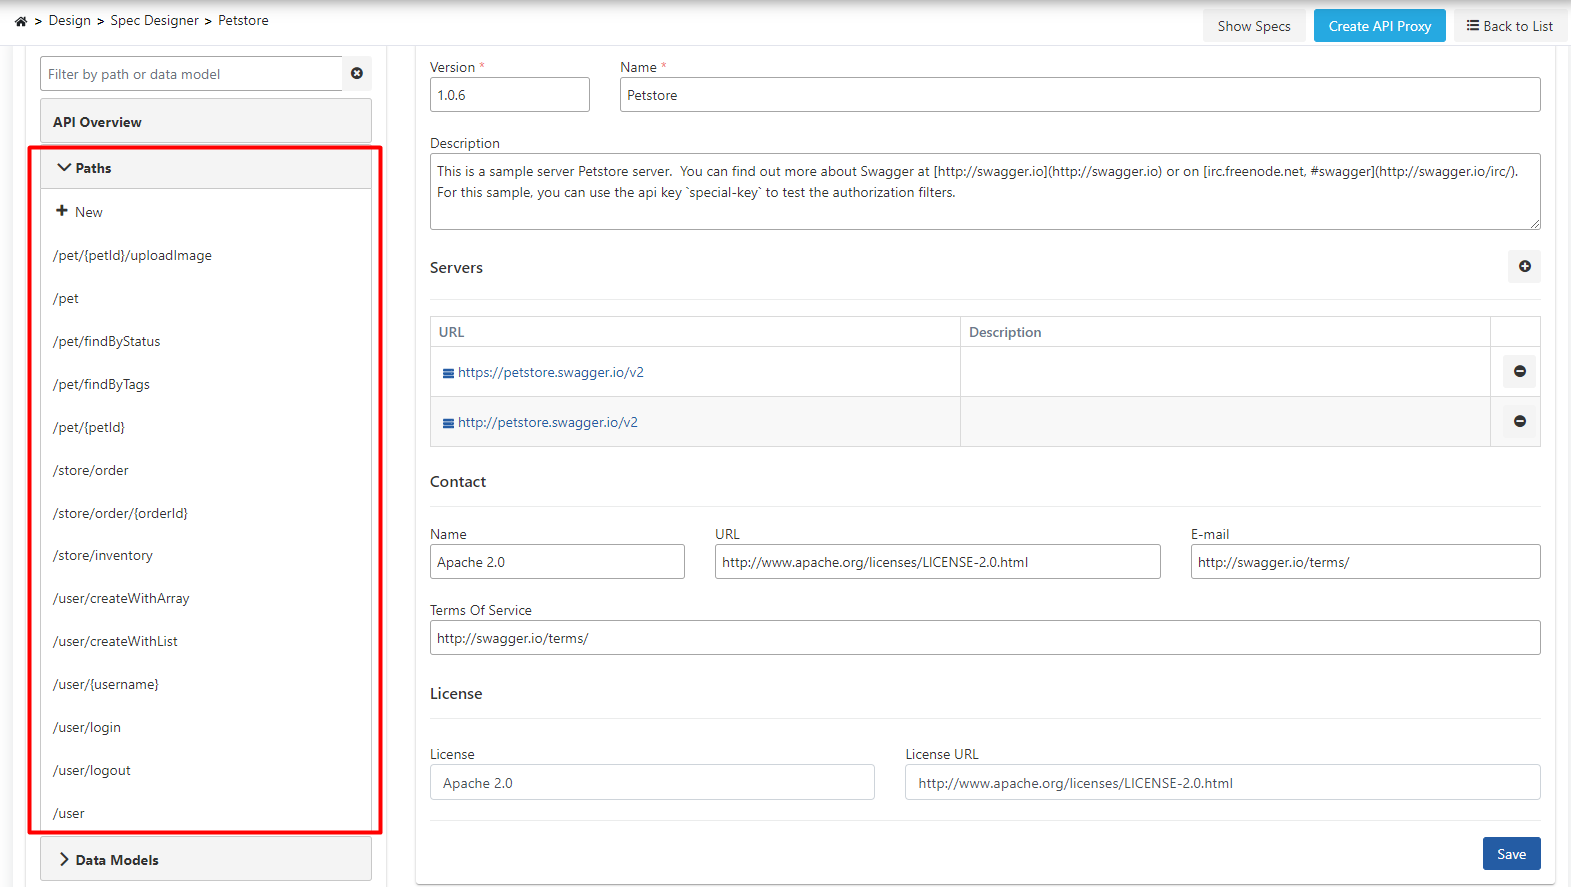 **Path** is the name given to each of the addresses where requests can be sent to an API.
#### Adding Path
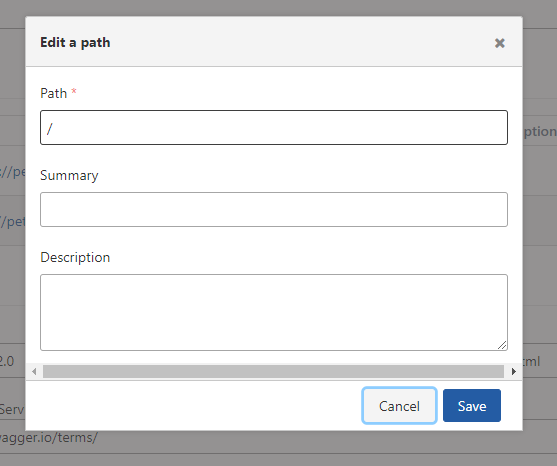
To add a new one to the API's addresses, click the **+ New** button under the title of the Paths section.
**Path** is the name given to each of the addresses where requests can be sent to an API.
#### Adding Path
To add a new one to the API's addresses, click the **+ New** button under the title of the Paths section.
 In the window that opens, enter the address to be added and click the **Save** button.
 #### Deleting Path
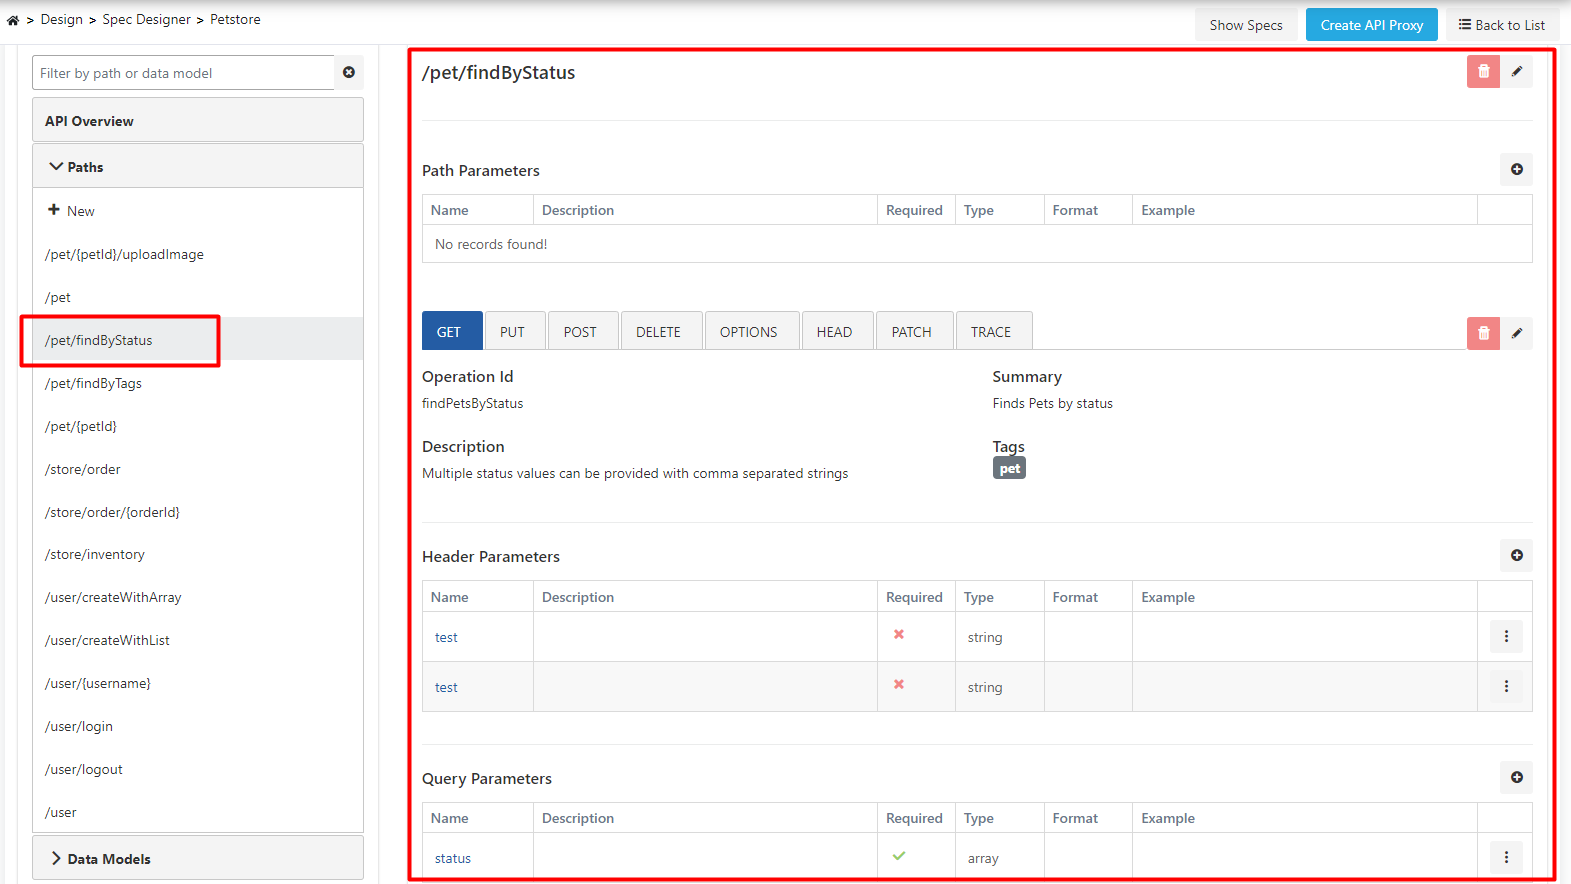
When any of the addresses in the list is clicked, that address is selected and a section where details related to that address can be managed is displayed on the right. The address can be deleted by clicking the **Delete** button in the upper right of this section.
#### Deleting Path
When any of the addresses in the list is clicked, that address is selected and a section where details related to that address can be managed is displayed on the right. The address can be deleted by clicking the **Delete** button in the upper right of this section.
 #### Updating Path
When any of the addresses in the list is clicked, that address is selected and a section where details related to that address can be managed is displayed on the right.
#### Updating Path
When any of the addresses in the list is clicked, that address is selected and a section where details related to that address can be managed is displayed on the right.
 ##### Changing Path
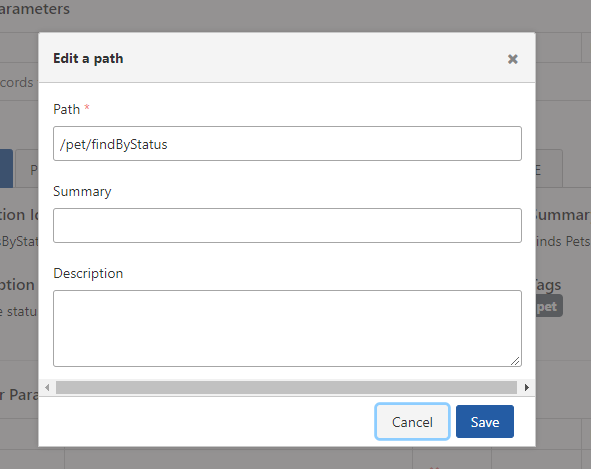
At the top right, the address is displayed as a link. When the **Edit** button next to this link is clicked, the address can be updated from the window that opens.
##### Changing Path
At the top right, the address is displayed as a link. When the **Edit** button next to this link is clicked, the address can be updated from the window that opens.
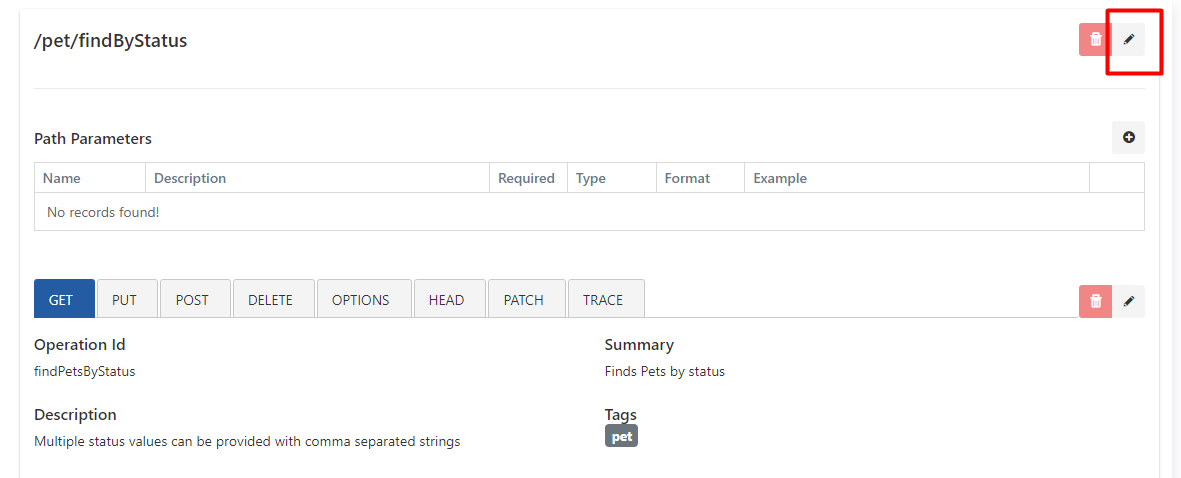 The path editing settings are shown in the following image:
 ##### Operations
When a **Path** is selected, a section where **Operations** defined for that address can be managed appears on the right side of the interface.
**Operation**: Consists of each valid HTTP Method through which an API accepts requests on its defined addresses, along with identity and identifier information, parameters, request and response contents related to this method.
When any address is selected, the first of the **Operations** defined for that address is displayed as selected.
The selected operation is indicated by a thin blue line at the bottom of the box containing the HTTP Method name.
In the above image, it is seen that the /pet/findByStatus address has been selected by the user, and the **Get** operation defined at this address has also been automatically selected and its detail is displayed.
###### Identity and Identification Fields
The fields used for Identity and Identification Fields are shown in the table below.
| Field | Description |
| --------------------------------- | --------------------------------------------------------------------------------------------------------------------------------------------------------------------------------------------------------------------------------------------------------------------- |
| **Summary** *(Summary)* | Brief information about what the operation does. Optional. |
| **Operation ID** *(Operation ID)* | Unique key of the operation.
##### Operations
When a **Path** is selected, a section where **Operations** defined for that address can be managed appears on the right side of the interface.
**Operation**: Consists of each valid HTTP Method through which an API accepts requests on its defined addresses, along with identity and identifier information, parameters, request and response contents related to this method.
When any address is selected, the first of the **Operations** defined for that address is displayed as selected.
The selected operation is indicated by a thin blue line at the bottom of the box containing the HTTP Method name.
In the above image, it is seen that the /pet/findByStatus address has been selected by the user, and the **Get** operation defined at this address has also been automatically selected and its detail is displayed.
###### Identity and Identification Fields
The fields used for Identity and Identification Fields are shown in the table below.
| Field | Description |
| --------------------------------- | --------------------------------------------------------------------------------------------------------------------------------------------------------------------------------------------------------------------------------------------------------------------- |
| **Summary** *(Summary)* | Brief information about what the operation does. Optional. |
| **Operation ID** *(Operation ID)* | Unique key of the operation.
• Must be unique among all operations of the API.
• Case-sensitive.
• Since tools and libraries can use this value to uniquely identify an operation, following common programming naming conventions is **RECOMMENDED**. |
| **Description** | Detailed description of the operation behavior. Optional. |
| **Tags** *(Tags)* | Tags can be used to logically group operations by resources or other qualifiers. Optional. Multiple can be added. |
###### Header Parameters
This is the section where headers that can be sent to the Operation are managed.
 ###### Query Parameters
This is the section where query parameters that the Operation can receive are managed.
###### Query Parameters
This is the section where query parameters that the Operation can receive are managed.
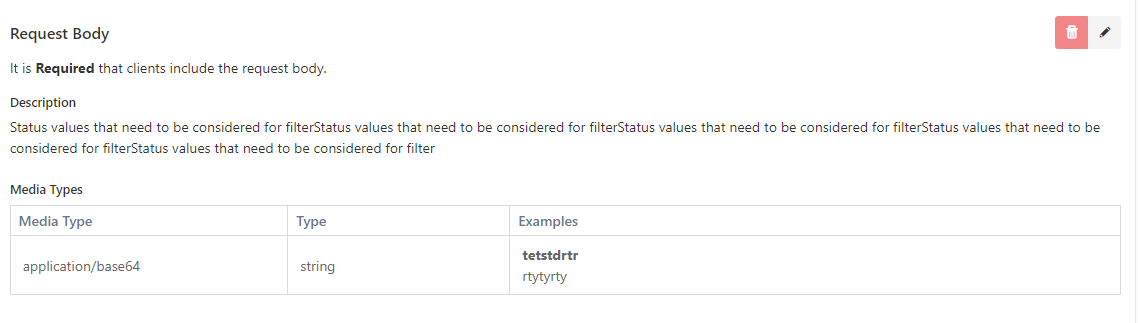
 ###### Request Body
This is the section where example request bodies for the Operation can be managed. Example request bodies can be defined for one or more **Media Types**.
###### Request Body
This is the section where example request bodies for the Operation can be managed. Example request bodies can be defined for one or more **Media Types**.
 ###### Responses
This is the section where **Responses** that can be returned for this Operation can be managed.
Each response consists of an **HTTP Status Code**, description of that status code, and **Response Body** created for one or more **Media Types**.
Apinizer allows defining multiple possible response bodies for a **Media Type** and under which conditions they can be returned.
The following are seen in the image below:
* 200 and 400 codes can be returned for this Operation.
* For 200 code, responses can be returned from two different Media Types: application/json or application/xml.
* For application/json Media Type, if the value of the **status** parameter is "pending", a response body similar to the first row will be returned, if "sold", a response body similar to the second row will be returned.
###### Responses
This is the section where **Responses** that can be returned for this Operation can be managed.
Each response consists of an **HTTP Status Code**, description of that status code, and **Response Body** created for one or more **Media Types**.
Apinizer allows defining multiple possible response bodies for a **Media Type** and under which conditions they can be returned.
The following are seen in the image below:
* 200 and 400 codes can be returned for this Operation.
* For 200 code, responses can be returned from two different Media Types: application/json or application/xml.
* For application/json Media Type, if the value of the **status** parameter is "pending", a response body similar to the first row will be returned, if "sold", a response body similar to the second row will be returned.
 ###### Adding Operation
When a Path is selected, Operations defined for that Path are displayed with their related HTTP Methods colored. HTTP Methods that are not colored mean that no Operation has been defined for them yet. If an Operation is desired to be defined for any of these, the desired HTTP Method is selected. With this selection, it is seen that no Operation has been defined yet. Operation can be added for the selected method by pressing the **Add Operation** button.
###### Adding Operation
When a Path is selected, Operations defined for that Path are displayed with their related HTTP Methods colored. HTTP Methods that are not colored mean that no Operation has been defined for them yet. If an Operation is desired to be defined for any of these, the desired HTTP Method is selected. With this selection, it is seen that no Operation has been defined yet. Operation can be added for the selected method by pressing the **Add Operation** button.
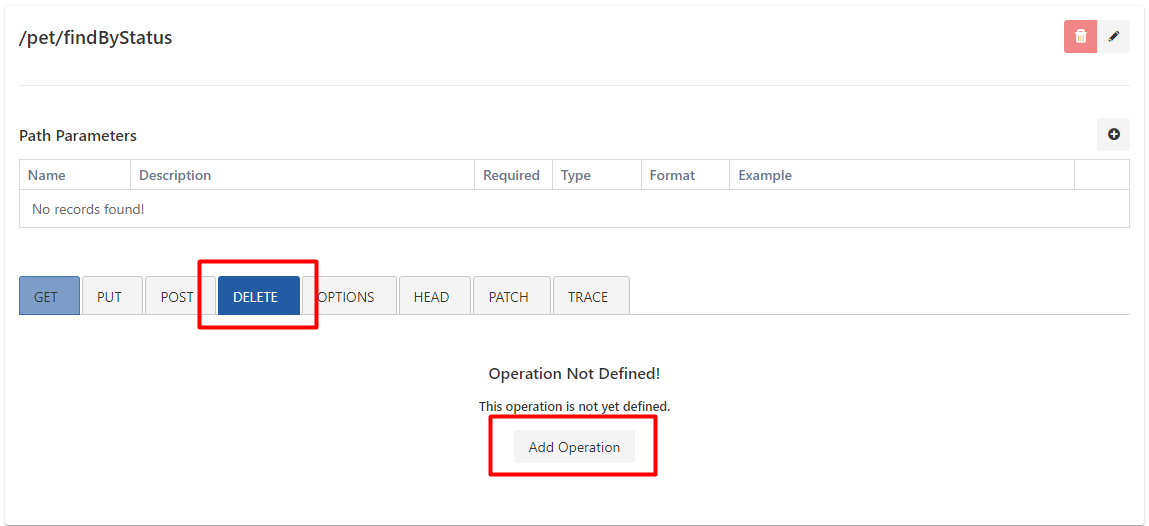 ###### Deleting Operation
When an Operation is selected, a **Delete** button appears on the right side of the window. The selected Operation can be deleted by clicking this button. In the image below, the Delete operation is selected and the Delete button that will be used to delete this operation is seen.
###### Deleting Operation
When an Operation is selected, a **Delete** button appears on the right side of the window. The selected Operation can be deleted by clicking this button. In the image below, the Delete operation is selected and the Delete button that will be used to delete this operation is seen.
 ### Data Models
At the bottom of the left side of the interface, data types used by this API that are not standard primitive types are displayed.
### Data Models
At the bottom of the left side of the interface, data types used by this API that are not standard primitive types are displayed.
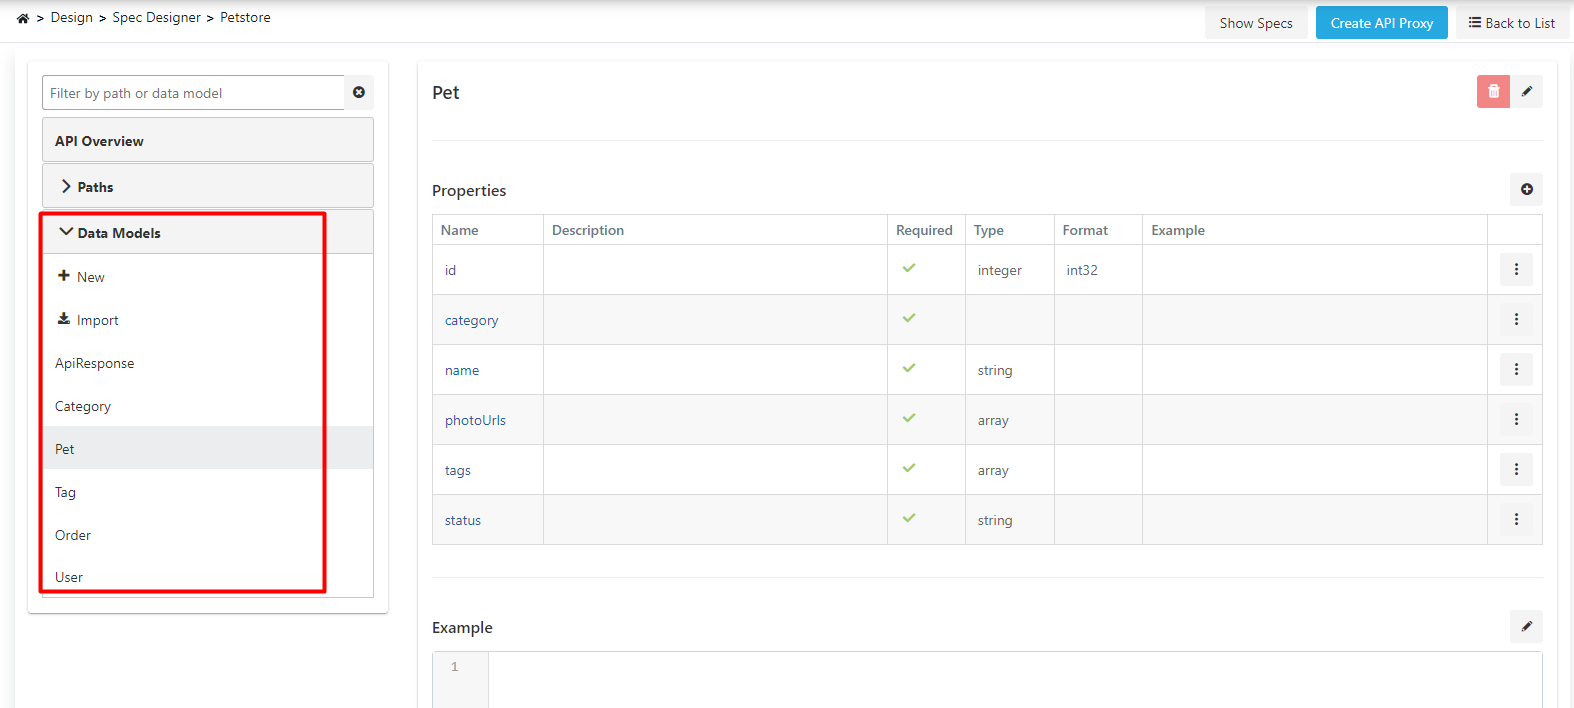 #### Adding Data Model
To add a new data model, click the **+ New** button under the title of the section.
#### Adding Data Model
To add a new data model, click the **+ New** button under the title of the section.
 In the window that opens, enter the name and description of the data model and click the **Save** button.
#### Importing Data Model
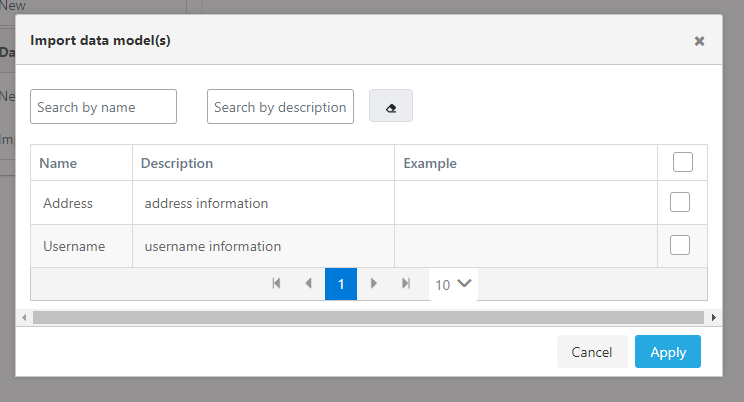
Models added through the Shared Query Model page can be imported into Data Models within the Spec.
In the window that opens, enter the name and description of the data model and click the **Save** button.
#### Importing Data Model
Models added through the Shared Query Model page can be imported into Data Models within the Spec.
 #### Deleting Data Model
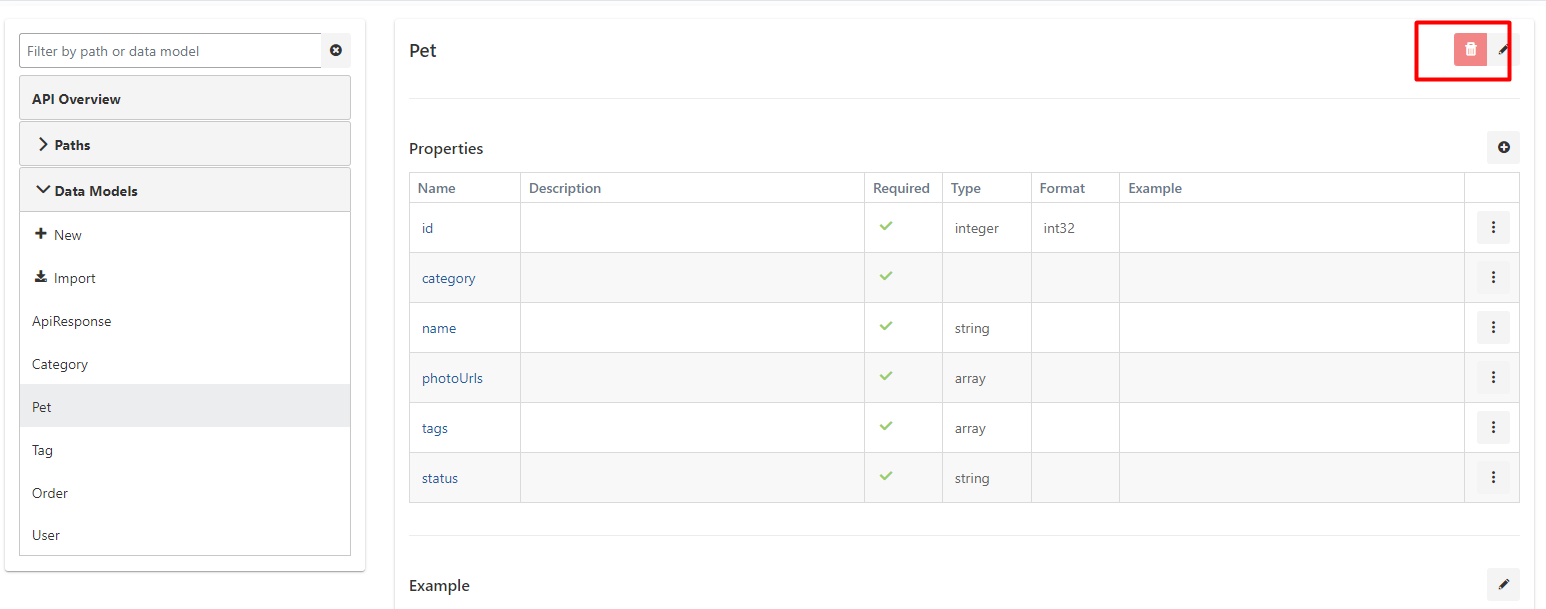
When any data model is clicked, its detail is displayed on the right. The data model can be deleted by clicking the **Delete** button in the upper right of this section that opens.
#### Deleting Data Model
When any data model is clicked, its detail is displayed on the right. The data model can be deleted by clicking the **Delete** button in the upper right of this section that opens.
 #### Updating Data Model
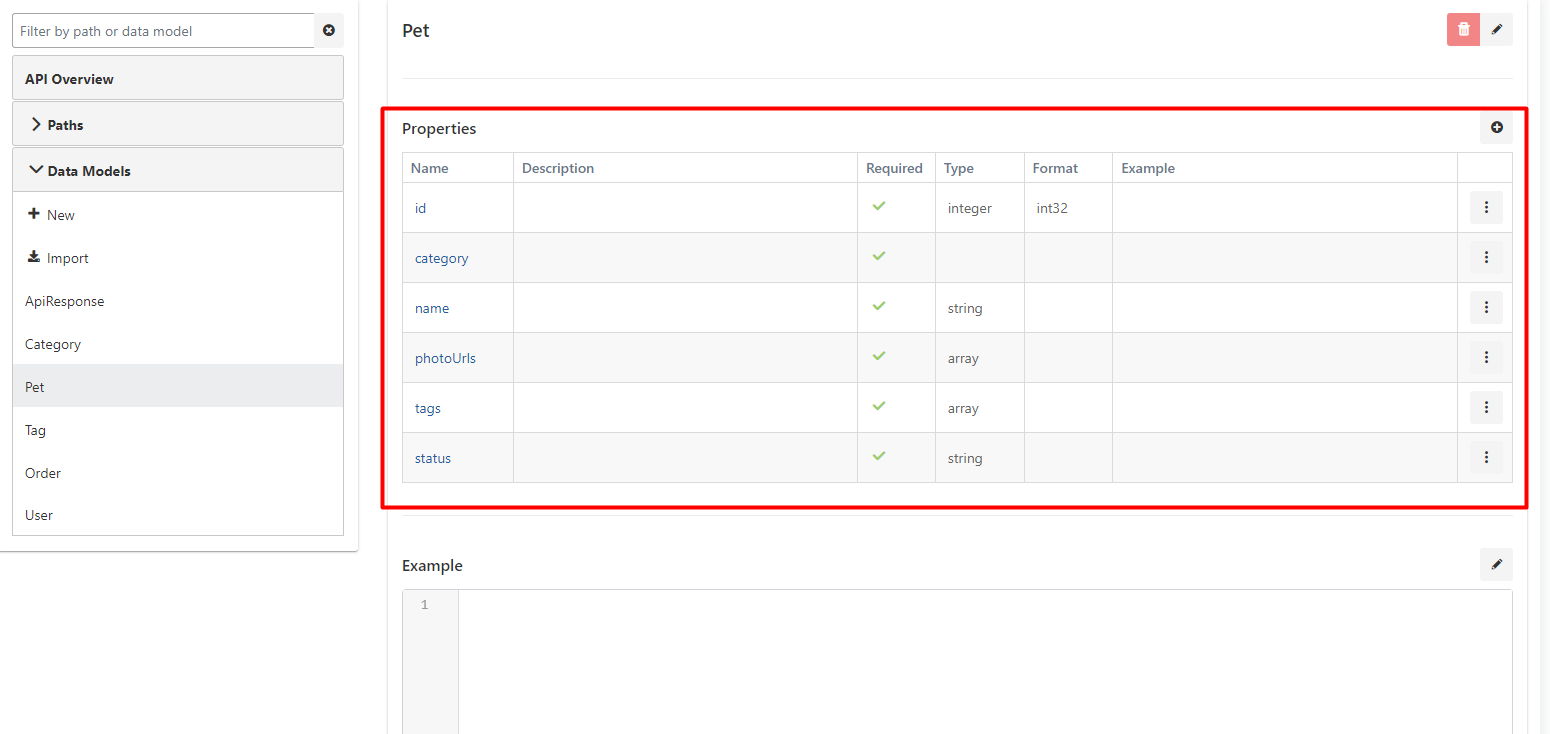
When any data model is clicked, its detail is displayed on the right. This section contains the data model's name, description, and properties.
##### Changing Data Model Name
When the **Edit** icon next to the data model's name is clicked, a text box opens where the name can be updated. The desired change is made in this field.
#### Updating Data Model
When any data model is clicked, its detail is displayed on the right. This section contains the data model's name, description, and properties.
##### Changing Data Model Name
When the **Edit** icon next to the data model's name is clicked, a text box opens where the name can be updated. The desired change is made in this field.
 ##### Properties
Each of the sub-fields of the data model is called a **Property**. A data model can be seen as a Class in Object-Oriented Programming, and a property as a property or attribute within this class.
##### Properties
Each of the sub-fields of the data model is called a **Property**. A data model can be seen as a Class in Object-Oriented Programming, and a property as a property or attribute within this class.
 ###### Adding Property
When the **+** button at the far right of the row containing column headers of the table containing properties is clicked, a window opens where a new property can be entered.
###### Adding Property
When the **+** button at the far right of the row containing column headers of the table containing properties is clicked, a window opens where a new property can be entered.
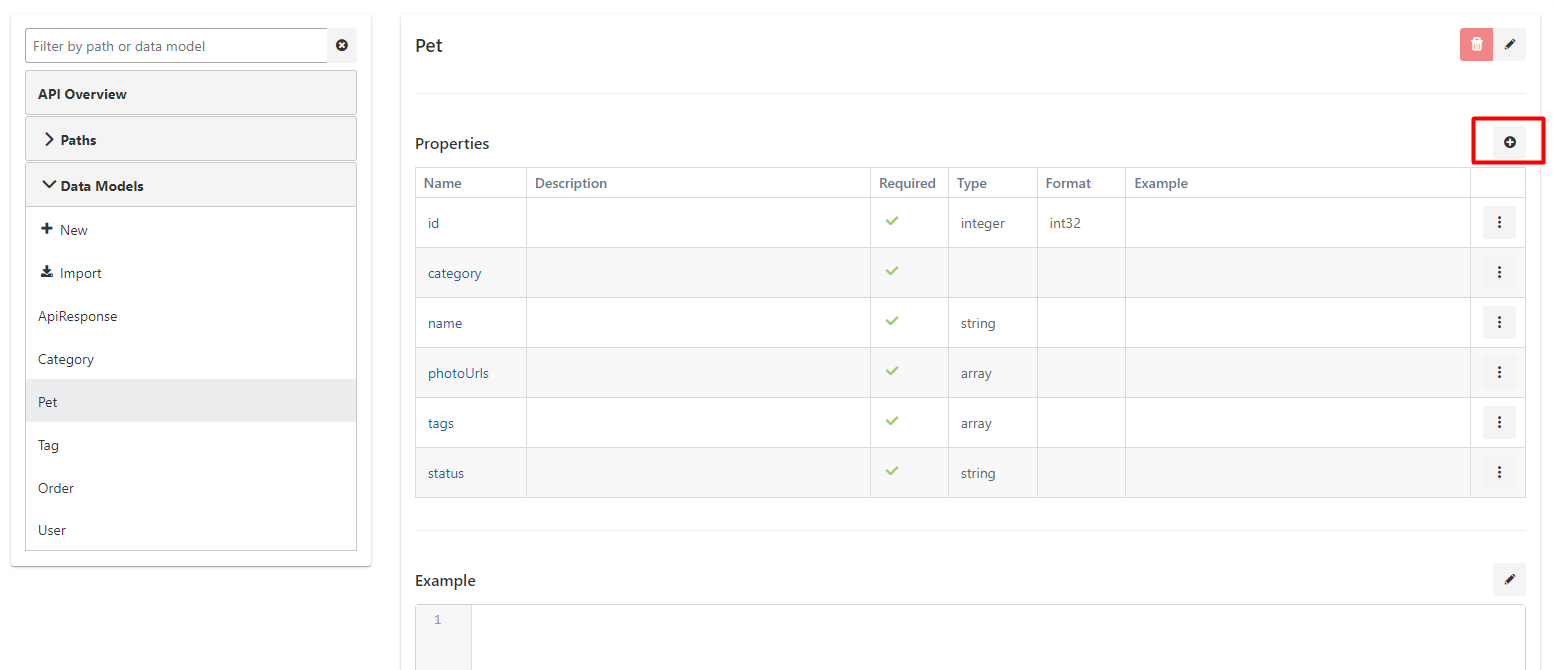 Fill in the data fields in the window that opens and click the **Save** button.
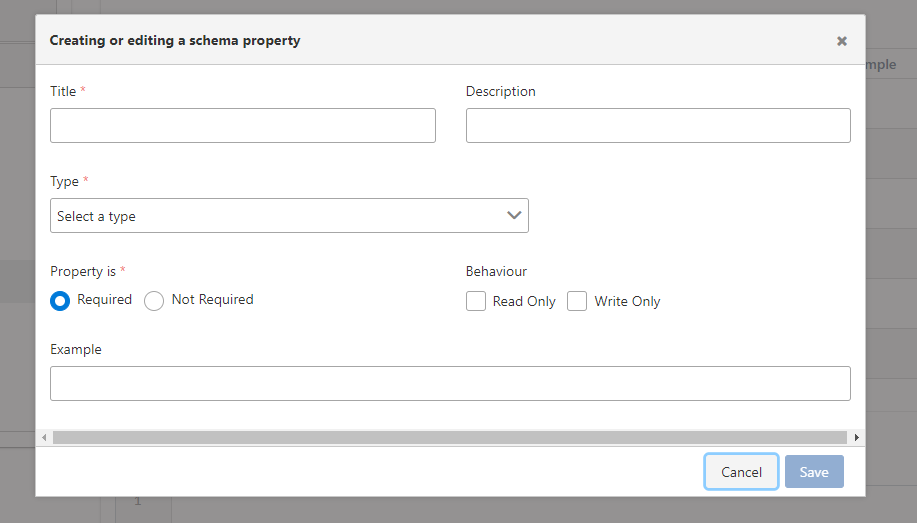 The fields used to add a property are shown in the table below.
| Field | Description |
| ------------------------- | -------------------------------------------------------------------------------------------------- |
| **Name** | The name of the property. Required and must be unique within all Properties of the Data Model. |
| **Description** | Description about what the property is and how it will be used. Optional field. |
| **Required** *(Required)* | Specifies whether having a value for this property is required. |
| **Type** | The type of the property. Basic types or types defined within the API can be used. Required field. |
###### Deleting Property
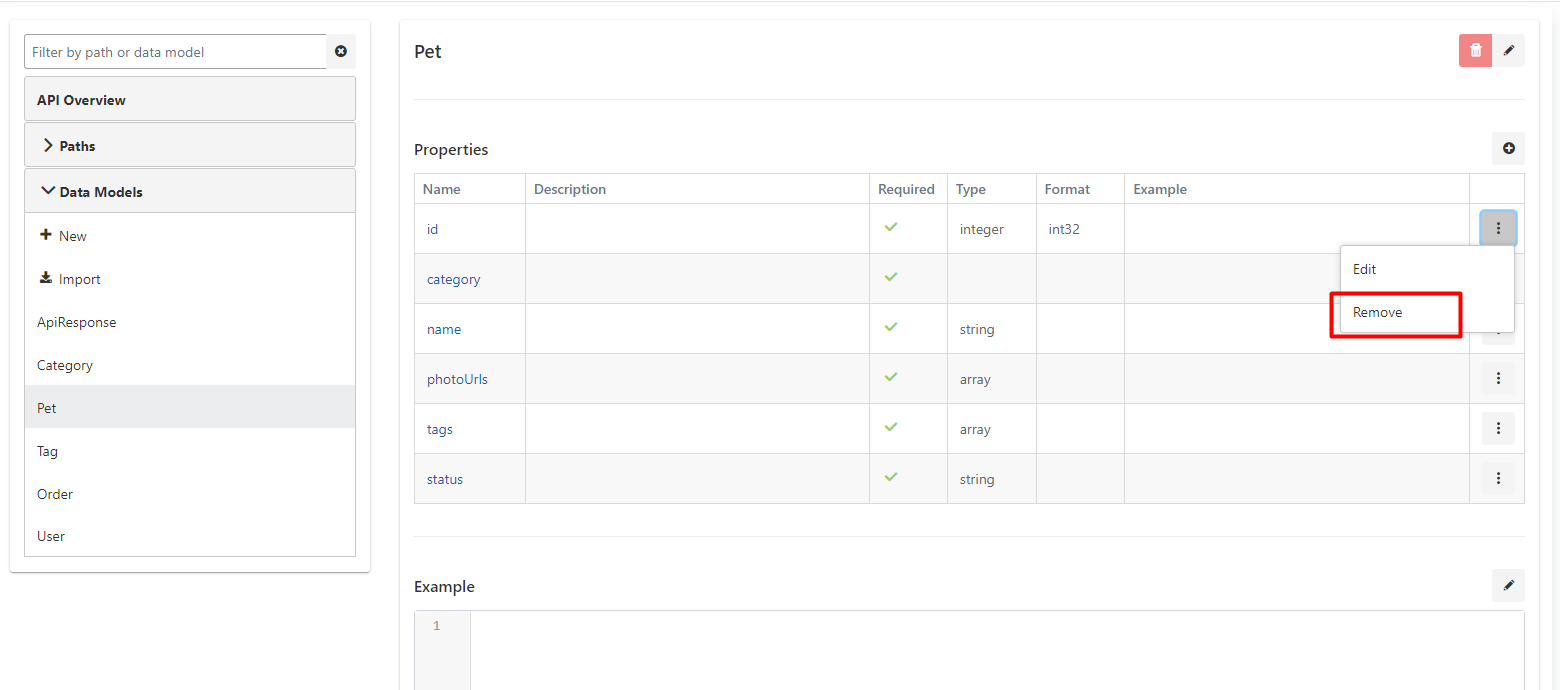
In the menu at the end of each property's row in the properties table, there is a **Remove** button that can be used to delete that property.
The fields used to add a property are shown in the table below.
| Field | Description |
| ------------------------- | -------------------------------------------------------------------------------------------------- |
| **Name** | The name of the property. Required and must be unique within all Properties of the Data Model. |
| **Description** | Description about what the property is and how it will be used. Optional field. |
| **Required** *(Required)* | Specifies whether having a value for this property is required. |
| **Type** | The type of the property. Basic types or types defined within the API can be used. Required field. |
###### Deleting Property
In the menu at the end of each property's row in the properties table, there is a **Remove** button that can be used to delete that property.
 ###### Updating Property
If the value in the Name column of any property is clicked, the window where that property can be updated opens. After updates are made, the update operation is completed by pressing the **Save** button.
## Deleting API Definition Document
A record can be deleted by clicking the menu button in the rightmost column of the record to be deleted in the API Definition Document list and selecting **Remove**.
###### Updating Property
If the value in the Name column of any property is clicked, the window where that property can be updated opens. After updates are made, the update operation is completed by pressing the **Save** button.
## Deleting API Definition Document
A record can be deleted by clicking the menu button in the rightmost column of the record to be deleted in the API Definition Document list and selecting **Remove**.
 ## API Proxy Creation
An API Proxy can be created using this API Spec by clicking the **Create API Proxy** button in the update interface of the API Definition Document.
## API Proxy Creation
An API Proxy can be created using this API Spec by clicking the **Create API Proxy** button in the update interface of the API Definition Document.
 When creating an API Proxy using the API Definition File, the definitions in the definition file are used as a template for the API Proxy. After the API Proxy is created, changes made to the definition file through the Spec Design Editor do not affect the API Proxy, and changes made from the Design tab of the API Proxy do not affect the API Definition File.
Multiple API Proxies can be created using one API Definition File.
## Spec Design Editor Usage Scenarios
API development scenarios with spec first approach:
1. Creating empty API Spec
2. Defining endpoints and operations
3. Creating data models
4. Validating specification
5. Creating API Proxy from Spec
6. Automatic documentation generation
1. Importing existing API Spec
2. Editing and updating specification
3. Improving endpoints and data models
4. Adding examples and descriptions
5. Creating API Proxy from Spec
## Relationship Between Spec Design Editor and API Designer
Spec Design Editor plays a central role in API Designer's spec first approach. Workflow:
```
Spec Design Editor
│
│ OpenAPI/Swagger Spec
│ (Spec First)
│
▼
Shared Data Models
│
│ Model Import
│ $ref References
│
▼
API Spec
│
│ Creating API Proxy from Spec
│
▼
API Proxy
│
│ Configuration
│
▼
API Gateway
```
OpenAPI/Swagger specification is created in Spec Design Editor
Creating Spec with empty API or import.
Paths and operations are defined
HTTP methods, parameters, and responses are managed.
Data models are created or imported
Shared data models can be used.
API Proxy is created from Spec
Automatic API Proxy creation and configuration.
This integration between Spec Design Editor and API Designer provides a seamless process from API design to deployment with spec first approach. Specification is created first, then API Proxy and documentation are automatically generated from this specification.
## Spec Design Editor Advantages
Advantages provided by spec first approach:
* API design starts with specification
* Standard OpenAPI/Swagger format
* API design without writing code
* Easy editing through forms
* Management with visual interface
* Validation and error checking
* Creating API Proxy from specification
* Automatic documentation generation
* Consistent API structure
* Compliance with OpenAPI/Swagger standards
* OpenAPI 3.0.x and Swagger 2.x support
* Interoperability and tool support
## Next Steps
Creating shared data models
Creating API Proxy from API Definition Documents
Quick start guide
Learn about the API Designer component
When creating an API Proxy using the API Definition File, the definitions in the definition file are used as a template for the API Proxy. After the API Proxy is created, changes made to the definition file through the Spec Design Editor do not affect the API Proxy, and changes made from the Design tab of the API Proxy do not affect the API Definition File.
Multiple API Proxies can be created using one API Definition File.
## Spec Design Editor Usage Scenarios
API development scenarios with spec first approach:
1. Creating empty API Spec
2. Defining endpoints and operations
3. Creating data models
4. Validating specification
5. Creating API Proxy from Spec
6. Automatic documentation generation
1. Importing existing API Spec
2. Editing and updating specification
3. Improving endpoints and data models
4. Adding examples and descriptions
5. Creating API Proxy from Spec
## Relationship Between Spec Design Editor and API Designer
Spec Design Editor plays a central role in API Designer's spec first approach. Workflow:
```
Spec Design Editor
│
│ OpenAPI/Swagger Spec
│ (Spec First)
│
▼
Shared Data Models
│
│ Model Import
│ $ref References
│
▼
API Spec
│
│ Creating API Proxy from Spec
│
▼
API Proxy
│
│ Configuration
│
▼
API Gateway
```
OpenAPI/Swagger specification is created in Spec Design Editor
Creating Spec with empty API or import.
Paths and operations are defined
HTTP methods, parameters, and responses are managed.
Data models are created or imported
Shared data models can be used.
API Proxy is created from Spec
Automatic API Proxy creation and configuration.
This integration between Spec Design Editor and API Designer provides a seamless process from API design to deployment with spec first approach. Specification is created first, then API Proxy and documentation are automatically generated from this specification.
## Spec Design Editor Advantages
Advantages provided by spec first approach:
* API design starts with specification
* Standard OpenAPI/Swagger format
* API design without writing code
* Easy editing through forms
* Management with visual interface
* Validation and error checking
* Creating API Proxy from specification
* Automatic documentation generation
* Consistent API structure
* Compliance with OpenAPI/Swagger standards
* OpenAPI 3.0.x and Swagger 2.x support
* Interoperability and tool support
## Next Steps
Creating shared data models
Creating API Proxy from API Definition Documents
Quick start guide
Learn about the API Designer component