> ## Documentation Index
> Fetch the complete documentation index at: https://docs.apinizer.com/llms.txt
> Use this file to discover all available pages before exploring further.
# API Proxy Metadata Information
> You can manage the basic settings and general information of the API Proxy, configure Client Route, manage API Proxy Keys, and view version information.
## General Information Tab
This tab contains general settings related to the selected [API Proxy](/en/concepts/core-concepts/what-is-api-proxy).
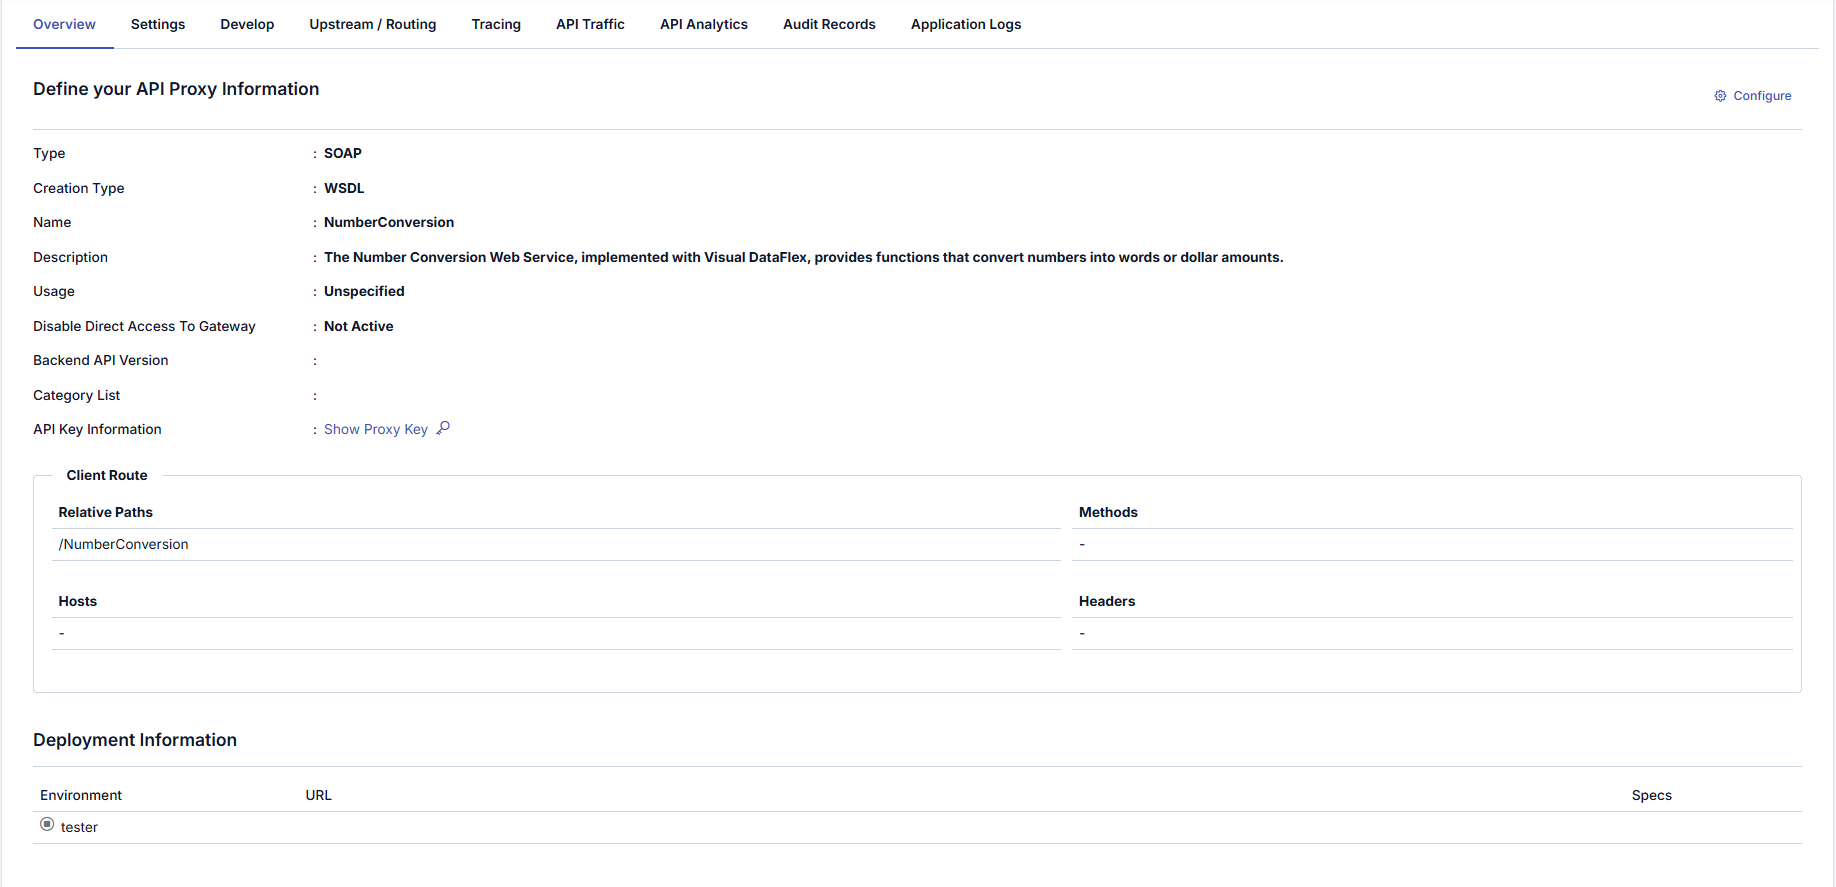 If the related API Proxy is part of a Group, you can click on the **API Proxy Group Enabled** link to navigate to the Group screen that the API Proxy belongs to.
## Configuration
By clicking the **Configure** button, the basic information of the API Proxy can be configured in the dialog screen that opens.
If the related API Proxy is part of a Group, you can click on the **API Proxy Group Enabled** link to navigate to the Group screen that the API Proxy belongs to.
## Configuration
By clicking the **Configure** button, the basic information of the API Proxy can be configured in the dialog screen that opens.
 ### Configuration Fields
| Field | Description |
| ------------------------------------ | ---------------------------------------------------------------------------------------------------------------------------------------------------------------------------------------------------------------------------------------------------------------- |
| **Name** | The name given to the API Proxy by the user. This value must be unique within the [project](/en/concepts/core-concepts/what-is-project). |
| **Description** | The description text of the API Proxy. Information about the purpose, business logic, or functions provided by the Proxy is written here. |
| **Disable Direct Access To Gateway** | When this option is enabled, direct access to the Backend service is blocked. The service can only be accessed through the API Proxy. |
| **Client Route** | The section that determines which path, method, and criteria incoming requests to the API will be routed. For detailed information, you can refer to the [Client Route](/en/concepts/core-concepts/client-route) page. |
| **Backend API Version** | The field where the Backend API version that the API Proxy corresponds to is entered. This value is important for information and version management. |
| **Category List** | Used to classify API Proxies. For example: Finance, CRM, Notification, Integration. Category selection helps API Portal users find APIs more easily. |
| **Usage** | Specifies the usage type of the API Proxy. Options:
### Configuration Fields
| Field | Description |
| ------------------------------------ | ---------------------------------------------------------------------------------------------------------------------------------------------------------------------------------------------------------------------------------------------------------------- |
| **Name** | The name given to the API Proxy by the user. This value must be unique within the [project](/en/concepts/core-concepts/what-is-project). |
| **Description** | The description text of the API Proxy. Information about the purpose, business logic, or functions provided by the Proxy is written here. |
| **Disable Direct Access To Gateway** | When this option is enabled, direct access to the Backend service is blocked. The service can only be accessed through the API Proxy. |
| **Client Route** | The section that determines which path, method, and criteria incoming requests to the API will be routed. For detailed information, you can refer to the [Client Route](/en/concepts/core-concepts/client-route) page. |
| **Backend API Version** | The field where the Backend API version that the API Proxy corresponds to is entered. This value is important for information and version management. |
| **Category List** | Used to classify API Proxies. For example: Finance, CRM, Notification, Integration. Category selection helps API Portal users find APIs more easily. |
| **Usage** | Specifies the usage type of the API Proxy. Options:
• Unspecified
• Publisher (Producer only)
• Consumer (Consumer only)
• Publisher & Consumer (Both uses)
This value is used to specify the role of the API within the project. |
| **Sharing Type** | The field that determines how the API Proxy is shared within or outside the project. Options:
• Unspecified
• External
• Internal
• External and Internal |
**For Detailed Information See**: [API Proxy Client Route Usage Guide](/en/develop/api-proxy-configuration/client-route)
## Example Configuration Flow
1. Proxy name and description are entered.
2. Path (Relative Path) is defined from the Client Route section.
3. Method, host, or header constraints are added if necessary.
4. Security settings are made (Disable Direct Access To Gateway, etc.)
5. Categories are selected.
6. Usage and sharing type are determined.
## Show Proxy Key
This is the section where the access keys of the API Proxy are managed. Access keys are used for OAuth2 Authentication Policy.
Client Id and Client Secret values are automatically generated, and the user can request new ones to be created. If any of the keys for a deployed API Proxy are regenerated, the API Proxy must be redeployed for the keys to be valid.
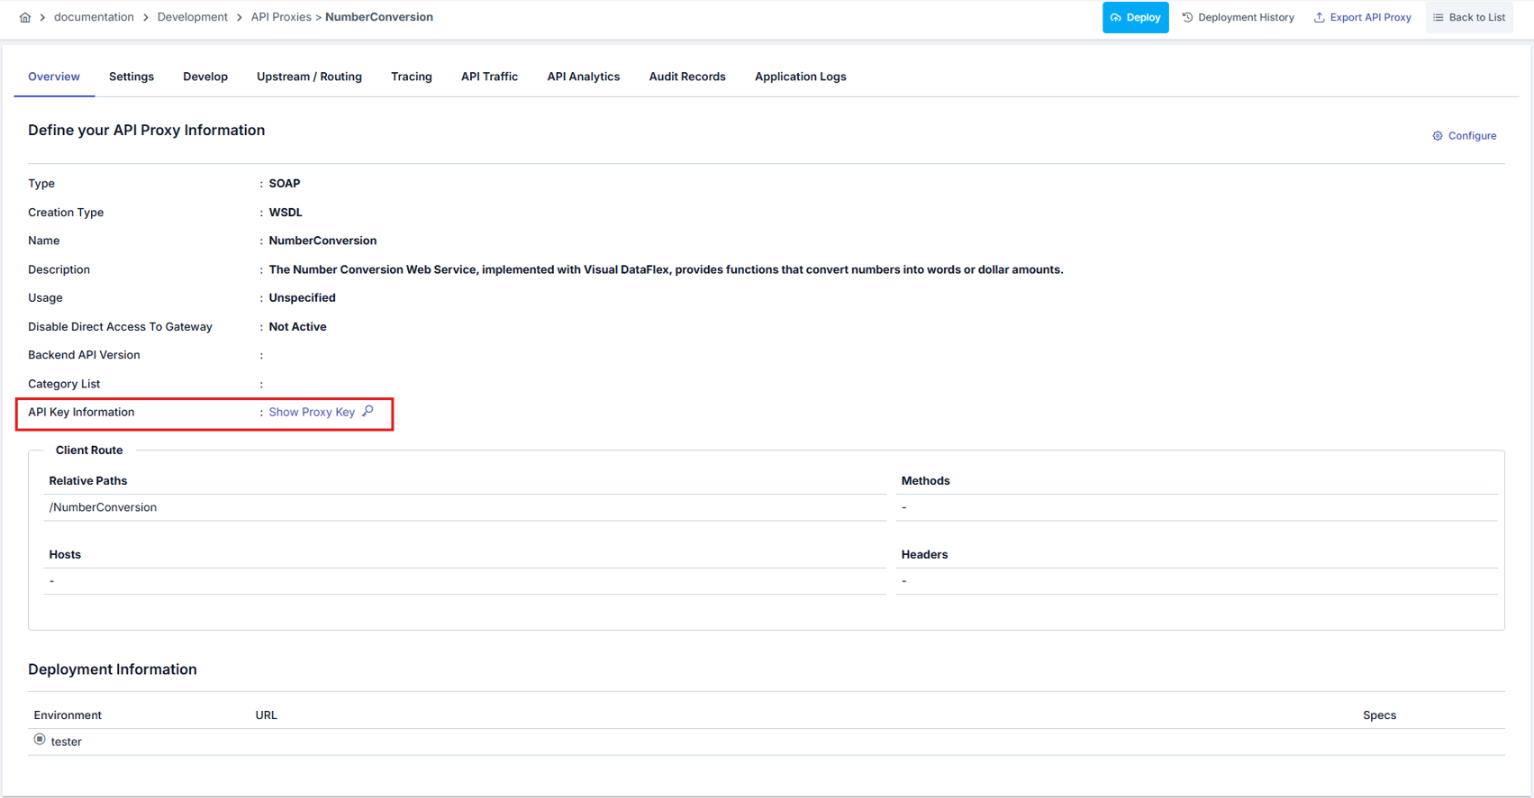 Dialog that opens when the **Show Proxy Key** button is clicked:
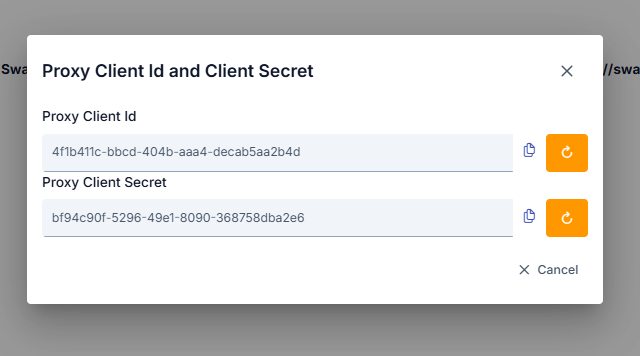 Confirmation dialog that opens when the refresh button next to the **Client ID** or **Secret** fields is clicked:
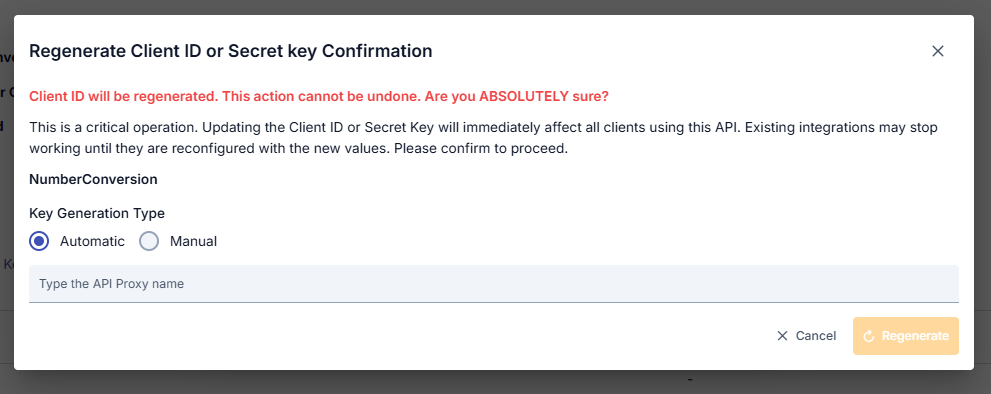 This dialog reminds that the Client ID or Secret refresh operation is irreversible and critical. To confirm the operation, you must type the API Proxy's name and select the key generation type (Automatic or Manual).
In the **Automatic** option, the system automatically generates a new value, while in the **Manual** option, you can enter your own value.
## Deployment and Specification Information
The deployment information section displays which [environments](/en/concepts/core-concepts/what-is-environment) the API Proxy is deployed to and the access address in that environment. An API Proxy can be deployed to multiple environments at the same time.
If an API Proxy Group has been created from the API Proxy, information about that group is also displayed in this area.
An image containing the deployment section is shown below:
This dialog reminds that the Client ID or Secret refresh operation is irreversible and critical. To confirm the operation, you must type the API Proxy's name and select the key generation type (Automatic or Manual).
In the **Automatic** option, the system automatically generates a new value, while in the **Manual** option, you can enter your own value.
## Deployment and Specification Information
The deployment information section displays which [environments](/en/concepts/core-concepts/what-is-environment) the API Proxy is deployed to and the access address in that environment. An API Proxy can be deployed to multiple environments at the same time.
If an API Proxy Group has been created from the API Proxy, information about that group is also displayed in this area.
An image containing the deployment section is shown below:
 The fields used for the deployment section configuration are shown in the table below.
| Field | Description |
| ----------------------- | --------------------------------------------------------------------------------------------------------------------------------------------------------------------------------------------------------------------------------------------------------------------------------------------------------------------------------------------------------------------- |
| **Environment** | The Environment information where the API Proxy is deployed. |
| **Access Type** | The access type information of the API Proxy. |
| **URL** | The access address of the API Proxy. It is automatically generated using the Gateway Address and the access address of the deployed Environment. |
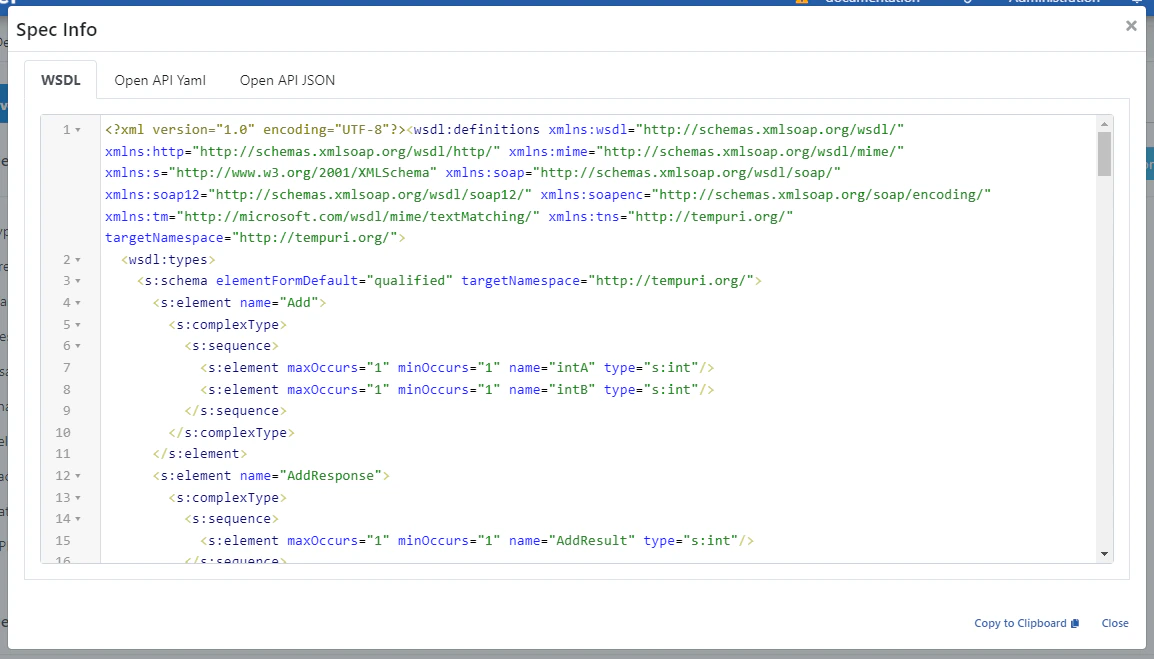
| **Specification Files** | The Specification files of the API Proxy. Specification files in Swagger and OpenAPI formats are generated for each API Proxy. If the API Proxy type is SOAP, WSDL and XSD specification files will also be generated. When the **Show** link is clicked for any environment, the API Specification Files valid for that environment for the API Proxy are displayed. |
When the Show button is clicked, a dialog showing API Proxy definitions in different types and formats is shown below:
The fields used for the deployment section configuration are shown in the table below.
| Field | Description |
| ----------------------- | --------------------------------------------------------------------------------------------------------------------------------------------------------------------------------------------------------------------------------------------------------------------------------------------------------------------------------------------------------------------- |
| **Environment** | The Environment information where the API Proxy is deployed. |
| **Access Type** | The access type information of the API Proxy. |
| **URL** | The access address of the API Proxy. It is automatically generated using the Gateway Address and the access address of the deployed Environment. |
| **Specification Files** | The Specification files of the API Proxy. Specification files in Swagger and OpenAPI formats are generated for each API Proxy. If the API Proxy type is SOAP, WSDL and XSD specification files will also be generated. When the **Show** link is clicked for any environment, the API Specification Files valid for that environment for the API Proxy are displayed. |
When the Show button is clicked, a dialog showing API Proxy definitions in different types and formats is shown below:
 ## Next Steps
API Proxy deployment and specification file information
API Proxy settings
API Proxy traffic log settings
API Proxy design tab
REST endpoint configuration
SOAP method configuration
Detailed Client Route configuration
## Next Steps
API Proxy deployment and specification file information
API Proxy settings
API Proxy traffic log settings
API Proxy design tab
REST endpoint configuration
SOAP method configuration
Detailed Client Route configuration