> ## Documentation Index
> Fetch the complete documentation index at: https://docs.apinizer.com/llms.txt
> Use this file to discover all available pages before exploring further.
# Token Acquisition Methods
> There are two types of methods for acquiring tokens. These methods are activated by selecting one of the "Manage From This Policy" or "Manage From ACL" options through the created JWT/OAuth2 Policy.
There are two types of methods for acquiring tokens. These methods are activated by selecting one of the "Manage From This Policy" or "Manage From ACL" options through the created JWT/OAuth2 Policy. Token acquisition operations will be explained in detail for both methods.
## 1. Token Acquisition with "Manage From This Policy" Option
The ways to obtain **client\_id** and **client\_secret** values according to the management level of the Authentication policy are as follows:
* **If Authentication Policy is Added to API Proxy:** client\_id and client\_secret values are obtained from the "Show Proxy Key" section in the Overview section of the API Proxy.
* **If Authentication Policy is Added to Proxy Group:** client\_id and client\_secret values are obtained from the "Show Proxy Key" section in the Overview section of the API Proxy Group.
* **If Authentication Policy is Added to Policy Group:** client\_id and client\_secret values are obtained from the "Show Proxy Key" section in the Definition section of the relevant Policy Group.
### 1.1 Token Acquisition with JWT
If the "Manage From This Policy" option is selected in the created JWT Policy, tokens are acquired using this method.
Prepare a new HTTP request using Apinizer Test Console or another application of your choice.
* The address should be entered similar to the following according to your own Apinizer access address: `https://apinizerErisimAdresiniz/auth/jwt`.
If the **Allow URL Parameters** option is selected, information can be sent using GET method and URL parameters. (See the table below for parameters to be sent)
* HTTP Method should be POST.
* "x-www-form-urlencoded" value should be selected in the Body field. If Apinizer Test Console is not used, a header should be added with "Content-Type" name and "application/x-www-form-urlencoded" value.
* The values to be entered in the Body field are as shown in the table below.
| Key Name | Value to Enter if "client\_credentials" is Selected When Defining Policy | Value to Enter if "password" is Selected When Defining Policy |
| -------------- | ------------------------------------------------------------------------ | ---------------------------------------------------------------------- |
| grant\_type | client\_credentials | password |
| client\_id | Public Key value obtained from API Key field | Public Key value obtained from API Key field |
| client\_secret | Secret Key value obtained from API Key field | "-" (dash) |
| username | This field is not added | Username of one of the records in the authentication pool you selected |
| password | This field is not added | Password of one of the records in the authentication pool you selected |
#### Token Refresh
If the **Token Should Be Immortal** option is closed and the **Token Refresh Should Be** option is opened, *tokens* that will become invalid after a certain period can be refreshed within the period specified in the **Refreshed Token Validity Period** field.
Prepare a new HTTP request using Apinizer Test Console or another application of your choice.
* The address should be entered similar to the following according to your own Apinizer access address: `https://apinizerErisimAdresiniz/auth/jwt`.
If the **Allow URL Parameters** option is selected, information can be sent using GET method through URL parameters. (See the table below for parameters to be sent).
* HTTP Method should be POST.
* "x-www-form-urlencoded" value should be selected in the Body field. If Apinizer Test Console is not used, a header should be added with "Content-Type" name and "application/x-www-form-urlencoded" value.
* The values to be entered in the Body field are as shown in the table below.
| Key Name | Key Value |
| -------------- | ------------------------------------------------------------------ |
| grant\_type | refresh\_token |
| client\_id | Public Key value obtained from API Key field |
| client\_secret | "-" (dash) |
| refresh\_token | Value in the "refresh\_token" key in the previously acquired token |
#### If grant\_type is client\_credentials
Add a JWT Authentication policy with default values. While doing this, copy your API Key information to use.
Send your token acquisition request with a message like the example below.
**The image containing the settings for sending a request to Token Service through Apinizer Test Console is shown below:**
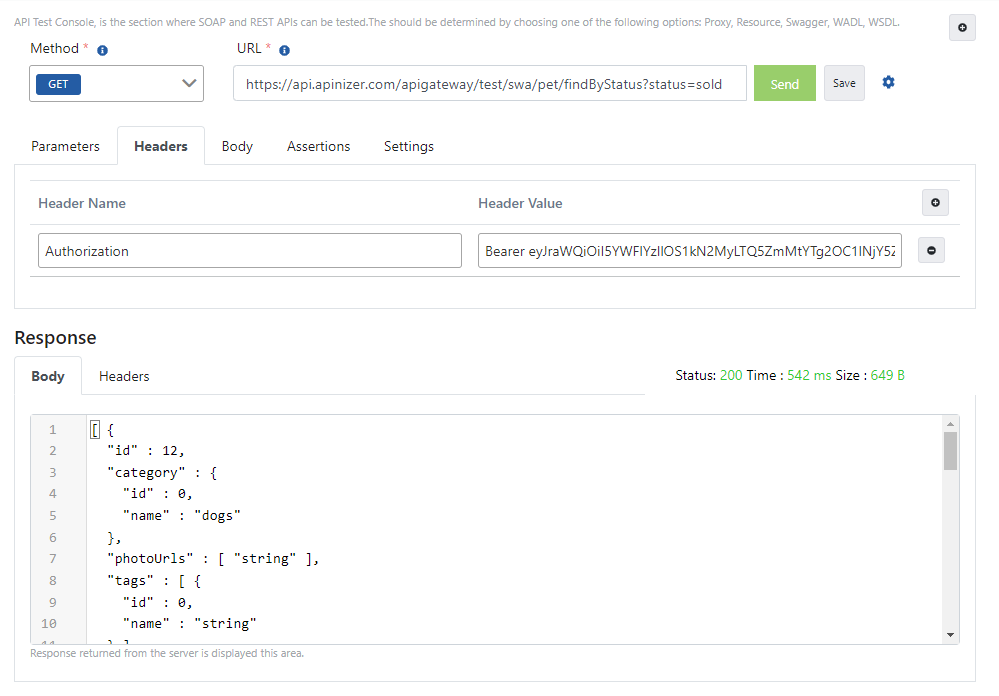
 The value in the "access\_token" field in the response message, when given as a value to the "Authorization" key in all requests to be sent to this API Proxy, provides secure access to the relevant API.
**The image containing the operation of sending a request with token information through Apinizer Test Console is shown below:**
The value in the "access\_token" field in the response message, when given as a value to the "Authorization" key in all requests to be sent to this API Proxy, provides secure access to the relevant API.
**The image containing the operation of sending a request with token information through Apinizer Test Console is shown below:**
 #### If grant\_type is password
Add a JWT Authentication policy with Grant Type value Password. While doing this, copy your API Key information to use.
Send your token acquisition request with a message like the example below.
**The image containing the settings for sending a request to Token Service through Apinizer Test Console is shown below:**
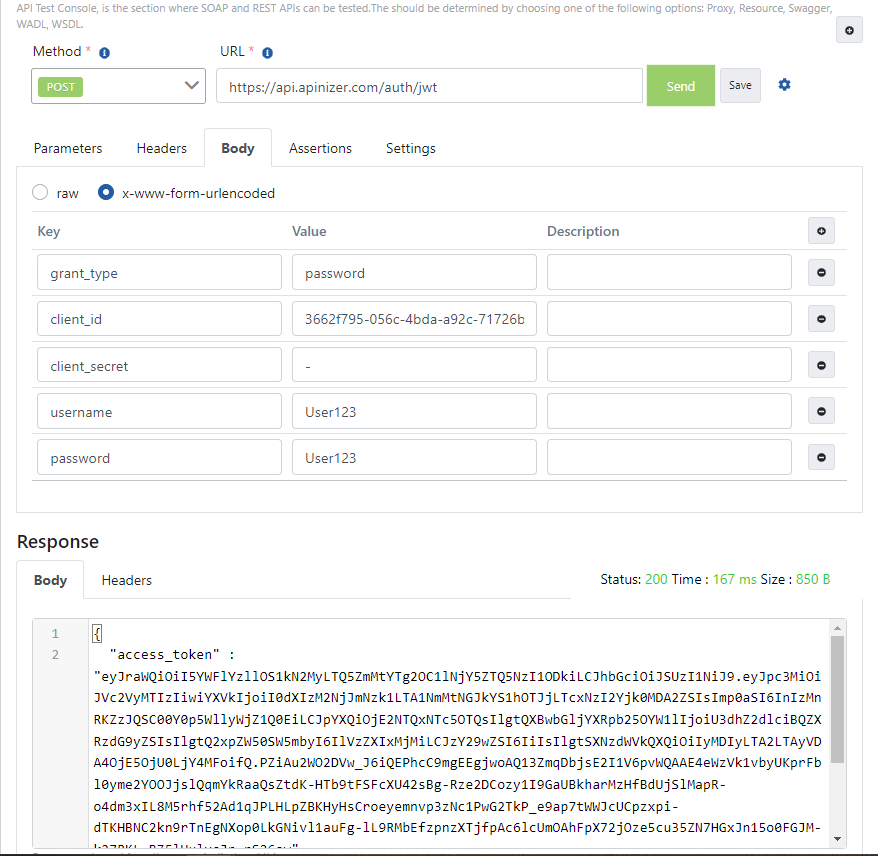
#### If grant\_type is password
Add a JWT Authentication policy with Grant Type value Password. While doing this, copy your API Key information to use.
Send your token acquisition request with a message like the example below.
**The image containing the settings for sending a request to Token Service through Apinizer Test Console is shown below:**
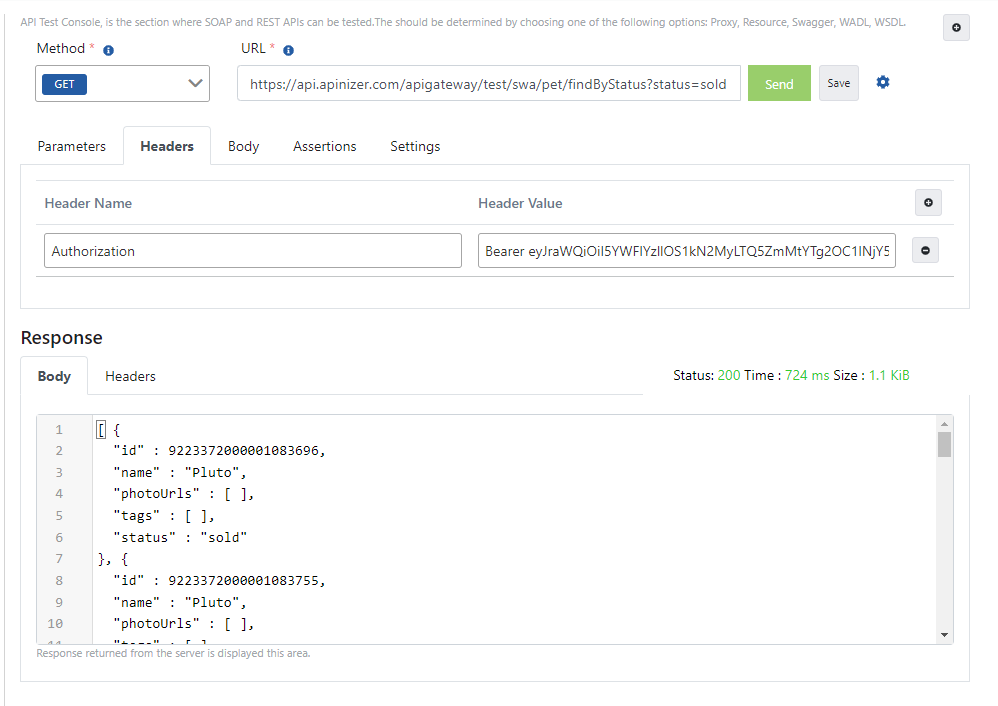
 The value in the "access\_token" field in the response message, when given as a value to the "Authorization" key in all requests to be sent to this API Proxy, provides secure access to the relevant API.
**The image containing the operation of sending a request with token information through Apinizer Test Console is shown below:**
The value in the "access\_token" field in the response message, when given as a value to the "Authorization" key in all requests to be sent to this API Proxy, provides secure access to the relevant API.
**The image containing the operation of sending a request with token information through Apinizer Test Console is shown below:**
 #### If grant\_type is refresh\_token
Add a JWT Authentication policy with refresh option enabled. While doing this, copy your API Key information to use.
Send your token acquisition request with a message like the example below.
**The image containing the settings for sending a request to Token Service through Apinizer Test Console is shown below:**
#### If grant\_type is refresh\_token
Add a JWT Authentication policy with refresh option enabled. While doing this, copy your API Key information to use.
Send your token acquisition request with a message like the example below.
**The image containing the settings for sending a request to Token Service through Apinizer Test Console is shown below:**
 To refresh the token, take the value in the "refresh\_token" field in the response from the first request and give it as a value to the refresh\_token key in the message you prepared as below.
The value in the "access\_token" field in the response to come will be your refreshed token value.
**The image containing the example request sent to refresh the token through Apinizer Test Console is shown below:**
To refresh the token, take the value in the "refresh\_token" field in the response from the first request and give it as a value to the refresh\_token key in the message you prepared as below.
The value in the "access\_token" field in the response to come will be your refreshed token value.
**The image containing the example request sent to refresh the token through Apinizer Test Console is shown below:**
 ### 1.2 Token Acquisition with OAuth2
If the "Manage From This Policy" option is selected in the created OAuth2 Policy, tokens are acquired using this method.
Prepare a new HTTP request using Apinizer Test Console or another application of your choice.
* The address should be entered similar to the following according to your own Apinizer access address: `https://apinizerErisimAdresiniz/auth/token`.
If the **Allow URL Parameters** option is selected, information can be sent using GET method and URL parameters. (See the table below for parameters to be sent)
* HTTP method should be POST.
* "x-www-form-urlencoded" value should be selected in the Body field. If Apinizer Test Console is not used, a header should be added with "Content-Type" name and "application/x-www-form-urlencoded" value.
* The values to be entered in the Body field are as shown in the table below.
| Key Name | Value to Enter if "client\_credentials" is Selected When Defining Policy | Value to Enter if "password" is Selected When Defining Policy |
| -------------- | ------------------------------------------------------------------------ | ---------------------------------------------------------------------- |
| grant\_type | client\_credentials | password |
| client\_id | Public Key value obtained from API Key field | Public Key value obtained from API Key field |
| client\_secret | Secret Key value obtained from API Key field | Secret Key value obtained from API Key field |
| username | This field is not added | Username of one of the records in the authentication pool you selected |
| password | This field is not added | Password of one of the records in the authentication pool you selected |
#### Token Refresh
If the **Token Should Be Immortal** option is closed and the **Token Refresh Should Be** option is opened, *tokens* that will become invalid after a certain period can be refreshed within the period specified in the **Refreshed Token Validity Period** field.
Prepare a new HTTP request using Apinizer Test Console or another application of your choice.
* The address should be entered similar to the following according to your own Apinizer access address: `https://apinizerErisimAdresiniz/auth/token`.
If the **Allow URL Parameters** option is selected, information can be sent using GET method through URL parameters. (See the table below for parameters to be sent).
* HTTP method should be POST.
* "x-www-form-urlencoded" value should be selected in the Body field. If Apinizer Test Console is not used, a header should be added with "Content-Type" name and "application/x-www-form-urlencoded" value.
* The values to be entered in the Body field are as shown in the table below
| Key Name | Key Value |
| -------------- | ------------------------------------------------------------------ |
| grant\_type | refresh\_token |
| client\_id | Public Key value obtained from API Key field |
| client\_secret | Secret Key value obtained from API Key field |
| refresh\_token | Value in the "refresh\_token" key in the previously acquired token |
#### If grant\_type is client\_credentials
Add an OAuth2 Authentication policy with default values. While doing this, copy your API Key information to use.
Send your token acquisition request with a message like the example below.
**The image containing the settings for sending a request to Token Service through Apinizer Test Console is shown below:**
### 1.2 Token Acquisition with OAuth2
If the "Manage From This Policy" option is selected in the created OAuth2 Policy, tokens are acquired using this method.
Prepare a new HTTP request using Apinizer Test Console or another application of your choice.
* The address should be entered similar to the following according to your own Apinizer access address: `https://apinizerErisimAdresiniz/auth/token`.
If the **Allow URL Parameters** option is selected, information can be sent using GET method and URL parameters. (See the table below for parameters to be sent)
* HTTP method should be POST.
* "x-www-form-urlencoded" value should be selected in the Body field. If Apinizer Test Console is not used, a header should be added with "Content-Type" name and "application/x-www-form-urlencoded" value.
* The values to be entered in the Body field are as shown in the table below.
| Key Name | Value to Enter if "client\_credentials" is Selected When Defining Policy | Value to Enter if "password" is Selected When Defining Policy |
| -------------- | ------------------------------------------------------------------------ | ---------------------------------------------------------------------- |
| grant\_type | client\_credentials | password |
| client\_id | Public Key value obtained from API Key field | Public Key value obtained from API Key field |
| client\_secret | Secret Key value obtained from API Key field | Secret Key value obtained from API Key field |
| username | This field is not added | Username of one of the records in the authentication pool you selected |
| password | This field is not added | Password of one of the records in the authentication pool you selected |
#### Token Refresh
If the **Token Should Be Immortal** option is closed and the **Token Refresh Should Be** option is opened, *tokens* that will become invalid after a certain period can be refreshed within the period specified in the **Refreshed Token Validity Period** field.
Prepare a new HTTP request using Apinizer Test Console or another application of your choice.
* The address should be entered similar to the following according to your own Apinizer access address: `https://apinizerErisimAdresiniz/auth/token`.
If the **Allow URL Parameters** option is selected, information can be sent using GET method through URL parameters. (See the table below for parameters to be sent).
* HTTP method should be POST.
* "x-www-form-urlencoded" value should be selected in the Body field. If Apinizer Test Console is not used, a header should be added with "Content-Type" name and "application/x-www-form-urlencoded" value.
* The values to be entered in the Body field are as shown in the table below
| Key Name | Key Value |
| -------------- | ------------------------------------------------------------------ |
| grant\_type | refresh\_token |
| client\_id | Public Key value obtained from API Key field |
| client\_secret | Secret Key value obtained from API Key field |
| refresh\_token | Value in the "refresh\_token" key in the previously acquired token |
#### If grant\_type is client\_credentials
Add an OAuth2 Authentication policy with default values. While doing this, copy your API Key information to use.
Send your token acquisition request with a message like the example below.
**The image containing the settings for sending a request to Token Service through Apinizer Test Console is shown below:**
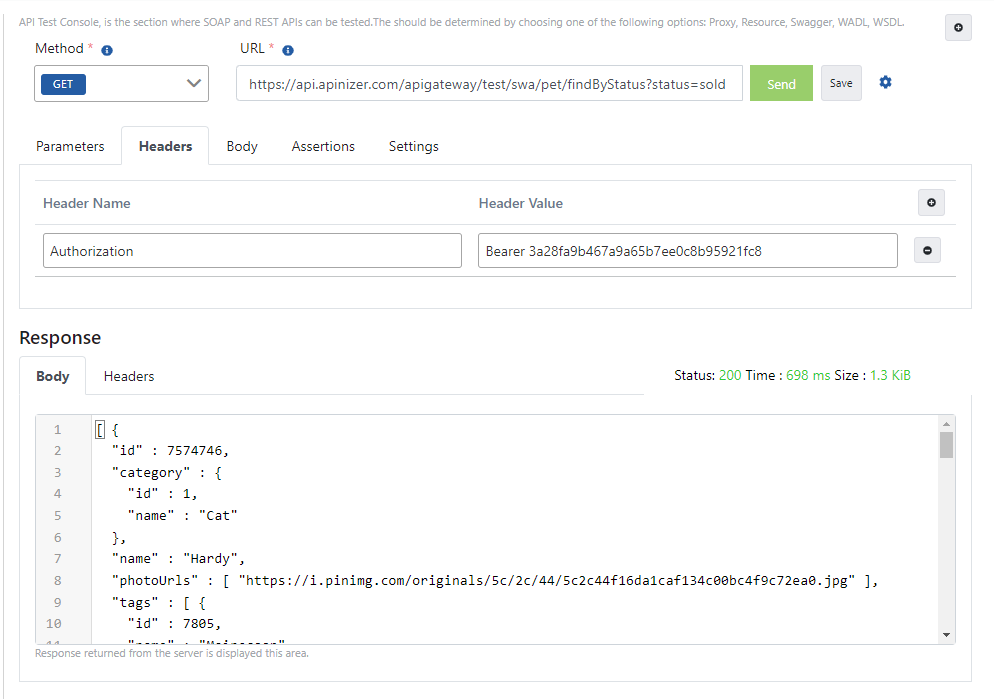
 The value in the "access\_token" field in the response message, when given as a value to the "Authorization" key in all requests to be sent to this API Proxy, provides secure access to the relevant API.
**The image containing the operation of sending a request with token information through Apinizer Test Console is shown below:**
The value in the "access\_token" field in the response message, when given as a value to the "Authorization" key in all requests to be sent to this API Proxy, provides secure access to the relevant API.
**The image containing the operation of sending a request with token information through Apinizer Test Console is shown below:**
 #### If grant\_type is password
Add an OAuth2 Authentication policy with Grant Type value Password. While doing this, copy your API Key information to use.
Send your token acquisition request with a message like the example below.
**The image containing the settings for sending a request to Token Service through Apinizer Test Console is shown below:**
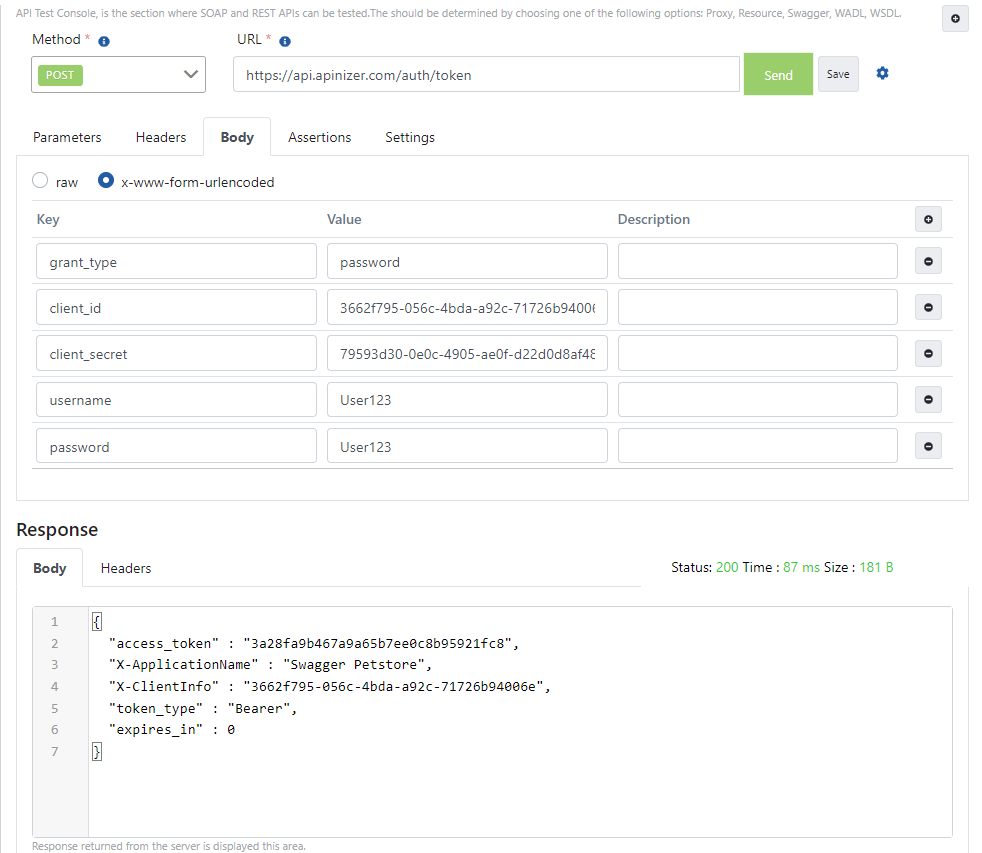
#### If grant\_type is password
Add an OAuth2 Authentication policy with Grant Type value Password. While doing this, copy your API Key information to use.
Send your token acquisition request with a message like the example below.
**The image containing the settings for sending a request to Token Service through Apinizer Test Console is shown below:**
 The value in the "access\_token" field in the response message, when given as a value to the "Authorization" key in all requests to be sent to this API Proxy, provides secure access to the relevant API.
**The image containing the operation of sending a request with token information through Apinizer Test Console is shown below:**
The value in the "access\_token" field in the response message, when given as a value to the "Authorization" key in all requests to be sent to this API Proxy, provides secure access to the relevant API.
**The image containing the operation of sending a request with token information through Apinizer Test Console is shown below:**
 #### GrantType: Refresh Token
Add an OAuth2 Authentication policy with refresh option enabled. While doing this, copy your API Key information to use.
Send your token acquisition request with a message like the example below.
**The image containing the settings for sending a request to Token Service through Apinizer Test Console is shown below:**
#### GrantType: Refresh Token
Add an OAuth2 Authentication policy with refresh option enabled. While doing this, copy your API Key information to use.
Send your token acquisition request with a message like the example below.
**The image containing the settings for sending a request to Token Service through Apinizer Test Console is shown below:**
 To refresh the token, take the value in the "refresh\_token" field in the response from the first request and give it as a value to the refresh\_token key in the message you prepared as below.
The value in the "access\_token" field in the response to come will be your refreshed token value.
**The image containing the example request sent to refresh the token through Apinizer Test Console is shown below:**
To refresh the token, take the value in the "refresh\_token" field in the response from the first request and give it as a value to the refresh\_token key in the message you prepared as below.
The value in the "access\_token" field in the response to come will be your refreshed token value.
**The image containing the example request sent to refresh the token through Apinizer Test Console is shown below:**
 ### 1.3 Token Acquisition with Scope
Prepare a new HTTP request using Apinizer Test Console or another application of your choice.
* The address should be entered similar to the following according to your own Apinizer access address: `https://apinizerErisimAdresiniz/auth/jwt`.
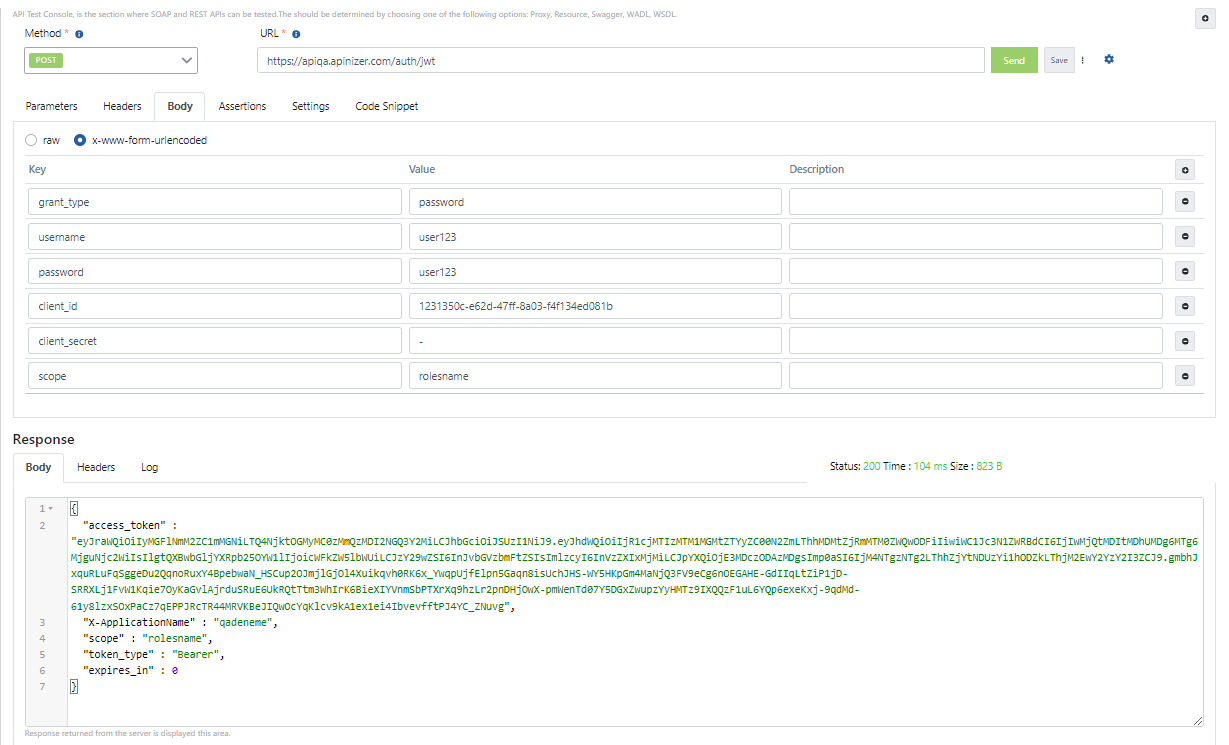
* HTTP Method should be POST. "x-www-form-urlencoded" value should be selected in the Body field. If Apinizer Test Console is not used, a header should be added with "Content-Type" name and "application/x-www-form-urlencoded" value.
* The values to be entered in the Body field are as shown in the table below
| Key Name | Value to Enter if "client\_credentials" is Selected When Defining Policy | Value to Enter if "password" is Selected When Defining Policy |
| -------------- | ------------------------------------------------------------------------ | ---------------------------------------------------------------------- |
| grant\_type | client\_credentials | password |
| client\_id | Public Key value obtained from API Key field | Public Key value obtained from API Key field |
| client\_secret | Secret Key value obtained from API Key field | "-" (dash) |
| username | This field is not added | Username of one of the records in the authentication pool you selected |
| password | This field is not added | Password of one of the records in the authentication pool you selected |
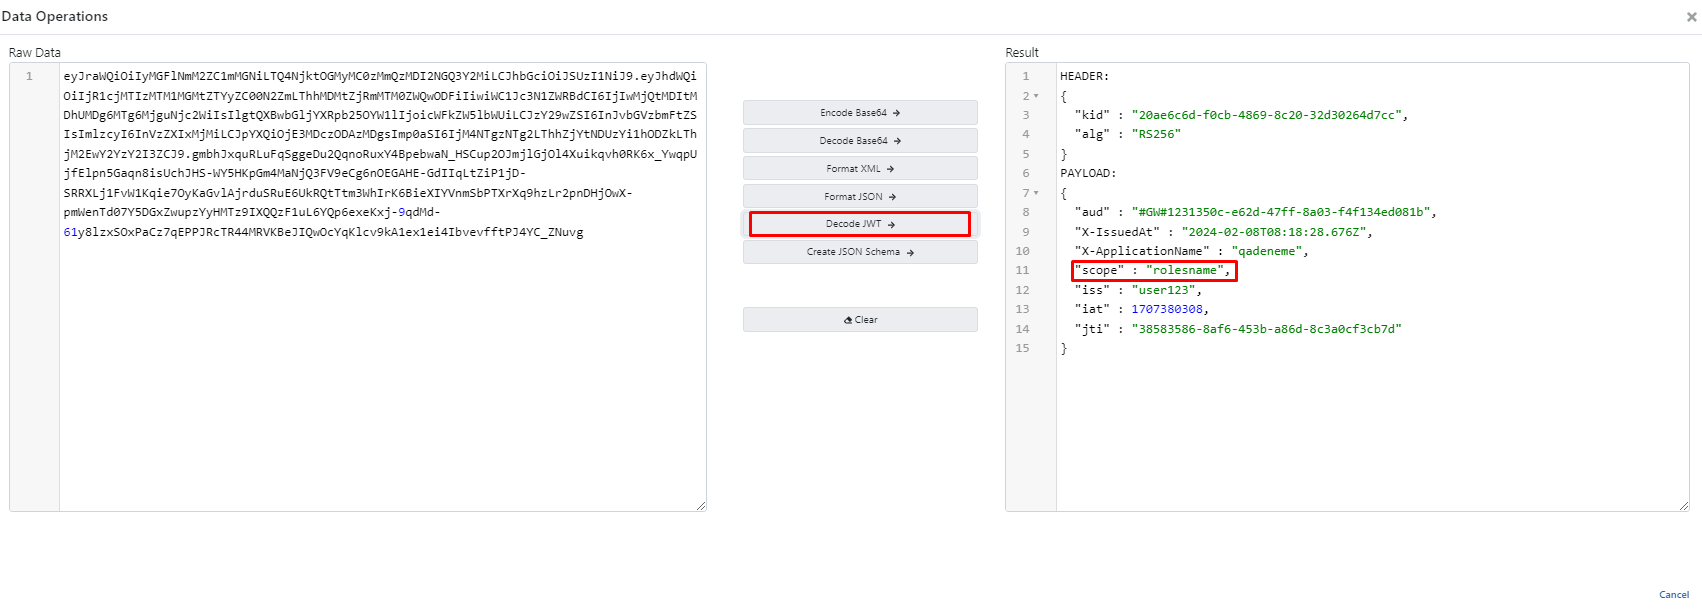
| scope | Role name defined for the user | Role name defined for the user |
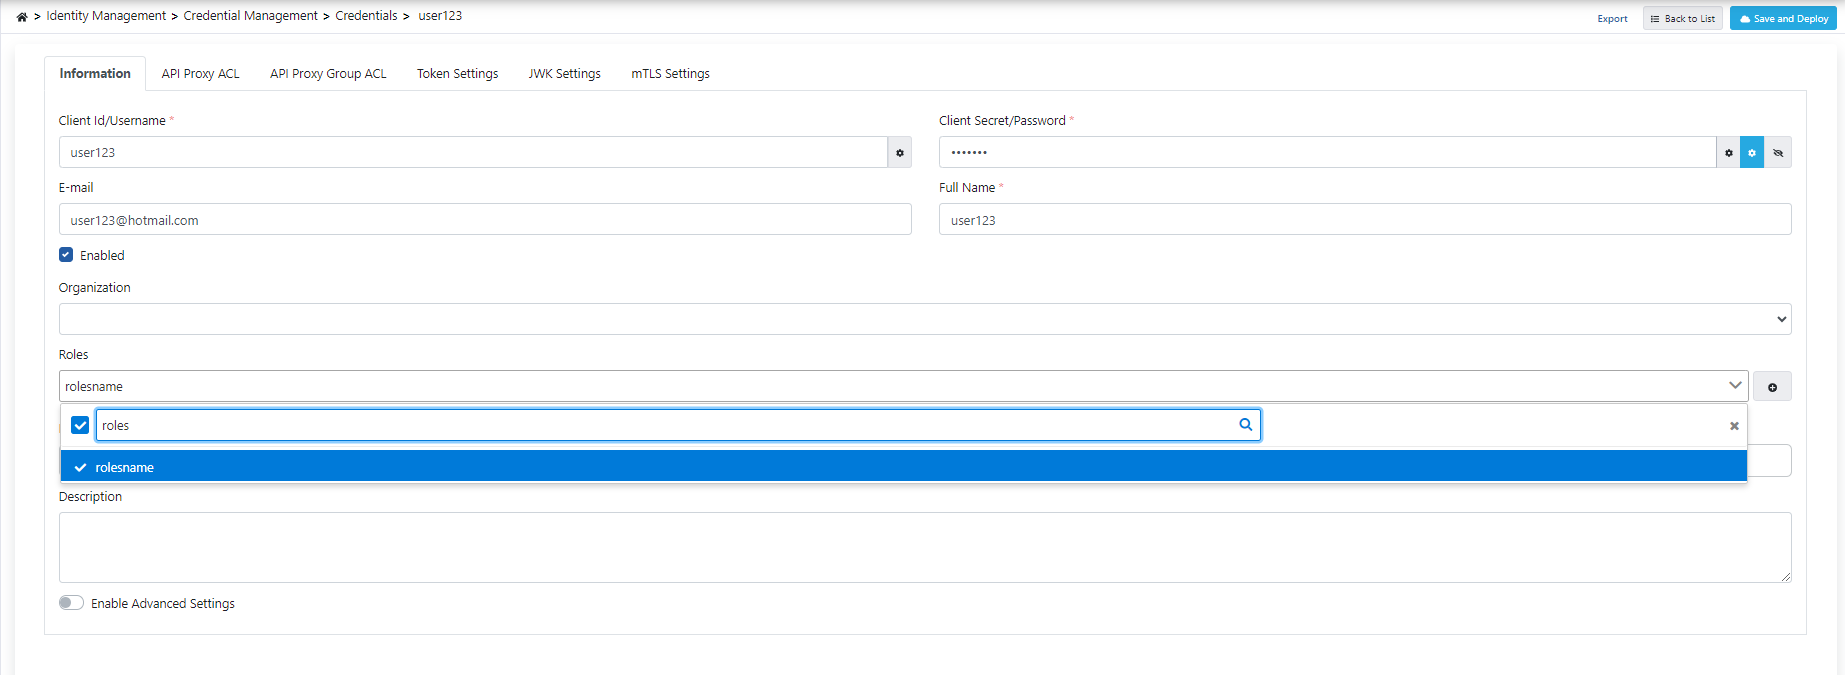
#### Defining Role for User
To define a role for the user, a new role should be added from the roles section as below and that Proxy should be added to the user from the API Proxy ACL section.
### 1.3 Token Acquisition with Scope
Prepare a new HTTP request using Apinizer Test Console or another application of your choice.
* The address should be entered similar to the following according to your own Apinizer access address: `https://apinizerErisimAdresiniz/auth/jwt`.
* HTTP Method should be POST. "x-www-form-urlencoded" value should be selected in the Body field. If Apinizer Test Console is not used, a header should be added with "Content-Type" name and "application/x-www-form-urlencoded" value.
* The values to be entered in the Body field are as shown in the table below
| Key Name | Value to Enter if "client\_credentials" is Selected When Defining Policy | Value to Enter if "password" is Selected When Defining Policy |
| -------------- | ------------------------------------------------------------------------ | ---------------------------------------------------------------------- |
| grant\_type | client\_credentials | password |
| client\_id | Public Key value obtained from API Key field | Public Key value obtained from API Key field |
| client\_secret | Secret Key value obtained from API Key field | "-" (dash) |
| username | This field is not added | Username of one of the records in the authentication pool you selected |
| password | This field is not added | Password of one of the records in the authentication pool you selected |
| scope | Role name defined for the user | Role name defined for the user |
#### Defining Role for User
To define a role for the user, a new role should be added from the roles section as below and that Proxy should be added to the user from the API Proxy ACL section.
 #### If grant\_type is client\_credentials
Add a JWT Authentication policy with default values. While doing this, copy your API Key information to use.
Send your token acquisition request with a message like the example below.
**The image containing the settings for sending a request to Token Service through Apinizer Test Console is shown below:**
#### If grant\_type is client\_credentials
Add a JWT Authentication policy with default values. While doing this, copy your API Key information to use.
Send your token acquisition request with a message like the example below.
**The image containing the settings for sending a request to Token Service through Apinizer Test Console is shown below:**
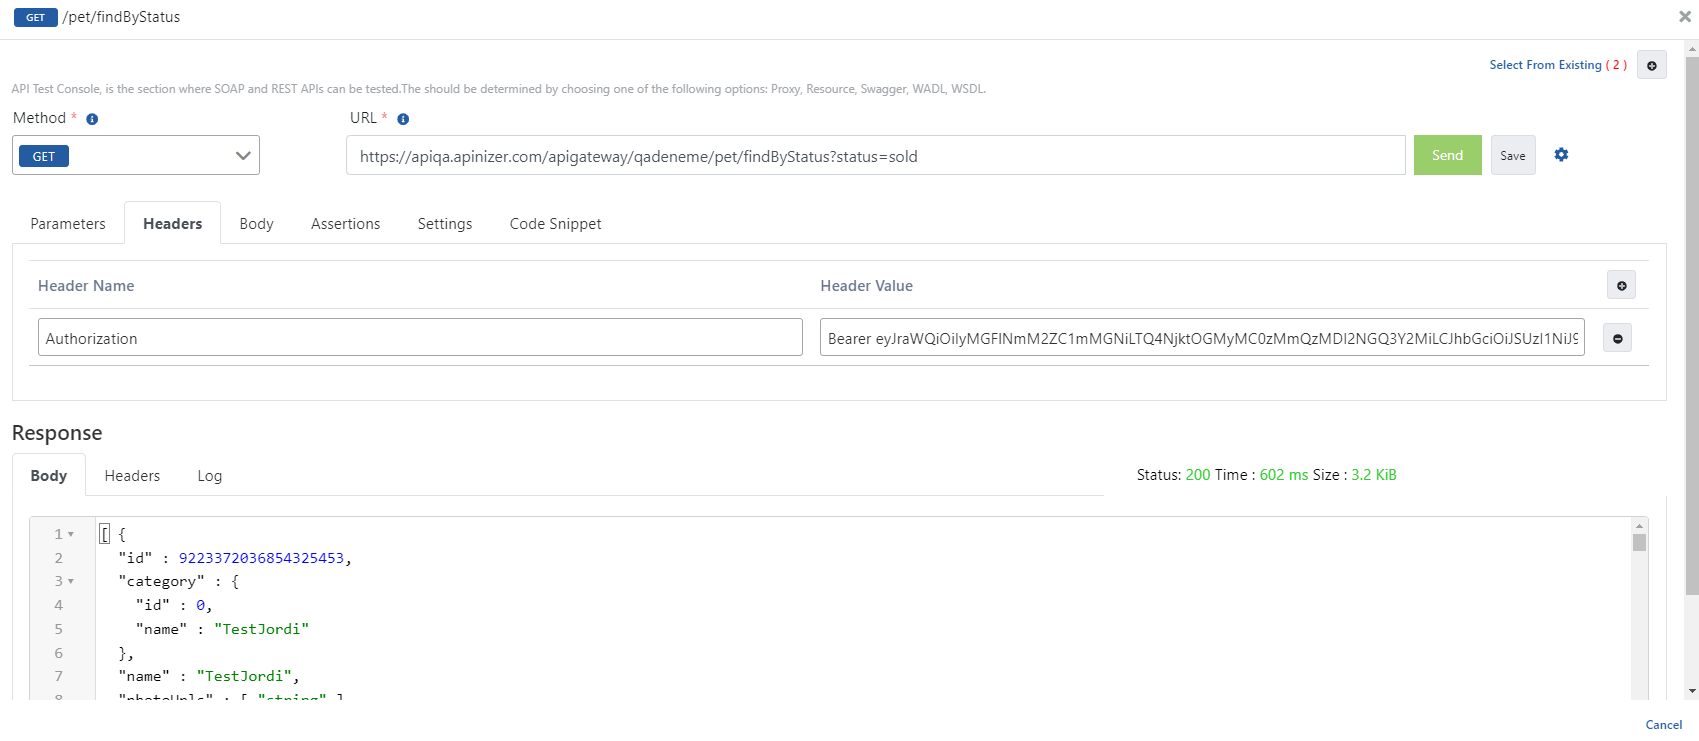
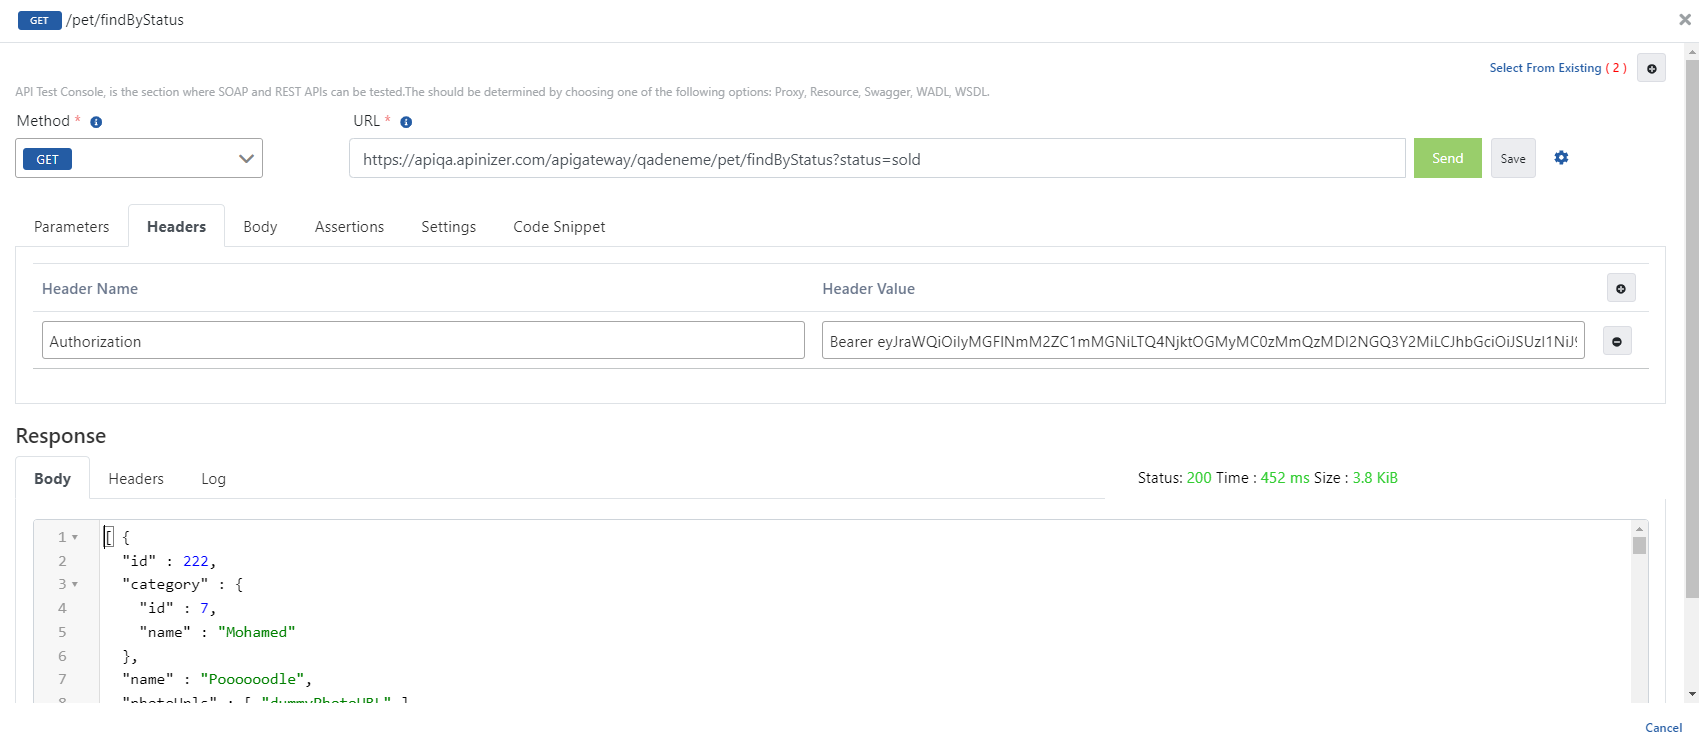
 The value in the "access\_token" field in the response message, when given as a value to the "Authorization" key in all requests to be sent to this API Proxy, provides secure access to the relevant API.
**The image containing the operation of sending a request with token information through Apinizer Test Console is shown below:**
The value in the "access\_token" field in the response message, when given as a value to the "Authorization" key in all requests to be sent to this API Proxy, provides secure access to the relevant API.
**The image containing the operation of sending a request with token information through Apinizer Test Console is shown below:**
 #### If grant\_type is password
Add a JWT Authentication policy with Grant Type value Password. While doing this, copy your API Key information to use.
Send your token acquisition request with a message like the example below.
**The image containing the settings for sending a request to Token Service through Apinizer Test Console is shown below:**
#### If grant\_type is password
Add a JWT Authentication policy with Grant Type value Password. While doing this, copy your API Key information to use.
Send your token acquisition request with a message like the example below.
**The image containing the settings for sending a request to Token Service through Apinizer Test Console is shown below:**
 The value in the "access\_token" field in the response message, when given as a value to the "Authorization" key in all requests to be sent to this API Proxy, provides secure access to the relevant API.
**The image containing the operation of sending a request with token information through Apinizer Test Console is shown below:**
The value in the "access\_token" field in the response message, when given as a value to the "Authorization" key in all requests to be sent to this API Proxy, provides secure access to the relevant API.
**The image containing the operation of sending a request with token information through Apinizer Test Console is shown below:**
 ## 2. Token Acquisition with "Manage From ACL" Option
### 2.1 Token Acquisition with JWT
If the "Manage From ACL" option is selected in the created JWT Policy, tokens are acquired using this method.
Prepare a new HTTP request using Apinizer Test Console or another application of your choice.
* The address should be entered similar to the following according to your own Apinizer access address: `https://apinizerErisimAdresiniz/credential/jwt`.
If the **Allow URL Parameters** option is selected, information can be sent using GET method and URL parameters. (See the table below for parameters to be sent)
* HTTP Method should be POST.
* "x-www-form-urlencoded" value should be selected in the Body field. If Apinizer Test Console is not used, a header should be added with "Content-Type" name and "application/x-www-form-urlencoded" value.
* The values to be entered in the Body field are as shown in the table below.
| Key Name | Value to Enter if "client\_credentials" is Selected When Defining Policy | Value to Enter if "password" is Selected When Defining Policy |
| -------------- | ------------------------------------------------------------------------ | ---------------------------------------------------------------------- |
| grant\_type | client\_credentials | password |
| client\_id | Client Id value belonging to Credentials | Client Id value belonging to Credentials |
| client\_secret | Client Secret value belonging to Credentials | Client Secret value belonging to Credentials |
| username | This field is not added | Username of one of the records in the authentication pool you selected |
| password | This field is not added | Password of one of the records in the authentication pool you selected |
#### Token Refresh
If the **Token Should Be Immortal** option is closed and the **Token Refresh Should Be** option is opened, *tokens* that will become invalid after a certain period can be refreshed within the period specified in the **Refreshed Token Validity Period** field.
Prepare a new HTTP request using Apinizer Test Console or another application of your choice.
* The address should be entered similar to the following according to your own Apinizer access address: `https://apinizerErisimAdresiniz/credential/jwt`.
If the **Allow URL Parameters** option is selected, information can be sent using GET method through URL parameters. (See the table below for parameters to be sent).
* HTTP Method should be POST.
* "x-www-form-urlencoded" value should be selected in the Body field. If Apinizer Test Console is not used, a header should be added with "Content-Type" name and "application/x-www-form-urlencoded" value.
* The values to be entered in the Body field are as shown in the table below.
| Key name | Key Value |
| -------------- | ------------------------------------------------------------------ |
| grant\_type | refresh\_token |
| client\_id | Client Id value belonging to Credentials |
| client\_secret | Client Secret value belonging to Credentials |
| refresh\_token | Value in the "refresh\_token" key in the previously acquired token |
#### If grant\_type is client\_credentials
Add a JWT Authentication policy with Manage From ACL option. Go to Token Settings panel from Credential screen and save default values.
Send your token acquisition request with a message like the example below.
**The image containing the settings for sending a request to Token Service through Apinizer Test Console is shown below:**
## 2. Token Acquisition with "Manage From ACL" Option
### 2.1 Token Acquisition with JWT
If the "Manage From ACL" option is selected in the created JWT Policy, tokens are acquired using this method.
Prepare a new HTTP request using Apinizer Test Console or another application of your choice.
* The address should be entered similar to the following according to your own Apinizer access address: `https://apinizerErisimAdresiniz/credential/jwt`.
If the **Allow URL Parameters** option is selected, information can be sent using GET method and URL parameters. (See the table below for parameters to be sent)
* HTTP Method should be POST.
* "x-www-form-urlencoded" value should be selected in the Body field. If Apinizer Test Console is not used, a header should be added with "Content-Type" name and "application/x-www-form-urlencoded" value.
* The values to be entered in the Body field are as shown in the table below.
| Key Name | Value to Enter if "client\_credentials" is Selected When Defining Policy | Value to Enter if "password" is Selected When Defining Policy |
| -------------- | ------------------------------------------------------------------------ | ---------------------------------------------------------------------- |
| grant\_type | client\_credentials | password |
| client\_id | Client Id value belonging to Credentials | Client Id value belonging to Credentials |
| client\_secret | Client Secret value belonging to Credentials | Client Secret value belonging to Credentials |
| username | This field is not added | Username of one of the records in the authentication pool you selected |
| password | This field is not added | Password of one of the records in the authentication pool you selected |
#### Token Refresh
If the **Token Should Be Immortal** option is closed and the **Token Refresh Should Be** option is opened, *tokens* that will become invalid after a certain period can be refreshed within the period specified in the **Refreshed Token Validity Period** field.
Prepare a new HTTP request using Apinizer Test Console or another application of your choice.
* The address should be entered similar to the following according to your own Apinizer access address: `https://apinizerErisimAdresiniz/credential/jwt`.
If the **Allow URL Parameters** option is selected, information can be sent using GET method through URL parameters. (See the table below for parameters to be sent).
* HTTP Method should be POST.
* "x-www-form-urlencoded" value should be selected in the Body field. If Apinizer Test Console is not used, a header should be added with "Content-Type" name and "application/x-www-form-urlencoded" value.
* The values to be entered in the Body field are as shown in the table below.
| Key name | Key Value |
| -------------- | ------------------------------------------------------------------ |
| grant\_type | refresh\_token |
| client\_id | Client Id value belonging to Credentials |
| client\_secret | Client Secret value belonging to Credentials |
| refresh\_token | Value in the "refresh\_token" key in the previously acquired token |
#### If grant\_type is client\_credentials
Add a JWT Authentication policy with Manage From ACL option. Go to Token Settings panel from Credential screen and save default values.
Send your token acquisition request with a message like the example below.
**The image containing the settings for sending a request to Token Service through Apinizer Test Console is shown below:**
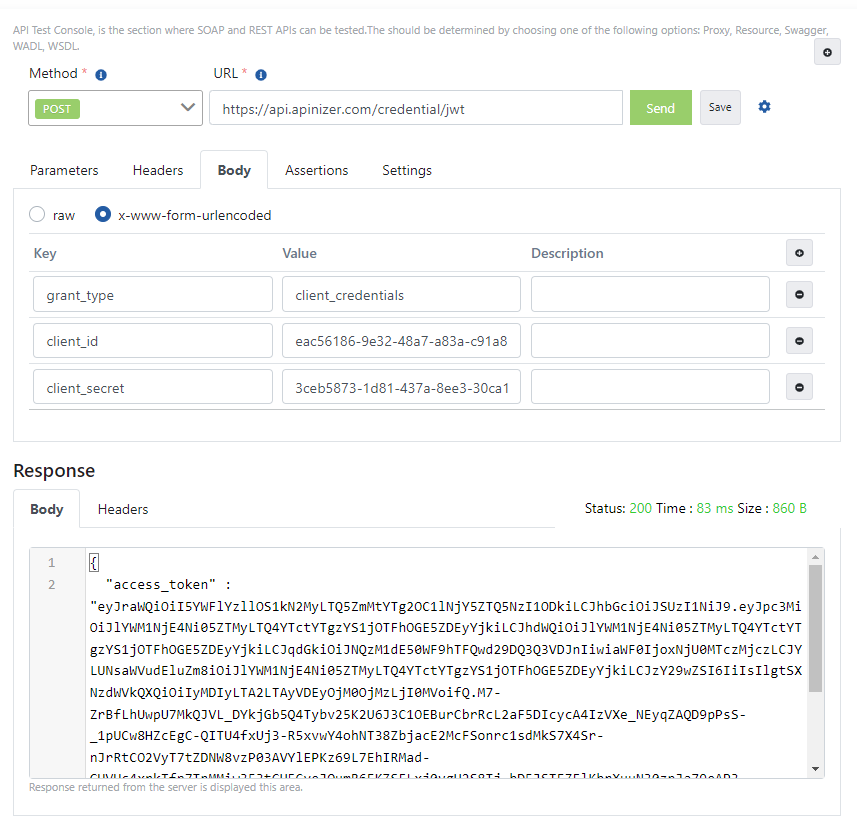 The value in the "access\_token" field in the response message, when given as a value to the "Authorization" key in all requests to be sent to this API Proxy, provides secure access to the relevant API.
**The image containing the operation of sending a request with token information through Apinizer Test Console is shown below:**
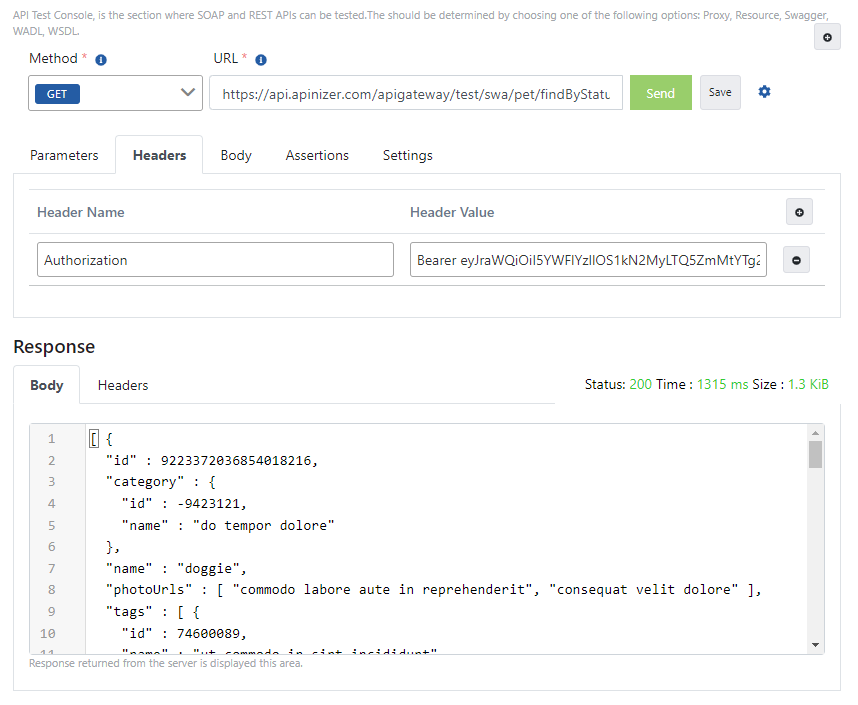
The value in the "access\_token" field in the response message, when given as a value to the "Authorization" key in all requests to be sent to this API Proxy, provides secure access to the relevant API.
**The image containing the operation of sending a request with token information through Apinizer Test Console is shown below:**
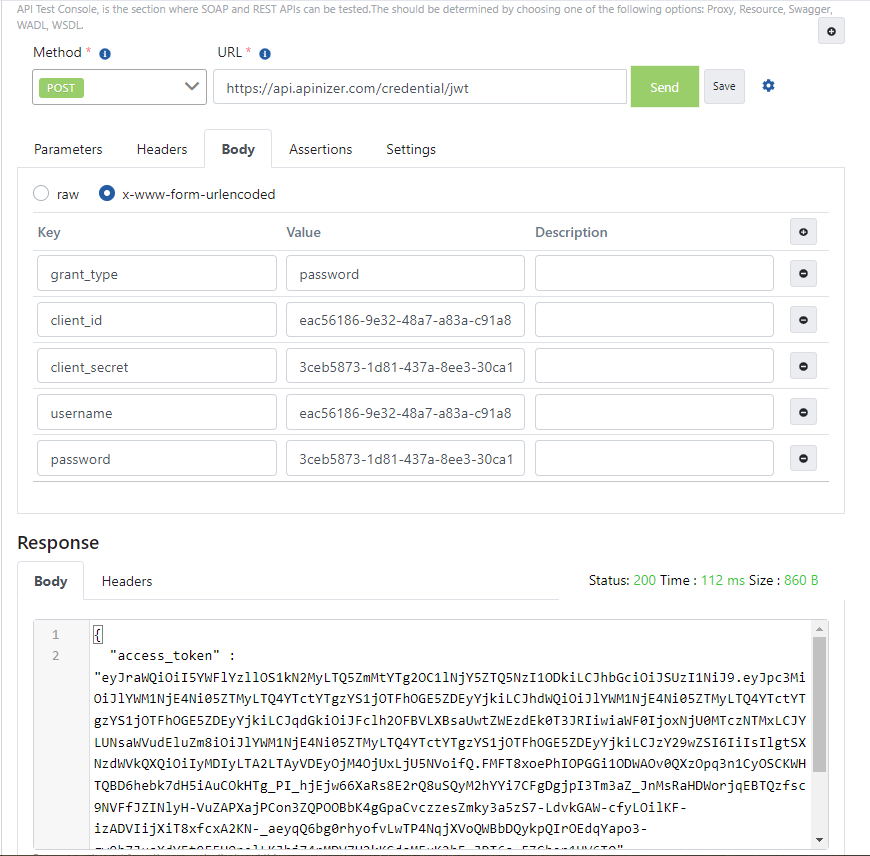
 #### If grant\_type is password
Add a JWT Authentication policy with Manage From ACL option. Go to Token Settings panel from Credential screen, select Grant Type value as Password and save.
Send your token acquisition request with a message like the example below.
**The image containing the settings for sending a request to Token Service through Apinizer Test Console is shown below:**
#### If grant\_type is password
Add a JWT Authentication policy with Manage From ACL option. Go to Token Settings panel from Credential screen, select Grant Type value as Password and save.
Send your token acquisition request with a message like the example below.
**The image containing the settings for sending a request to Token Service through Apinizer Test Console is shown below:**
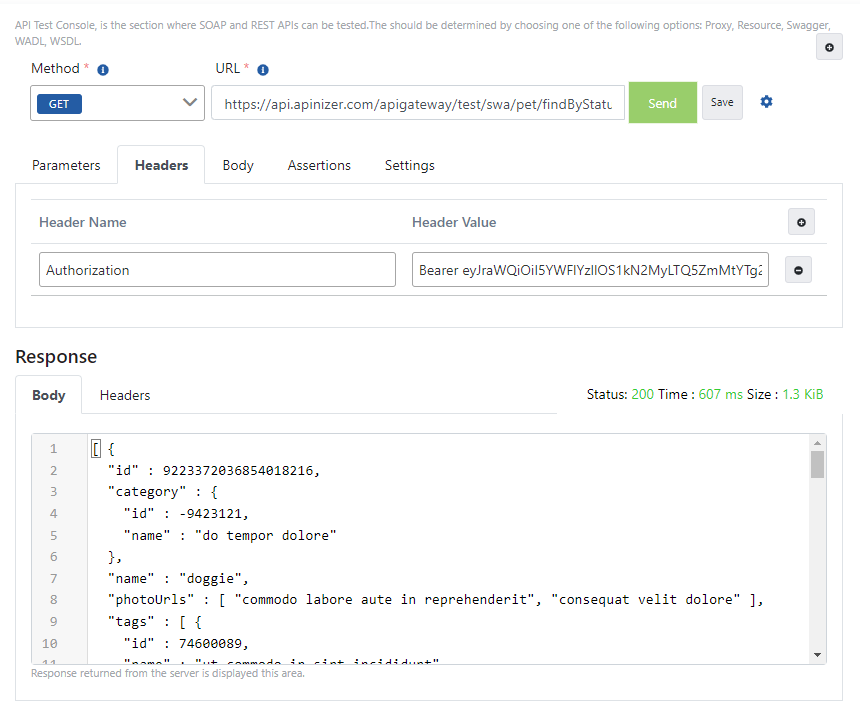
 The value in the "access\_token" field in the response message, when given as a value to the "Authorization" key in all requests to be sent to this API Proxy, provides secure access to the relevant API.
**The image containing the operation of sending a request with token information through Apinizer Test Console is shown below:**
The value in the "access\_token" field in the response message, when given as a value to the "Authorization" key in all requests to be sent to this API Proxy, provides secure access to the relevant API.
**The image containing the operation of sending a request with token information through Apinizer Test Console is shown below:**
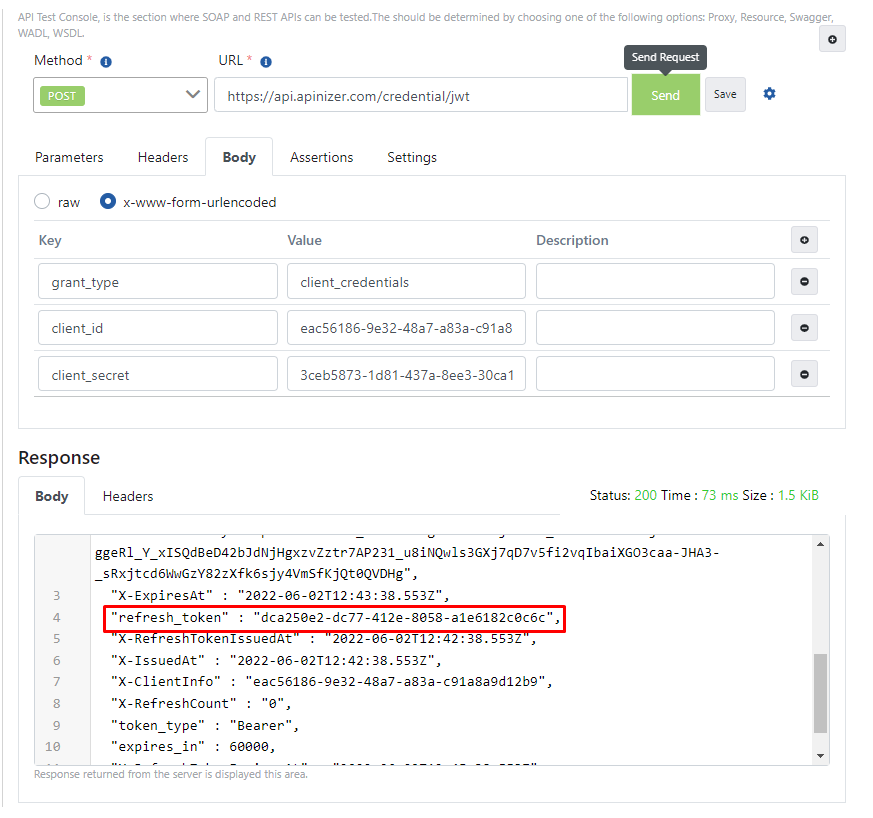
 #### If grant\_type is refresh\_token
Add a JWT Authentication policy with Manage From ACL option. Go to Token Settings panel from Credential screen, enable Token Refresh option and save.
Send your token acquisition request with a message like the example below.
**The image containing the settings for sending a request to Token Service through Apinizer Test Console is shown below:**
#### If grant\_type is refresh\_token
Add a JWT Authentication policy with Manage From ACL option. Go to Token Settings panel from Credential screen, enable Token Refresh option and save.
Send your token acquisition request with a message like the example below.
**The image containing the settings for sending a request to Token Service through Apinizer Test Console is shown below:**
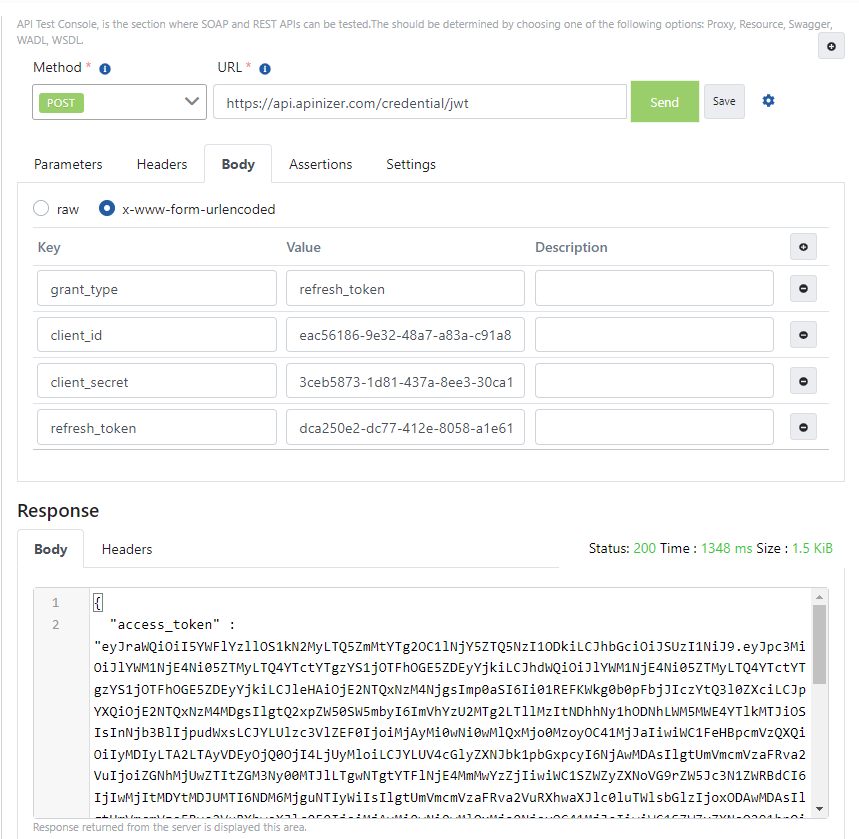
 To refresh the token, take the value in the "refresh\_token" field in the response from the first request and give it as a value to the refresh\_token key in the message you prepared as below.
The value in the "access\_token" field in the response to come will be your refreshed token value.
**The image containing the example request sent to refresh the token through Apinizer Test Console is shown below:**
To refresh the token, take the value in the "refresh\_token" field in the response from the first request and give it as a value to the refresh\_token key in the message you prepared as below.
The value in the "access\_token" field in the response to come will be your refreshed token value.
**The image containing the example request sent to refresh the token through Apinizer Test Console is shown below:**
 ### 2.2 Token Acquisition with OAuth2
If the "Manage From ACL" option is selected in the created OAuth2 Policy, tokens are acquired using this method.
Prepare a new HTTP request using Apinizer Test Console or another application of your choice.
* The address should be entered similar to the following according to your own Apinizer access address: `https://apinizerErisimAdresiniz/credential/token`.
If the **Allow URL Parameters** option is selected, information can be sent using GET method and URL parameters. (See the table below for parameters to be sent)
* HTTP method should be POST.
* "x-www-form-urlencoded" value should be selected in the Body field. If Apinizer Test Console is not used, a header should be added with "Content-Type" name and "application/x-www-form-urlencoded" value.
* The values to be entered in the Body field are as shown in the table below.
| Key Name | Value to Enter if "client\_credentials" is Selected When Defining Policy | Value to Enter if "password" is Selected When Defining Policy |
| -------------- | ------------------------------------------------------------------------ | ---------------------------------------------------------------------- |
| grant\_type | client\_credentials | password |
| client\_id | Client Id value belonging to Credentials | Client Id value belonging to Credentials |
| client\_secret | Client Secret value belonging to Credentials | Client Secret value belonging to Credentials |
| username | This field is not added | Username of one of the records in the authentication pool you selected |
| password | This field is not added | Password of one of the records in the authentication pool you selected |
#### Token Refresh
If the **Token Should Be Immortal** option is closed and the **Token Refresh Should Be** option is opened, *tokens* that will become invalid after a certain period can be refreshed within the period specified in the **Refreshed Token Validity Period** field.
Prepare a new HTTP request using Apinizer Test Console or another application of your choice.
* The address should be entered similar to the following according to your own Apinizer access address: `https://apinizerErisimAdresiniz/credential/token`.
If the **Allow URL Parameters** option is selected, information can be sent using GET method through URL parameters. (See the table below for parameters to be sent).
* HTTP method should be POST.
* "x-www-form-urlencoded" value should be selected in the Body field. If Apinizer Test Console is not used, a header should be added with "Content-Type" name and "application/x-www-form-urlencoded" value.
* The values to be entered in the Body field are as shown in the table below
| Key Name | Key Value |
| -------------- | ------------------------------------------------------------------ |
| grant\_type | refresh\_token |
| client\_id | Client Id value belonging to Credentials |
| client\_secret | Client Secret value belonging to Credentials |
| refresh\_token | Value in the "refresh\_token" key in the previously acquired token |
#### If grant\_type is client\_credentials
Add an OAuth2 Authentication policy with Manage From ACL option. Go to Token Settings panel from Credential screen and save default values.
Send your token acquisition request with a message like the example below.
**The image containing the settings for sending a request to Token Service through Apinizer Test Console is shown below:**
### 2.2 Token Acquisition with OAuth2
If the "Manage From ACL" option is selected in the created OAuth2 Policy, tokens are acquired using this method.
Prepare a new HTTP request using Apinizer Test Console or another application of your choice.
* The address should be entered similar to the following according to your own Apinizer access address: `https://apinizerErisimAdresiniz/credential/token`.
If the **Allow URL Parameters** option is selected, information can be sent using GET method and URL parameters. (See the table below for parameters to be sent)
* HTTP method should be POST.
* "x-www-form-urlencoded" value should be selected in the Body field. If Apinizer Test Console is not used, a header should be added with "Content-Type" name and "application/x-www-form-urlencoded" value.
* The values to be entered in the Body field are as shown in the table below.
| Key Name | Value to Enter if "client\_credentials" is Selected When Defining Policy | Value to Enter if "password" is Selected When Defining Policy |
| -------------- | ------------------------------------------------------------------------ | ---------------------------------------------------------------------- |
| grant\_type | client\_credentials | password |
| client\_id | Client Id value belonging to Credentials | Client Id value belonging to Credentials |
| client\_secret | Client Secret value belonging to Credentials | Client Secret value belonging to Credentials |
| username | This field is not added | Username of one of the records in the authentication pool you selected |
| password | This field is not added | Password of one of the records in the authentication pool you selected |
#### Token Refresh
If the **Token Should Be Immortal** option is closed and the **Token Refresh Should Be** option is opened, *tokens* that will become invalid after a certain period can be refreshed within the period specified in the **Refreshed Token Validity Period** field.
Prepare a new HTTP request using Apinizer Test Console or another application of your choice.
* The address should be entered similar to the following according to your own Apinizer access address: `https://apinizerErisimAdresiniz/credential/token`.
If the **Allow URL Parameters** option is selected, information can be sent using GET method through URL parameters. (See the table below for parameters to be sent).
* HTTP method should be POST.
* "x-www-form-urlencoded" value should be selected in the Body field. If Apinizer Test Console is not used, a header should be added with "Content-Type" name and "application/x-www-form-urlencoded" value.
* The values to be entered in the Body field are as shown in the table below
| Key Name | Key Value |
| -------------- | ------------------------------------------------------------------ |
| grant\_type | refresh\_token |
| client\_id | Client Id value belonging to Credentials |
| client\_secret | Client Secret value belonging to Credentials |
| refresh\_token | Value in the "refresh\_token" key in the previously acquired token |
#### If grant\_type is client\_credentials
Add an OAuth2 Authentication policy with Manage From ACL option. Go to Token Settings panel from Credential screen and save default values.
Send your token acquisition request with a message like the example below.
**The image containing the settings for sending a request to Token Service through Apinizer Test Console is shown below:**
 The value in the "access\_token" field in the response message, when given as a value to the "Authorization" key in all requests to be sent to this API Proxy, provides secure access to the relevant API.
**The image containing the operation of sending a request with token information through Apinizer Test Console is shown below:**
The value in the "access\_token" field in the response message, when given as a value to the "Authorization" key in all requests to be sent to this API Proxy, provides secure access to the relevant API.
**The image containing the operation of sending a request with token information through Apinizer Test Console is shown below:**
 #### If grant\_type is password
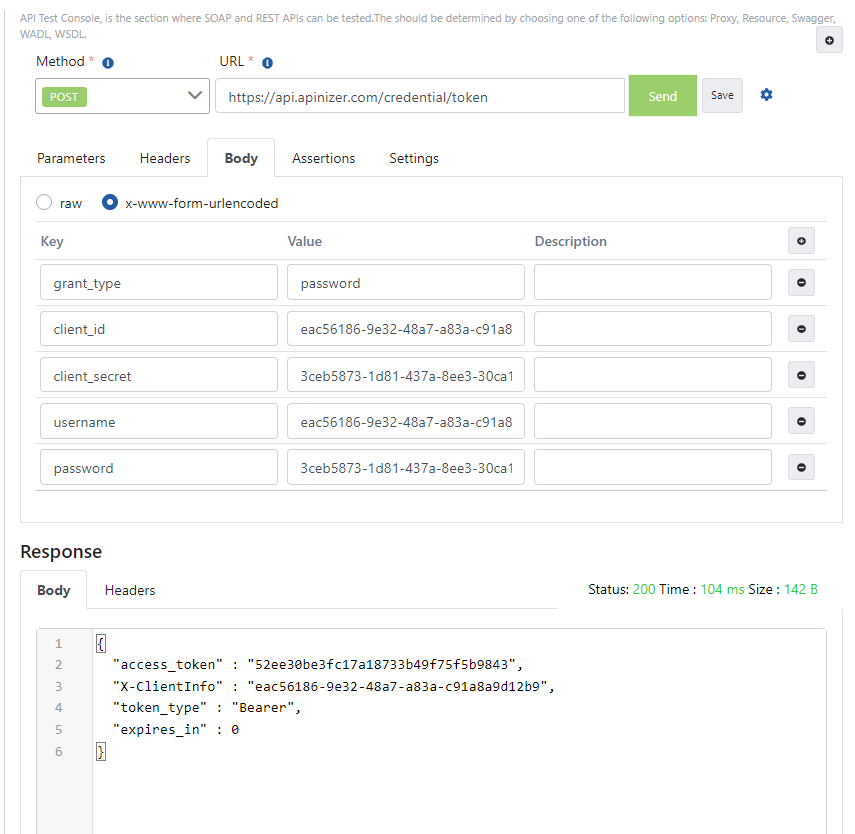
Add an OAuth2 Authentication policy with Manage From ACL option. Go to Token Settings panel from Credential screen, select Grant Type value as Password and save.
Send your token acquisition request with a message like the example below.
**The image containing the settings for sending a request to Token Service through Apinizer Test Console is shown below:**
#### If grant\_type is password
Add an OAuth2 Authentication policy with Manage From ACL option. Go to Token Settings panel from Credential screen, select Grant Type value as Password and save.
Send your token acquisition request with a message like the example below.
**The image containing the settings for sending a request to Token Service through Apinizer Test Console is shown below:**
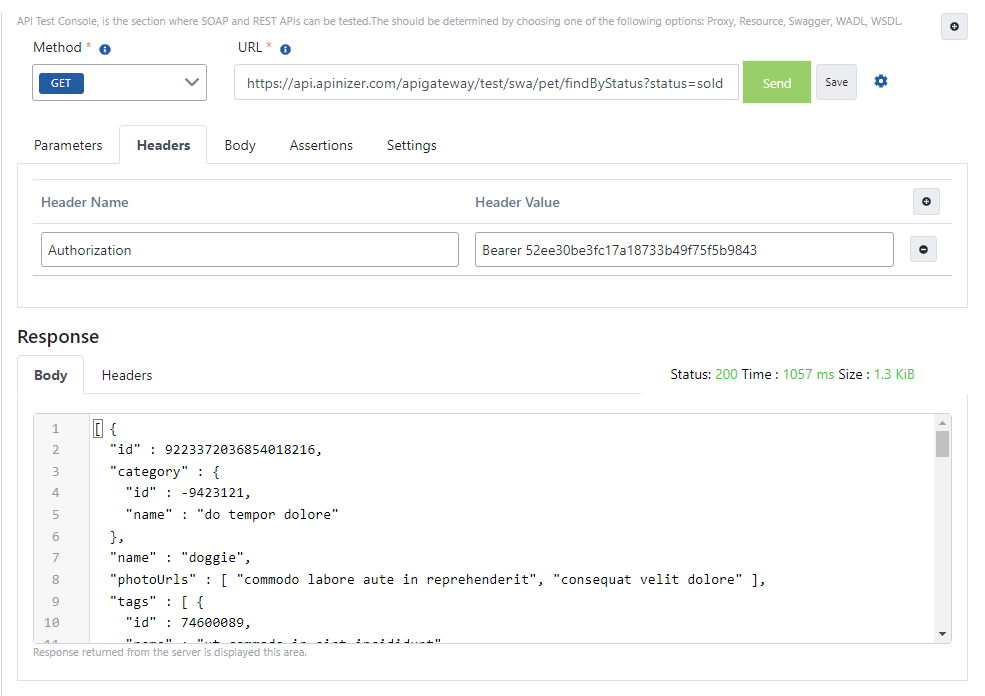
 The value in the "access\_token" field in the response message, when given as a value to the "Authorization" key in all requests to be sent to this API Proxy, provides secure access to the relevant API.
**The image containing the operation of sending a request with token information through Apinizer Test Console is shown below:**
The value in the "access\_token" field in the response message, when given as a value to the "Authorization" key in all requests to be sent to this API Proxy, provides secure access to the relevant API.
**The image containing the operation of sending a request with token information through Apinizer Test Console is shown below:**
 #### If grant\_type is refresh\_token
Add an OAuth2 Authentication policy with Manage From ACL option. Go to Token Settings panel from Credential screen, enable Token Refresh option and save.
Send your token acquisition request with a message like the example below.
**The image containing the settings for sending a request to Token Service through Apinizer Test Console is shown below:**
#### If grant\_type is refresh\_token
Add an OAuth2 Authentication policy with Manage From ACL option. Go to Token Settings panel from Credential screen, enable Token Refresh option and save.
Send your token acquisition request with a message like the example below.
**The image containing the settings for sending a request to Token Service through Apinizer Test Console is shown below:**
 To refresh the token, take the value in the "refresh\_token" field in the response from the first request and give it as a value to the refresh\_token key in the message you prepared as below.
The value in the "access\_token" field in the response to come will be your refreshed token value.
**The image containing the example request sent to refresh the token through Apinizer Test Console is shown below:**
To refresh the token, take the value in the "refresh\_token" field in the response from the first request and give it as a value to the refresh\_token key in the message you prepared as below.
The value in the "access\_token" field in the response to come will be your refreshed token value.
**The image containing the example request sent to refresh the token through Apinizer Test Console is shown below:**
