> ## Documentation Index
> Fetch the complete documentation index at: https://docs.apinizer.com/llms.txt
> Use this file to discover all available pages before exploring further.
# Test Console
> You can test SOAP and REST APIs without using external tools like Postman or SOAP UI, save test scenarios, define assertions, examine requests and responses, and manage environment variables.
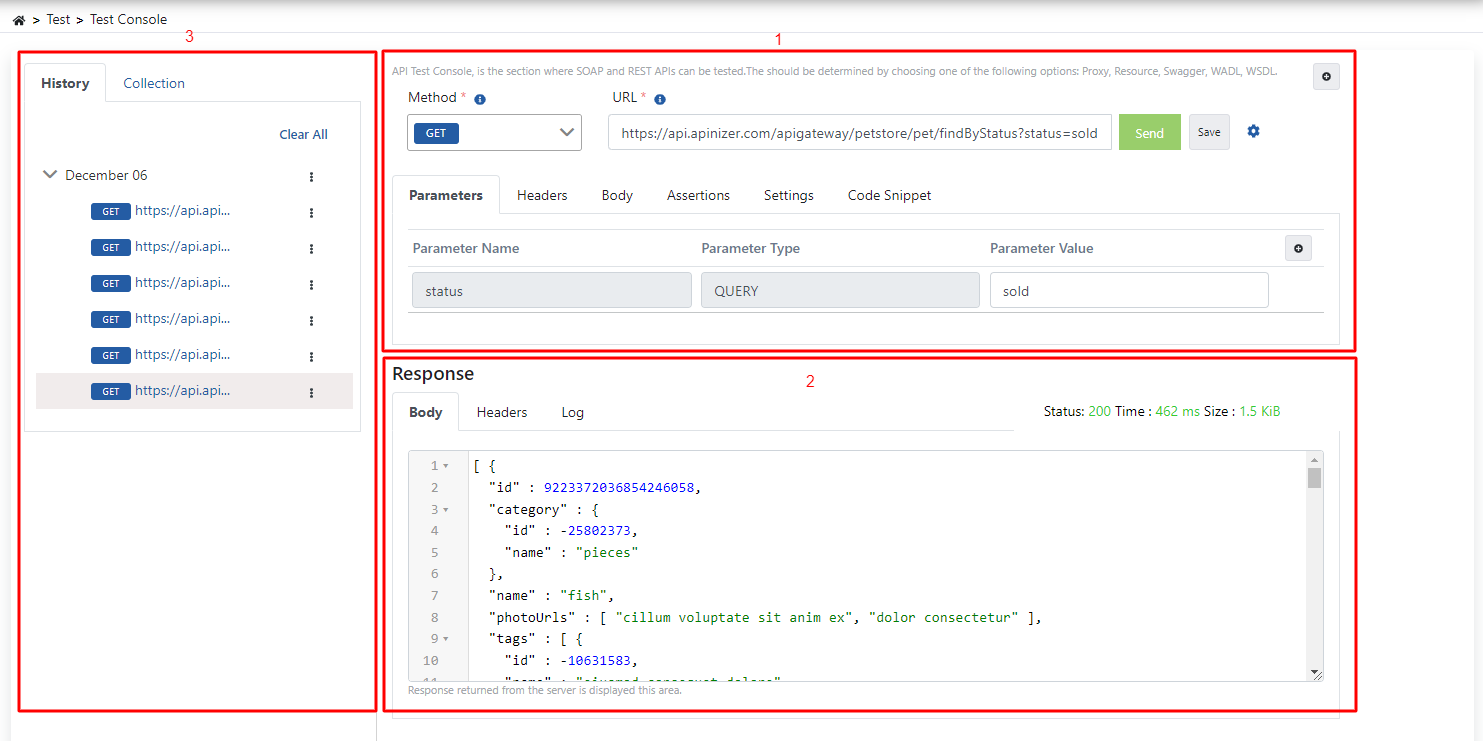 Test Console consists of three main sections:
Manages request preparation operations
Manages result operations related to response
Displays test history and tests saved as groups
## Request
### Creating Request Address
There are two ways to create a request address:
* The endpoint to be tested can be written manually
* An API Proxy on Apinizer can be tested from the **Test Helper** interface or a request address can be created from an API definition file
#### Creating Request Address with Test Helper
When the selected button in the following image is clicked, the Test Helper dialog opens.
Test Console consists of three main sections:
Manages request preparation operations
Manages result operations related to response
Displays test history and tests saved as groups
## Request
### Creating Request Address
There are two ways to create a request address:
* The endpoint to be tested can be written manually
* An API Proxy on Apinizer can be tested from the **Test Helper** interface or a request address can be created from an API definition file
#### Creating Request Address with Test Helper
When the selected button in the following image is clicked, the Test Helper dialog opens.

 The fields used for Test Helper configuration are shown in the table below.
| Field | Description |
| -------------------- | ------------------------------------------------------------------------------------------------------------------------------------------------------------------------------------------------------------------------------------------------------------------------------------------------------------------------------------------------------------------------------------------------------------------------------------------------------------------------------------------------------------------------------------------- |
| **Request Type** | The API type to be tested is determined by selecting one of Proxy, Proxy Group, Swagger, OpenApi, WADL, WSDL options. These types:
The fields used for Test Helper configuration are shown in the table below.
| Field | Description |
| -------------------- | ------------------------------------------------------------------------------------------------------------------------------------------------------------------------------------------------------------------------------------------------------------------------------------------------------------------------------------------------------------------------------------------------------------------------------------------------------------------------------------------------------------------------------------------- |
| **Request Type** | The API type to be tested is determined by selecting one of Proxy, Proxy Group, Swagger, OpenApi, WADL, WSDL options. These types:
**Proxy, Proxy Group**
These types are selected when API Proxies in your selected project on Apinizer are desired to be tested.
Also, it is tested from the environments where the selected API Proxy is deployed.
**Swagger, OpenApi, WADL, WSDL**
These types are selected when testing is desired to be performed from an API definition file. |
| **Proxy Group List** | API Proxy groups that can be tested within the same project are listed. |
| **Proxy List** | API Proxies that can be tested within the same project are listed.
The Proxy must be deployed to be tested. |
| **Service URL** | The service URL of the API to be tested. Parse operation is performed via URL and endpoints of the API are created. |
| **Endpoints** | The endpoint to be tested is selected from the endpoints in the API. |
| **Environment List** | The environment where the Proxy will be tested is selected. |
If the created endpoint has a parameter list and example request body, they are also created by Apinizer.
### Adding Query Parameter
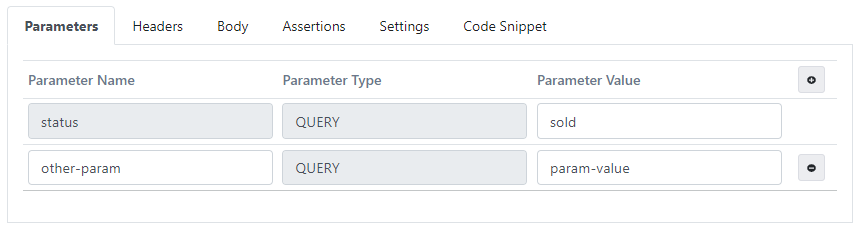
Query parameters of the request are managed from the Parameters tab. Each edited value is automatically updated on the URL information.
 ### Adding Header
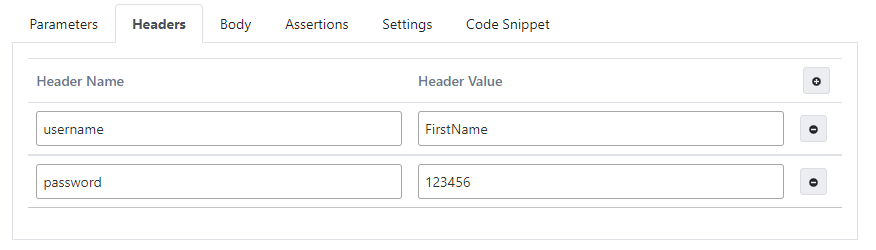
Request headers are managed from the Headers tab.
### Adding Header
Request headers are managed from the Headers tab.
 ### Adding Body
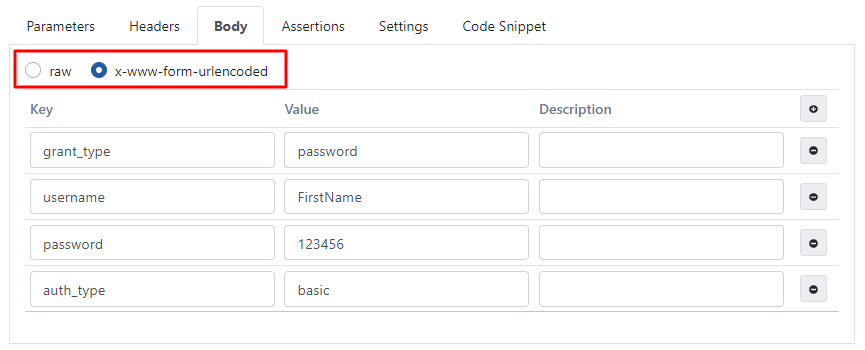
Data to be added to the request body can be created in two different ways: raw, x-www-form-urlencoded
### Adding Body
Data to be added to the request body can be created in two different ways: raw, x-www-form-urlencoded
 #### Format XML
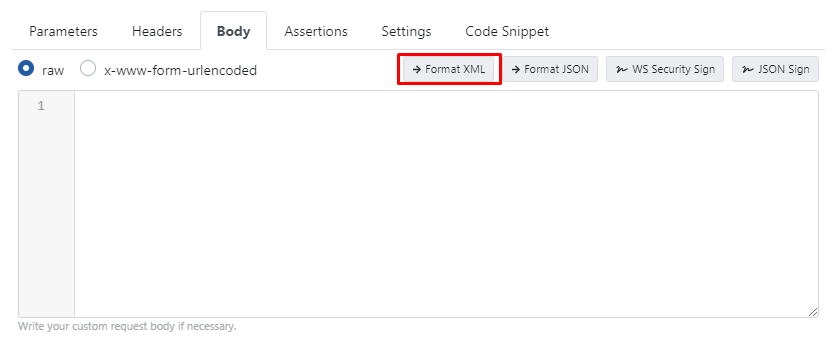
Format XML operation can be performed with the data to be added to the request body.
#### Format XML
Format XML operation can be performed with the data to be added to the request body.
 #### Format JSON
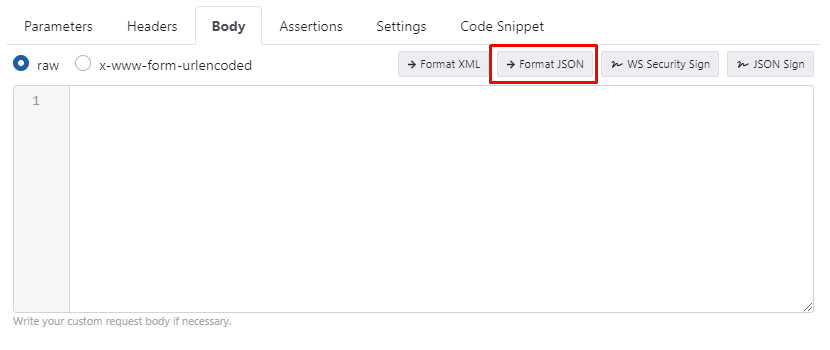
Format JSON operation can be performed with the data to be added to the request body.
#### Format JSON
Format JSON operation can be performed with the data to be added to the request body.
 #### WS Security Sign
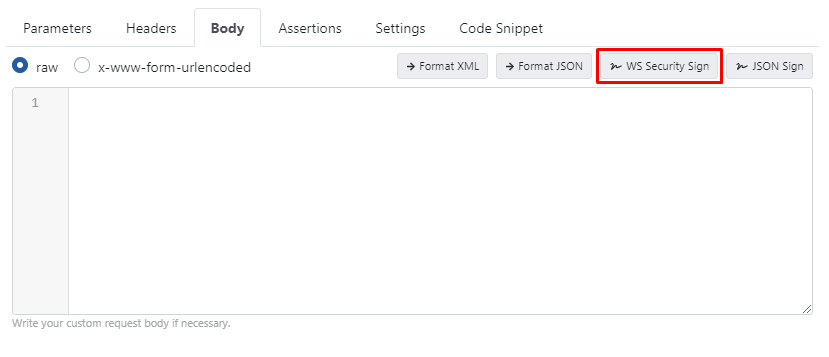
WS Security Sign operation can be performed when the data to be added to the request body is selected as raw.
#### WS Security Sign
WS Security Sign operation can be performed when the data to be added to the request body is selected as raw.
 When the WS Security Signing button is pressed, the data in the test console is signed with the following configuration.
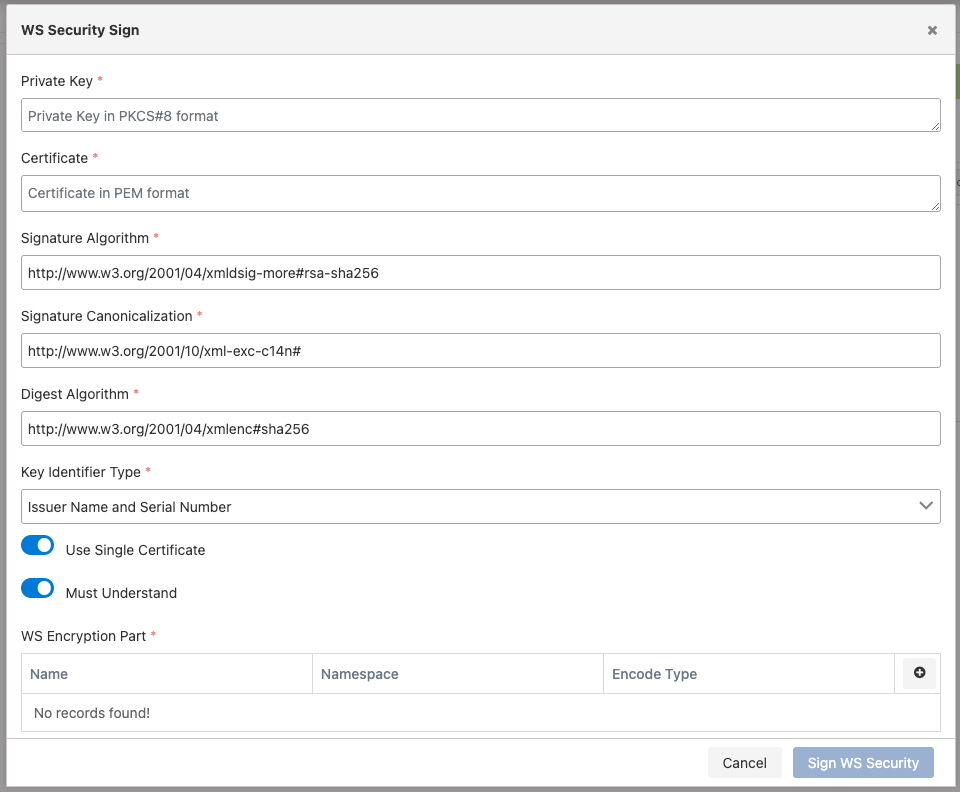 The fields used for WS Security Sign configuration are shown in the table below.
| Field | Description |
| ------------------------------ | ---------------------------------------------------------------------------------------------------------------------------------------------------------------------------------------------------------------------------------------------------- |
| **Private Key** | The textual form in PKCS#8 PEM format of the Private Key value to be used for signing. |
| **Certificate** | The textual form in PKCS#8 PEM format of the certificate to be used for signing. |
| **Signature Algorithm** | Signature algorithm information. |
| **Signature Canonicalization** | Signature canonicalization information. |
| **Digest Algorithm** | Digest algorithm to be used in the signature. |
| **Key Identifier Type** | Information about where and how the signature key will be placed in the message. |
| **Use Single Certificate** | Information about whether signing will be done with a single certificate. |
| **Must Understand** | Specifies what the "Must Understand" value should be in the WS-Security header. |
| **WS Encryption Part** | Information about which parts of the data will be signed. Multiple values can be entered.
The fields used for WS Security Sign configuration are shown in the table below.
| Field | Description |
| ------------------------------ | ---------------------------------------------------------------------------------------------------------------------------------------------------------------------------------------------------------------------------------------------------- |
| **Private Key** | The textual form in PKCS#8 PEM format of the Private Key value to be used for signing. |
| **Certificate** | The textual form in PKCS#8 PEM format of the certificate to be used for signing. |
| **Signature Algorithm** | Signature algorithm information. |
| **Signature Canonicalization** | Signature canonicalization information. |
| **Digest Algorithm** | Digest algorithm to be used in the signature. |
| **Key Identifier Type** | Information about where and how the signature key will be placed in the message. |
| **Use Single Certificate** | Information about whether signing will be done with a single certificate. |
| **Must Understand** | Specifies what the "Must Understand" value should be in the WS-Security header. |
| **WS Encryption Part** | Information about which parts of the data will be signed. Multiple values can be entered.
XML element name to be signed, namespace information of the XML element, and information about whether it will be signed as Element or Content. |
#### Sign JSON
Sign JSON operation can be performed when the data to be added to the request body is selected as raw.
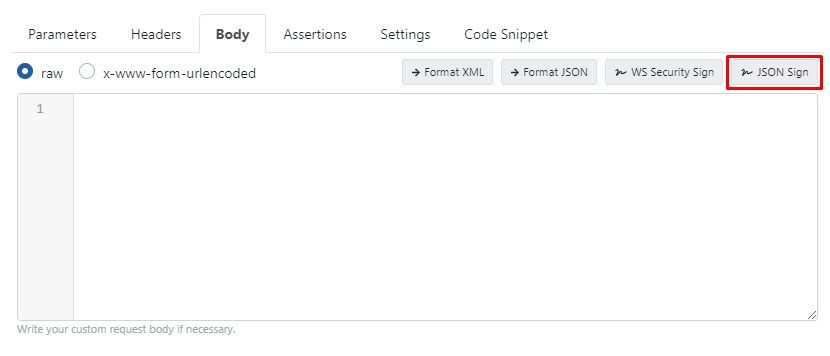 When the JSON signing button is pressed, the data in the test console is signed with the following configuration.
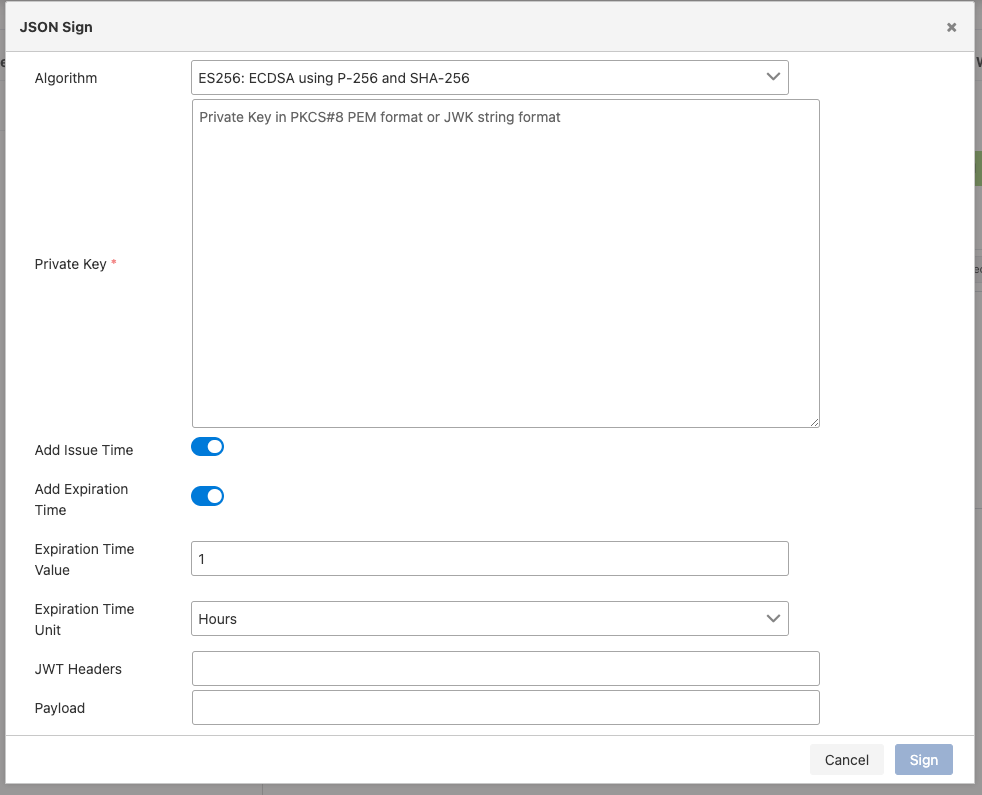 The fields used for Sign JSON configuration are shown in the table below.
| Field | Description |
| ------------------------- | --------------------------------------------------------------------------------------------------------------------------------------------- |
| **Algorithm** | Algorithm information for signing |
| **Private Key** | The textual form in PKCS#8 PEM or JWK format of the Private Key value to be used for signing. |
| **Add Issue Time** | This option should be activated if the creation time is to be added to the signature to be created. |
| **Add Expiration Time** | This option should be activated if the expiration time is to be added to the signature to be created. |
| **Expiration Time Value** | Information about how long the signature will be valid |
| **Expiration Time Unit** | Time unit of the validity period of the signature. |
| **JWT Headers** | If extra header information is desired to be added to the header part of the data to be signed, it can be added in JSON format to this field. |
| **Payload** | If extra information is desired to be added to the body part of the data to be signed, it can be added in JSON format to this field. |
### Creating Assertion
The Assertion tab allows verification of the response related to the request by querying values in the body with timeout, HTTP status code, body, JsonPath/XPath and comparing with expected values.
The fields used for Sign JSON configuration are shown in the table below.
| Field | Description |
| ------------------------- | --------------------------------------------------------------------------------------------------------------------------------------------- |
| **Algorithm** | Algorithm information for signing |
| **Private Key** | The textual form in PKCS#8 PEM or JWK format of the Private Key value to be used for signing. |
| **Add Issue Time** | This option should be activated if the creation time is to be added to the signature to be created. |
| **Add Expiration Time** | This option should be activated if the expiration time is to be added to the signature to be created. |
| **Expiration Time Value** | Information about how long the signature will be valid |
| **Expiration Time Unit** | Time unit of the validity period of the signature. |
| **JWT Headers** | If extra header information is desired to be added to the header part of the data to be signed, it can be added in JSON format to this field. |
| **Payload** | If extra information is desired to be added to the body part of the data to be signed, it can be added in JSON format to this field. |
### Creating Assertion
The Assertion tab allows verification of the response related to the request by querying values in the body with timeout, HTTP status code, body, JsonPath/XPath and comparing with expected values.
 The fields used for Assertion configuration are shown in the table below.
| Field | Description |
| ----------------------------- | ------------------------------------------------------------------------------------------------------------------------------------ |
| **Use Timeout for Assertion** | If activated, verification is performed using the timeout value of the request. |
| **Result Status Code** | Activated to perform verification based on status code. |
| **Expected Status Code** | The value of the expected status code is written. |
| **Result Body** | Activated to verify the body of the response. |
| **Expected Result Body** | The value of the expected response body is written. |
| **XPath Result** | Activated to verify a value within the body of the response. The data type of the body value of the response must be in XML format. |
| **Expected XPath** | An XPath query is written for the key information containing the value to be verified in the response body. |
| **Expected XPath Result** | The expected result is written for the XPath information to be verified in the response body. |
| **JsonPath Result** | Activated to verify a value within the body of the response. The data type of the body value of the response must be in JSON format. |
| **Expected JsonPath** | A JsonPath query is written for the key information containing the value to be verified in the response body. |
| **Expected JsonPath Result** | The expected result is written for the JsonPath information to be verified in the response body. |
### Settings
Timeout and secure connection (SSL/TLS/mTLS) settings are managed in the Settings tab.
The fields used for Assertion configuration are shown in the table below.
| Field | Description |
| ----------------------------- | ------------------------------------------------------------------------------------------------------------------------------------ |
| **Use Timeout for Assertion** | If activated, verification is performed using the timeout value of the request. |
| **Result Status Code** | Activated to perform verification based on status code. |
| **Expected Status Code** | The value of the expected status code is written. |
| **Result Body** | Activated to verify the body of the response. |
| **Expected Result Body** | The value of the expected response body is written. |
| **XPath Result** | Activated to verify a value within the body of the response. The data type of the body value of the response must be in XML format. |
| **Expected XPath** | An XPath query is written for the key information containing the value to be verified in the response body. |
| **Expected XPath Result** | The expected result is written for the XPath information to be verified in the response body. |
| **JsonPath Result** | Activated to verify a value within the body of the response. The data type of the body value of the response must be in JSON format. |
| **Expected JsonPath** | A JsonPath query is written for the key information containing the value to be verified in the response body. |
| **Expected JsonPath Result** | The expected result is written for the JsonPath information to be verified in the response body. |
### Settings
Timeout and secure connection (SSL/TLS/mTLS) settings are managed in the Settings tab.
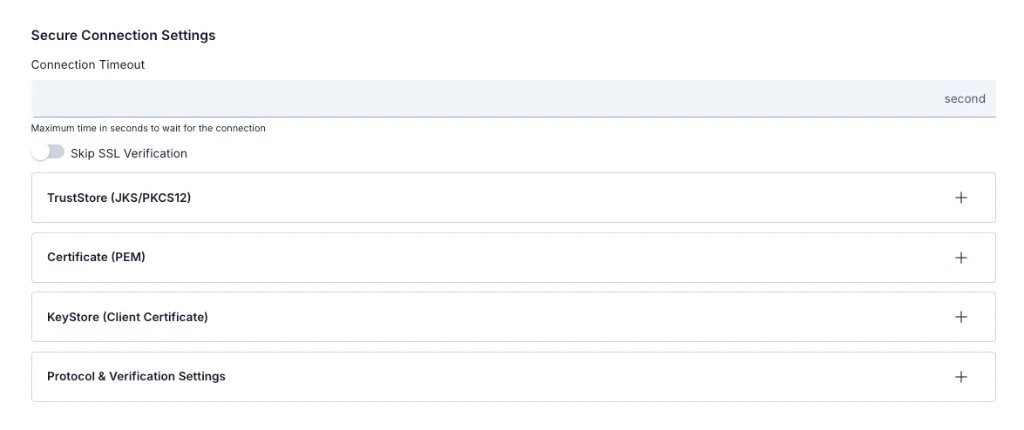 #### Top fields
| Field | Description |
| ------------------------- | ---------------------------------------------------------------------------------------------------------------------------------------------------------------------------------------------------- |
| **Connection Timeout** | Maximum time in seconds to wait for the connection. Helper text: maximum time to wait for the connection. |
| **Skip SSL Verification** | When on, server certificate verification is skipped; useful for self-signed environments. When enabled, TrustStore, certificate, and client certificate panels are typically not used or are hidden. |
#### Expandable sections
Use **+** on the right to expand each panel and configure TrustStore, PEM certificate, client KeyStore, and protocol/hostname verification:
* **TrustStore (JKS/PKCS12)**
* **Certificate (PEM)**
* **KeyStore (Client Certificate)** — for mTLS when the backend requires a client certificate
* **Protocol & Verification Settings** — supported TLS versions and hostname verifier
#### TrustStore (JKS/PKCS12)
Used to verify the server certificate:
| Option | Description |
| --------------------- | --------------------------------------------------------------------------------------------------- |
| **Select Existing** | Choose a TrustStore from the existing KeyStore pool. Click the plus (+) button to create a new one. |
| **Upload TrustStore** | Upload a .jks, .p12, or .pfx file. Enter the password; use **Try It** to verify the password. |
#### Certificate (PEM)
PEM format certificate usage:
| Option | Description |
| ------------------- | ------------------------------------------------------------------------------------------------------- |
| **Select Existing** | Choose a certificate from the existing certificate pool. Click the plus (+) button to create a new one. |
| **Upload PEM Cert** | Upload a .pem, .crt, or .cer file. |
#### KeyStore (Client Certificate)
Client certificate for mTLS when the target server requires it:
| Option | Description |
| ------------------- | ------------------------------------------------------------------------------------------------- |
| **Select Existing** | Choose a KeyStore from the existing KeyStore pool. Click the plus (+) button to create a new one. |
| **Upload KeyStore** | Upload a .jks, .p12, or .pfx file. Enter the password; use **Try It** to verify the password. |
#### Protocol and Verification Settings
| Field | Description |
| ----------------------- | -------------------------------------------------------------------------------------------- |
| **Supported Protocols** | TLS/SSL protocol versions can be selected (TLSv1.3, TLSv1.2, etc.). |
| **Hostname Verifier** | Server hostname verification method can be selected (Default, Strict, Browser Compat, Noop). |
To reuse uploaded TrustStore, Certificate, or KeyStore files on other screens later, check **Save to Keystore Pool** or **Save to Certificate Pool** and provide a name.
For detailed information about the KeyStore and TrustStore pool, see the [Key Stores](/en/admin/secrets-management/keystore-management) page.
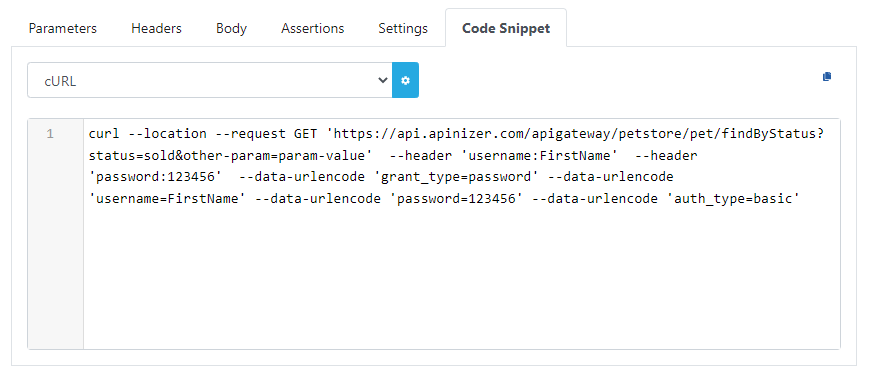
### Code Snippet
The Code Snippet tab enables generating the code necessary to send the request via cURL.
#### Top fields
| Field | Description |
| ------------------------- | ---------------------------------------------------------------------------------------------------------------------------------------------------------------------------------------------------- |
| **Connection Timeout** | Maximum time in seconds to wait for the connection. Helper text: maximum time to wait for the connection. |
| **Skip SSL Verification** | When on, server certificate verification is skipped; useful for self-signed environments. When enabled, TrustStore, certificate, and client certificate panels are typically not used or are hidden. |
#### Expandable sections
Use **+** on the right to expand each panel and configure TrustStore, PEM certificate, client KeyStore, and protocol/hostname verification:
* **TrustStore (JKS/PKCS12)**
* **Certificate (PEM)**
* **KeyStore (Client Certificate)** — for mTLS when the backend requires a client certificate
* **Protocol & Verification Settings** — supported TLS versions and hostname verifier
#### TrustStore (JKS/PKCS12)
Used to verify the server certificate:
| Option | Description |
| --------------------- | --------------------------------------------------------------------------------------------------- |
| **Select Existing** | Choose a TrustStore from the existing KeyStore pool. Click the plus (+) button to create a new one. |
| **Upload TrustStore** | Upload a .jks, .p12, or .pfx file. Enter the password; use **Try It** to verify the password. |
#### Certificate (PEM)
PEM format certificate usage:
| Option | Description |
| ------------------- | ------------------------------------------------------------------------------------------------------- |
| **Select Existing** | Choose a certificate from the existing certificate pool. Click the plus (+) button to create a new one. |
| **Upload PEM Cert** | Upload a .pem, .crt, or .cer file. |
#### KeyStore (Client Certificate)
Client certificate for mTLS when the target server requires it:
| Option | Description |
| ------------------- | ------------------------------------------------------------------------------------------------- |
| **Select Existing** | Choose a KeyStore from the existing KeyStore pool. Click the plus (+) button to create a new one. |
| **Upload KeyStore** | Upload a .jks, .p12, or .pfx file. Enter the password; use **Try It** to verify the password. |
#### Protocol and Verification Settings
| Field | Description |
| ----------------------- | -------------------------------------------------------------------------------------------- |
| **Supported Protocols** | TLS/SSL protocol versions can be selected (TLSv1.3, TLSv1.2, etc.). |
| **Hostname Verifier** | Server hostname verification method can be selected (Default, Strict, Browser Compat, Noop). |
To reuse uploaded TrustStore, Certificate, or KeyStore files on other screens later, check **Save to Keystore Pool** or **Save to Certificate Pool** and provide a name.
For detailed information about the KeyStore and TrustStore pool, see the [Key Stores](/en/admin/secrets-management/keystore-management) page.
### Code Snippet
The Code Snippet tab enables generating the code necessary to send the request via cURL.
 ### Creating New Test
If a new test is desired after a test operation is performed, the test field information can be refreshed by clicking the button marked in the following image.
### Creating New Test
If a new test is desired after a test operation is performed, the test field information can be refreshed by clicking the button marked in the following image.
 ## Response
### Response Body
The body of the response is shown in this section.
## Response
### Response Body
The body of the response is shown in this section.
 Format XML and Format JSON operations can be performed with the response body data.
### Request Response Headers
The headers of the response are shown in this section.
Format XML and Format JSON operations can be performed with the response body data.
### Request Response Headers
The headers of the response are shown in this section.
 ### Assertion Results
Results about whether assertions added to the request were successful are shown in this tab.
### Assertion Results
Results about whether assertions added to the request were successful are shown in this tab.
 ### Response Logs
The log of the response information is seen in this section.
### Response Logs
The log of the response information is seen in this section.
 ## History
The history of each request tested in the Test Console is stored. Test history is categorized by the days they were tested.
When the link to the test's log is clicked, the request can be tested again.
## History
The history of each request tested in the Test Console is stored. Test history is categorized by the days they were tested.
When the link to the test's log is clicked, the request can be tested again.
 ### Test History Deletion Operations
* Click the **Clear All** link to delete all history information
* Delete day-based history from the detail menu of the relevant day information
* Delete only history from the detail menu of the relevant history information
## Collection
Collection is the creation of test records configured under a group structure so that tests can be reused.
Multiple collections can be found within each collection.
### Saving Test to a Collection
After completing your test, click the **Save** button marked in the image to save it.
### Test History Deletion Operations
* Click the **Clear All** link to delete all history information
* Delete day-based history from the detail menu of the relevant day information
* Delete only history from the detail menu of the relevant history information
## Collection
Collection is the creation of test records configured under a group structure so that tests can be reused.
Multiple collections can be found within each collection.
### Saving Test to a Collection
After completing your test, click the **Save** button marked in the image to save it.
 Then, click the link of the collection to which the test will be assigned in the dialog named **Collection List** that opens.
Apinizer creates a collection named 'Default Collection' for startup.
After selecting your collection, the test is saved by giving it a name. The name of the default test record is determined as the endpoint URL information you tested.
Then, click the link of the collection to which the test will be assigned in the dialog named **Collection List** that opens.
Apinizer creates a collection named 'Default Collection' for startup.
After selecting your collection, the test is saved by giving it a name. The name of the default test record is determined as the endpoint URL information you tested.
 ### Collection-Based Operations
Operations that can be performed on a collection are done through the detail menu of the collection in the following image.
### Collection-Based Operations
Operations that can be performed on a collection are done through the detail menu of the collection in the following image.
 **Rename:** Used to change the name of the relevant collection. When clicked, a new name is given to the screen that appears and saved.
**Add New Collection:** Used to add a new collection inside the relevant collection.
**Delete Collection:** Used to delete the relevant collection. If a collection is deleted, all records connected to that collection will be deleted.
### Record-Based Operations
Many operations that can be performed on a record are accessed through the detail menu in the following image.
**Rename:** Used to change the name of the relevant collection. When clicked, a new name is given to the screen that appears and saved.
**Add New Collection:** Used to add a new collection inside the relevant collection.
**Delete Collection:** Used to delete the relevant collection. If a collection is deleted, all records connected to that collection will be deleted.
### Record-Based Operations
Many operations that can be performed on a record are accessed through the detail menu in the following image.
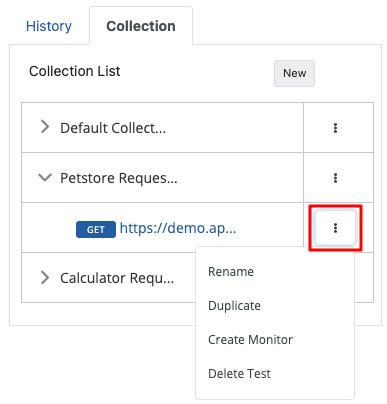 **Rename:** Used to change the name of the relevant test. When clicked, a new name is given to the screen that appears and saved.
**Duplicate:** Used to create a copy of the relevant test.
**Create Monitor:** Used to create an Uptime Monitor using the relevant test. Click the [Uptime Monitor](/en/monitor/api-health-check) page for detailed information.
**Delete Test:** Used to delete the relevant test.
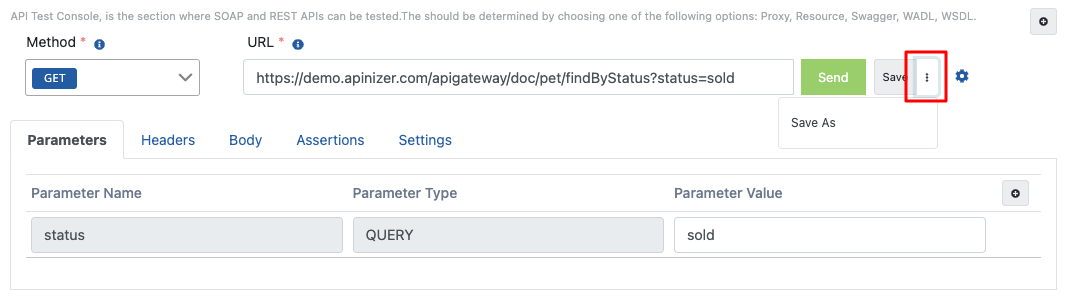
**Save As:** Click the button marked in the image to save a saved test to another collection.
**Rename:** Used to change the name of the relevant test. When clicked, a new name is given to the screen that appears and saved.
**Duplicate:** Used to create a copy of the relevant test.
**Create Monitor:** Used to create an Uptime Monitor using the relevant test. Click the [Uptime Monitor](/en/monitor/api-health-check) page for detailed information.
**Delete Test:** Used to delete the relevant test.
**Save As:** Click the button marked in the image to save a saved test to another collection.