> ## Documentation Index
> Fetch the complete documentation index at: https://docs.apinizer.com/llms.txt
> Use this file to discover all available pages before exploring further.
# API Integration
> Provides installation and configuration of Apinizer Integration on Kubernetes. Provides the ability to create workflows by seamlessly connecting one or more endpoints. Contains integration details with API Manager.
## Introduction
API integration provides the ability to create workflows by seamlessly connecting one or more endpoints.
## Pre-Installation Steps
Before starting the installation of Apinizer API Integration, the following should be noted:
Learn API Manager installation
API Manager must be installed. Also, API Integration must be present in your license key.
## Installation Steps
API Integration Installation is done in two ways.
* If Kubernetes management is done **through** Apinizer, you can install API Integration through API Manager.
* If Kubernetes management is **not** done through Apinizer, manual installation can be done to Kubernetes and then connection can be established with API Manager.
### API Integration Installation
#### If API Integration Installation Will Be Done Through API Manager
For API Integration installation through API Manager, the following section must be active in the General Settings menu.
If Kubernetes management is done through Apinizer, the "Kubernetes Management" option must be active on the General Settings page.
 In API Manager, go to **Administration → Server Management → Kubernetes Resources** page. Enable API Integration from the Deployment & Pods tab. Complete the installation by making the necessary definitions.
 In the opened dialog, define the required fields according to your organization.
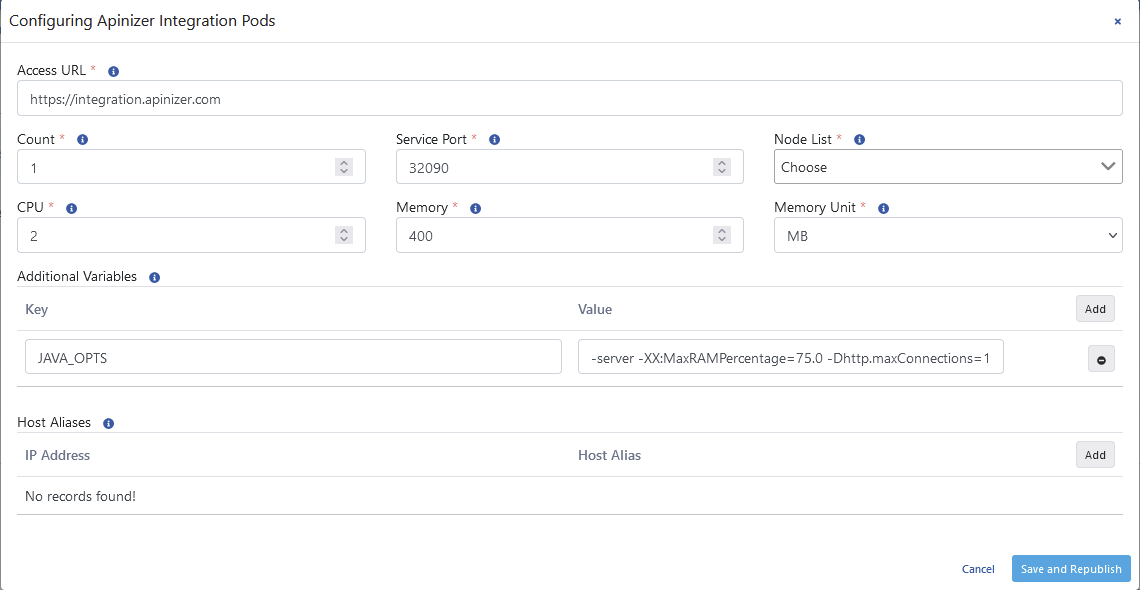 | Field | Description |
| ------------------------------------------------- | -------------------------------------------------------------------------------------------------------------------------------------------------------------------------------------------------------------------------------------------------------------------------------------------------------- |
| **Access URL** *(Access URL)* | API Integration access address. Example address: `http://:`. |
| **Count** *(Count)* | API Integration application count, adjusts the replicaSet setting in Kubernetes Cluster. |
| **Service Port** *(Service Port)* | API Integration access port. |
| **Node List** *(Node List)* | Sets which Kubernetes Worker servers the Pods will run on. Adjusts the NodeAffinity setting in Kubernetes. |
| **CPU** | Information about the maximum CPU core count the Pod will use. |
| **Memory** *(Memory)* | Maximum memory value the Pod will use. |
| **Memory Unit** *(Memory Unit)* | The unit of the value required for memory is selected; MB, GB. |
| **Additional Variables** *(Additional Variables)* | Variables and values to be run in the Pod are defined. |
| **Host Aliases** *(Host Aliases)* | IP addresses in the network can sometimes be placed behind host names, if these cannot be resolved through nameserver or are not defined in the host file, **Host Alias** definition must be made for application pods to resolve these names. Multiple domain names can be entered for each IP address. |
**Additional Variables**
When configuring the **Java Options** setting in the Additional Variables field, the following warning should be considered:
* When `-Xmx` and `-Xms` parameters are used, automatic heap sizing is disabled.
* When `-Xmx` and `-Xms` parameters are used, automatic heap sizing is disabled.
* Apinizer sets **JVM Heap** values to use **75.0%** of the memory given to the container since it runs inside the container.
* **UseContainerSupport** is active by default.
* Old flags `-XX:{Min|Max}RAMFraction` are now deprecated. There is a new `-XX:MaxRAMPercentage` flag that takes a value between 0.0 and 100.0 and defaults to 75.0. Therefore, if there is a 1 GB memory limit, the JVM heap is limited to \~ 750 MB by default.
For detailed information, [click here](https://www.eclipse.org/openj9/docs/xxinitialrampercentage/).
After completing the above steps and ensuring that the Pods belonging to API Integration on Kubernetes are in ready state, you can start using from **Project → Development → API Integrator → Task Flows** menu.
#### If API Integration Installation Will Not Be Done Through API Manager
A namespace is created for Integration.
```bash theme={null}
kubectl create ns apinizer-integration
```
The 'mongo-db-credentials' secret in the Apinizer namespace is copied to the apinizer-integration namespace.
```bash theme={null}
kubectl get secret mongo-db-credentials -n apinizer -o yaml | sed 's/namespace: apinizer/namespace: apinizer-integration/' | kubectl create -f -
```
Deployment yaml is created for Integration.
```bash theme={null}
vi integration-deployment.yaml
```
```yaml theme={null}
apiVersion: apps/v1
kind: Deployment
metadata:
name: integration
namespace: apinizer-integration
spec:
replicas: 1
selector:
matchLabels:
app: integration
version: v1
strategy:
rollingUpdate:
maxSurge: 1
maxUnavailable: 75%
type: RollingUpdate
template:
metadata:
labels:
app: integration
version: v1
spec:
containers:
- env:
- name: JAVA_OPTS
value: -server -XX:MaxRAMPercentage=75.0 -Dlog4j.formatMsgNoLookups=true
- name: SPRING_DATA_MONGODB_URI
valueFrom:
secretKeyRef:
key: dbUrl
name: mongo-db-credentials
- name: SPRING_DATA_MONGODB_DATABASE
valueFrom:
secretKeyRef:
key: dbName
name: mongo-db-credentials
- name: SPRING_PROFILES_ACTIVE
value: prod
image: apinizercloud/integration:
imagePullPolicy: IfNotPresent
livenessProbe:
failureThreshold: 3
httpGet:
path: /apinizer/management/health
port: 8092
scheme: HTTP
initialDelaySeconds: 120
periodSeconds: 30
successThreshold: 1
timeoutSeconds: 30
name: integration
ports:
- containerPort: 8092
protocol: TCP
readinessProbe:
failureThreshold: 3
httpGet:
path: /apinizer/management/health
port: 8092
scheme: HTTP
initialDelaySeconds: 120
periodSeconds: 30
successThreshold: 1
timeoutSeconds: 30
resources:
limits:
cpu: "1"
memory: 1024Mi
startupProbe:
failureThreshold: 3
httpGet:
path: /apinizer/management/health
port: 8092
scheme: HTTP
initialDelaySeconds: 91
periodSeconds: 30
successThreshold: 1
timeoutSeconds: 30
hostAliases:
- ip: ""
hostnames:
- ""
- ""
```
```bash theme={null}
kubectl apply -f integration-deployment.yaml
```
To see the status of the created Pod, you can use the following Kubectl command:
```bash theme={null}
kubectl get pods -n apinizer-integration
```
If Ingress will not be used in service creation, the definition is created as NodePort type and external cluster access of the pod is configured.
```bash theme={null}
vi apinizer-integration-service.yaml
```
```yaml theme={null}
apiVersion: v1
kind: Service
metadata:
name: integration
namespace: apinizer-integration
labels:
app: integration
spec:
ports:
- nodePort: 32090
port: 8092
protocol: TCP
targetPort: 8092
selector:
app: integration
type: NodePort
```
```bash theme={null}
kubectl apply -f apinizer-integration-service.yaml
```
**Connecting the Created API Integration Application to API Management Console**
In API Manager, go to **System Settings → General Settings** page. Enable API Integration from the "Define API Integration (Task Flow) Module information." section. Complete the installation by making the necessary definitions.
| Field | Description |
| ------------------------------------------------- | -------------------------------------------------------------------------------------------------------------------------------------------------------------------------------------------------------------------------------------------------------------------------------------------------------- |
| **Access URL** *(Access URL)* | API Integration access address. Example address: `http://:`. |
| **Count** *(Count)* | API Integration application count, adjusts the replicaSet setting in Kubernetes Cluster. |
| **Service Port** *(Service Port)* | API Integration access port. |
| **Node List** *(Node List)* | Sets which Kubernetes Worker servers the Pods will run on. Adjusts the NodeAffinity setting in Kubernetes. |
| **CPU** | Information about the maximum CPU core count the Pod will use. |
| **Memory** *(Memory)* | Maximum memory value the Pod will use. |
| **Memory Unit** *(Memory Unit)* | The unit of the value required for memory is selected; MB, GB. |
| **Additional Variables** *(Additional Variables)* | Variables and values to be run in the Pod are defined. |
| **Host Aliases** *(Host Aliases)* | IP addresses in the network can sometimes be placed behind host names, if these cannot be resolved through nameserver or are not defined in the host file, **Host Alias** definition must be made for application pods to resolve these names. Multiple domain names can be entered for each IP address. |
**Additional Variables**
When configuring the **Java Options** setting in the Additional Variables field, the following warning should be considered:
* When `-Xmx` and `-Xms` parameters are used, automatic heap sizing is disabled.
* When `-Xmx` and `-Xms` parameters are used, automatic heap sizing is disabled.
* Apinizer sets **JVM Heap** values to use **75.0%** of the memory given to the container since it runs inside the container.
* **UseContainerSupport** is active by default.
* Old flags `-XX:{Min|Max}RAMFraction` are now deprecated. There is a new `-XX:MaxRAMPercentage` flag that takes a value between 0.0 and 100.0 and defaults to 75.0. Therefore, if there is a 1 GB memory limit, the JVM heap is limited to \~ 750 MB by default.
For detailed information, [click here](https://www.eclipse.org/openj9/docs/xxinitialrampercentage/).
After completing the above steps and ensuring that the Pods belonging to API Integration on Kubernetes are in ready state, you can start using from **Project → Development → API Integrator → Task Flows** menu.
#### If API Integration Installation Will Not Be Done Through API Manager
A namespace is created for Integration.
```bash theme={null}
kubectl create ns apinizer-integration
```
The 'mongo-db-credentials' secret in the Apinizer namespace is copied to the apinizer-integration namespace.
```bash theme={null}
kubectl get secret mongo-db-credentials -n apinizer -o yaml | sed 's/namespace: apinizer/namespace: apinizer-integration/' | kubectl create -f -
```
Deployment yaml is created for Integration.
```bash theme={null}
vi integration-deployment.yaml
```
```yaml theme={null}
apiVersion: apps/v1
kind: Deployment
metadata:
name: integration
namespace: apinizer-integration
spec:
replicas: 1
selector:
matchLabels:
app: integration
version: v1
strategy:
rollingUpdate:
maxSurge: 1
maxUnavailable: 75%
type: RollingUpdate
template:
metadata:
labels:
app: integration
version: v1
spec:
containers:
- env:
- name: JAVA_OPTS
value: -server -XX:MaxRAMPercentage=75.0 -Dlog4j.formatMsgNoLookups=true
- name: SPRING_DATA_MONGODB_URI
valueFrom:
secretKeyRef:
key: dbUrl
name: mongo-db-credentials
- name: SPRING_DATA_MONGODB_DATABASE
valueFrom:
secretKeyRef:
key: dbName
name: mongo-db-credentials
- name: SPRING_PROFILES_ACTIVE
value: prod
image: apinizercloud/integration:
imagePullPolicy: IfNotPresent
livenessProbe:
failureThreshold: 3
httpGet:
path: /apinizer/management/health
port: 8092
scheme: HTTP
initialDelaySeconds: 120
periodSeconds: 30
successThreshold: 1
timeoutSeconds: 30
name: integration
ports:
- containerPort: 8092
protocol: TCP
readinessProbe:
failureThreshold: 3
httpGet:
path: /apinizer/management/health
port: 8092
scheme: HTTP
initialDelaySeconds: 120
periodSeconds: 30
successThreshold: 1
timeoutSeconds: 30
resources:
limits:
cpu: "1"
memory: 1024Mi
startupProbe:
failureThreshold: 3
httpGet:
path: /apinizer/management/health
port: 8092
scheme: HTTP
initialDelaySeconds: 91
periodSeconds: 30
successThreshold: 1
timeoutSeconds: 30
hostAliases:
- ip: ""
hostnames:
- ""
- ""
```
```bash theme={null}
kubectl apply -f integration-deployment.yaml
```
To see the status of the created Pod, you can use the following Kubectl command:
```bash theme={null}
kubectl get pods -n apinizer-integration
```
If Ingress will not be used in service creation, the definition is created as NodePort type and external cluster access of the pod is configured.
```bash theme={null}
vi apinizer-integration-service.yaml
```
```yaml theme={null}
apiVersion: v1
kind: Service
metadata:
name: integration
namespace: apinizer-integration
labels:
app: integration
spec:
ports:
- nodePort: 32090
port: 8092
protocol: TCP
targetPort: 8092
selector:
app: integration
type: NodePort
```
```bash theme={null}
kubectl apply -f apinizer-integration-service.yaml
```
**Connecting the Created API Integration Application to API Management Console**
In API Manager, go to **System Settings → General Settings** page. Enable API Integration from the "Define API Integration (Task Flow) Module information." section. Complete the installation by making the necessary definitions.
 ## Next Steps
Get detailed information about API Integration
Learn Multi-Region installation
Learn API Portal installation
Learn Apinizer installation
## Next Steps
Get detailed information about API Integration
Learn Multi-Region installation
Learn API Portal installation
Learn Apinizer installation