> ## Documentation Index
> Fetch the complete documentation index at: https://docs.apinizer.com/llms.txt
> Use this file to discover all available pages before exploring further.
# Azure AKS
> Provides installation and configuration of Apinizer on Microsoft AKS (Azure Kubernetes Service). Provides AKS cluster installation, resource creation and Apinizer installation steps on AKS. Includes external MongoDB and Elasticsearch server configurations.
In the first sections of the content, step by step from the beginning; AKS installation, resource creation, usage and external MongoDb and ElasticSearch server steps are described.
If there is a ready cluster on AKS, you can start directly from [step 5 Installing Apinizer on AKS](#installing-apinizer-on-aks).
## 1. Introduction
### What is Microsoft AKS (Azure Kubernetes Service)?
Azure is a complete cloud platform that facilitates new application development processes by hosting existing applications.
Azure Kubernetes Service (AKS) enables creating, configuring and managing a pre-configured virtual machine cluster to run containerized applications.
When you deploy an AKS cluster, Master nodes and all other kubernetes nodes are deployed and configured on your behalf.
## 2. Installing and Configuring AKS, AKS CLI and kubectl
### AKS Cluster Installation
Since Azure contains a structure targeting ease of use, installation can be done easily by proceeding with default settings if no special setting is requested.
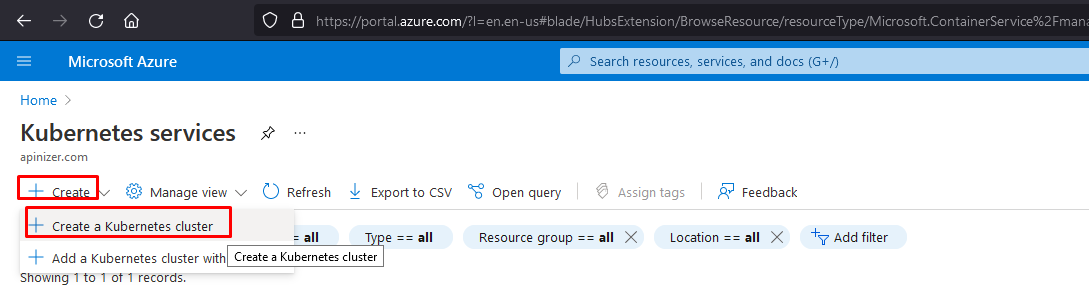
 Click the links selected in the image below in order to create a Kubernetes cluster.
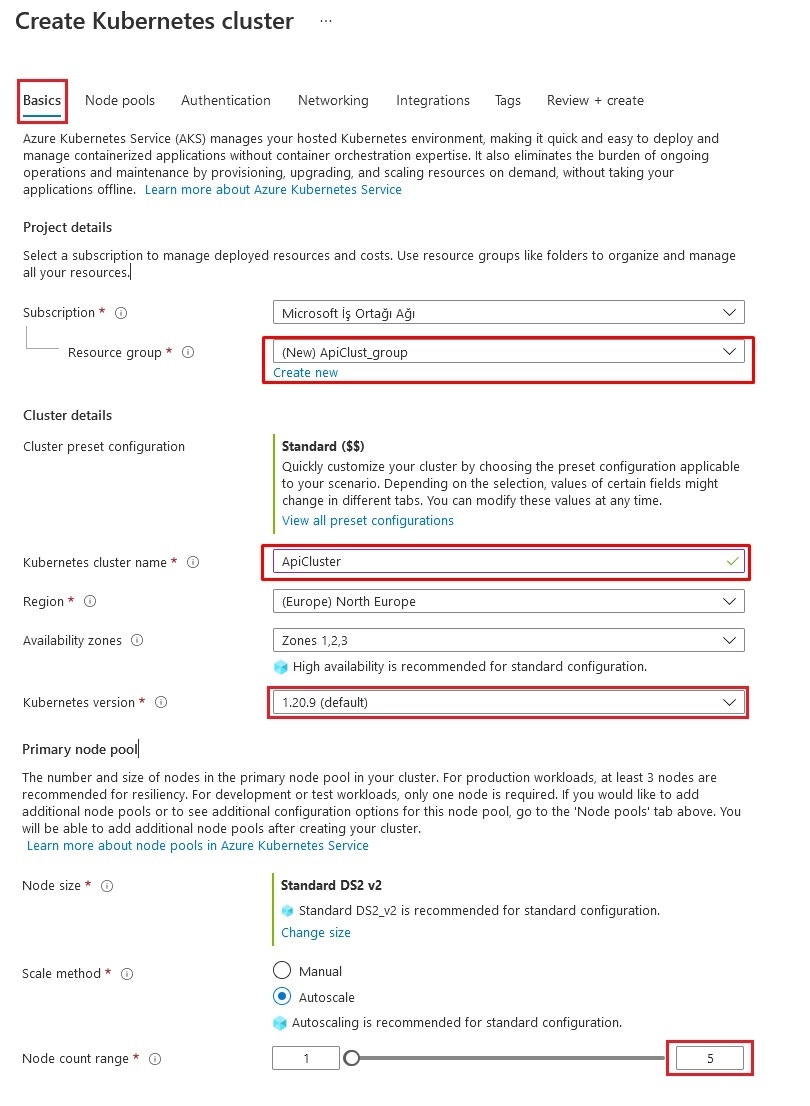
 A new resource group (Resource group) can be created if there is no existing selection for the name to be given to the cluster to be created.
Kubernetes version 1.18 or 1.20 major type can be selected.
A new resource group (Resource group) can be created if there is no existing selection for the name to be given to the cluster to be created.
Kubernetes version 1.18 or 1.20 major type can be selected.
 #### Adding Node Pool
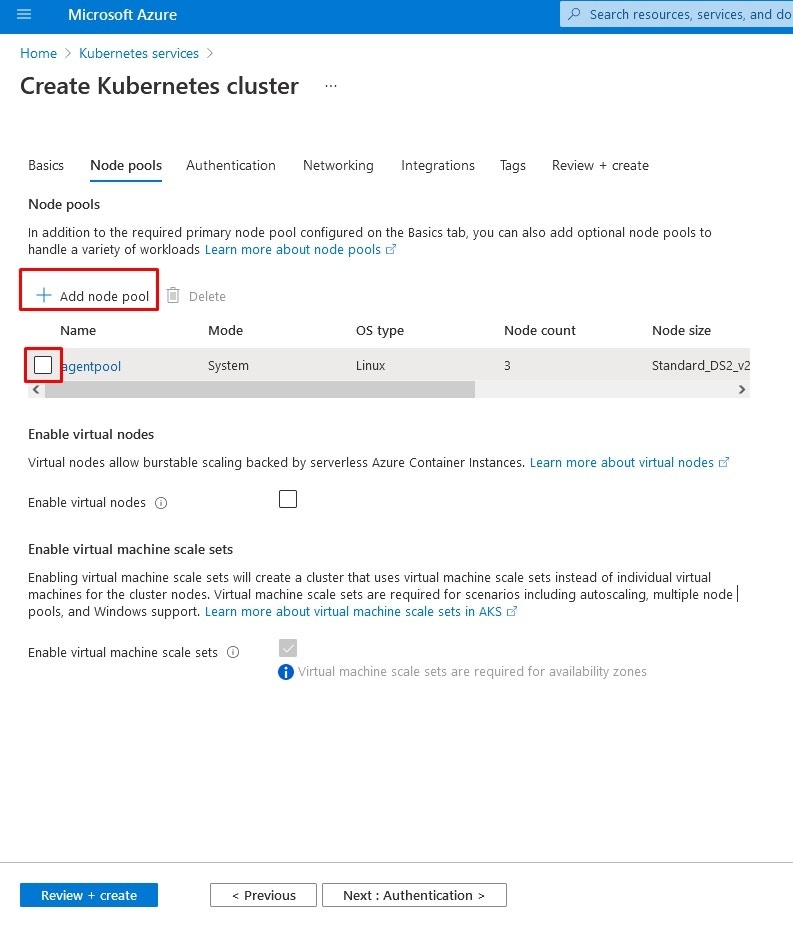
Node Pool (Node Pool) contains settings related to nodes within the cluster. You can select an existing node definition or create a new definition.
#### Adding Node Pool
Node Pool (Node Pool) contains settings related to nodes within the cluster. You can select an existing node definition or create a new definition.
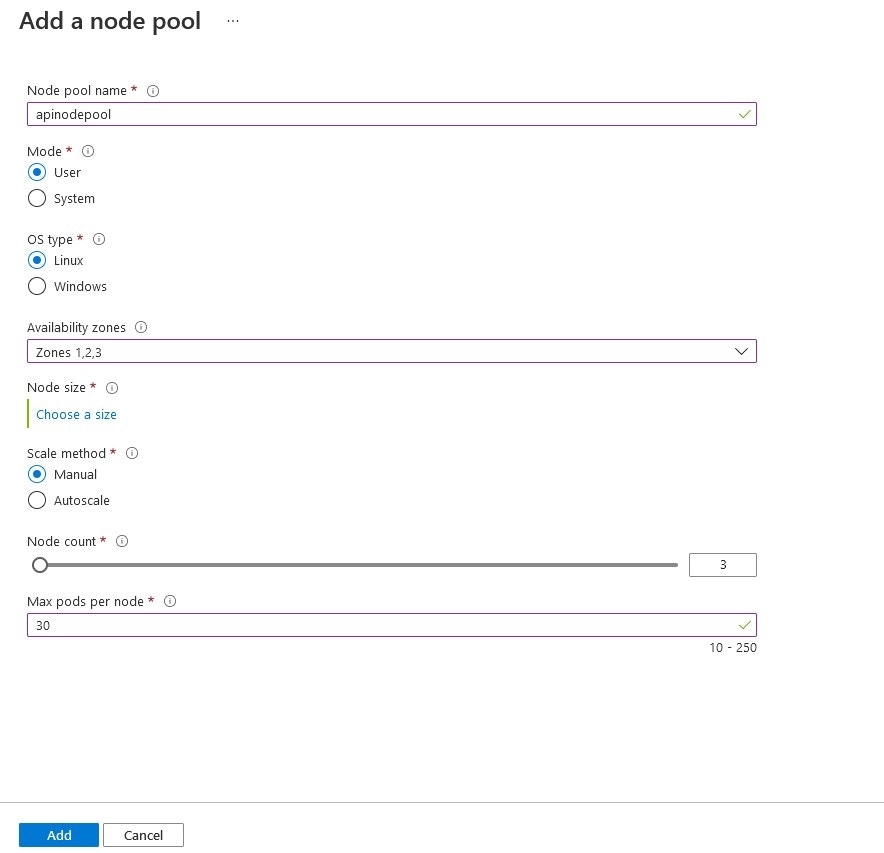
 The screenshot containing the name to be given to the node pool and the selectable settings is below:
 #### Authentication Settings
In the Authentication section, you can set how you want to restrict your cluster.
#### Authentication Settings
In the Authentication section, you can set how you want to restrict your cluster.
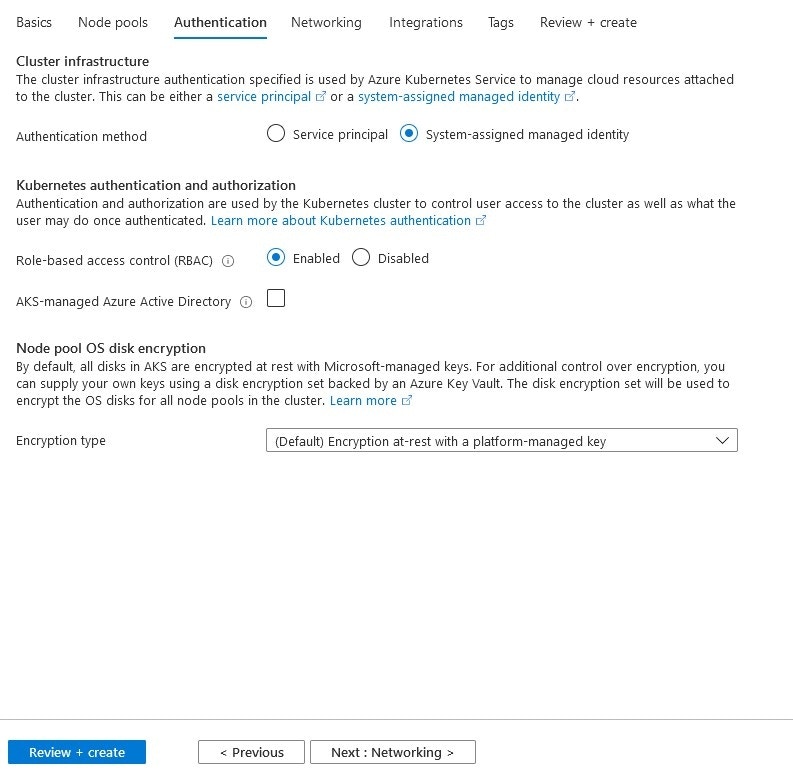 #### Networking Settings
The Networking tab includes whether you will leave network settings to Kubenet or Azure CNI, which draft you want your DNS name in, and security and network settings related to access.
#### Networking Settings
The Networking tab includes whether you will leave network settings to Kubenet or Azure CNI, which draft you want your DNS name in, and security and network settings related to access.
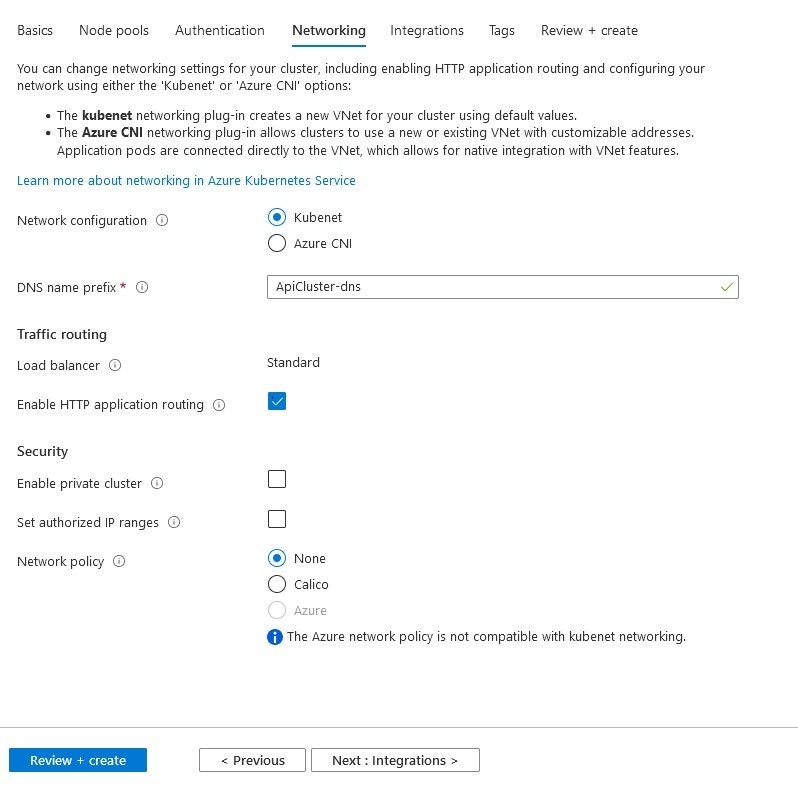 #### Integration Settings
In the Integrations tab, your decisions regarding some useful integrations provided by Azure are set.
#### Integration Settings
In the Integrations tab, your decisions regarding some useful integrations provided by Azure are set.
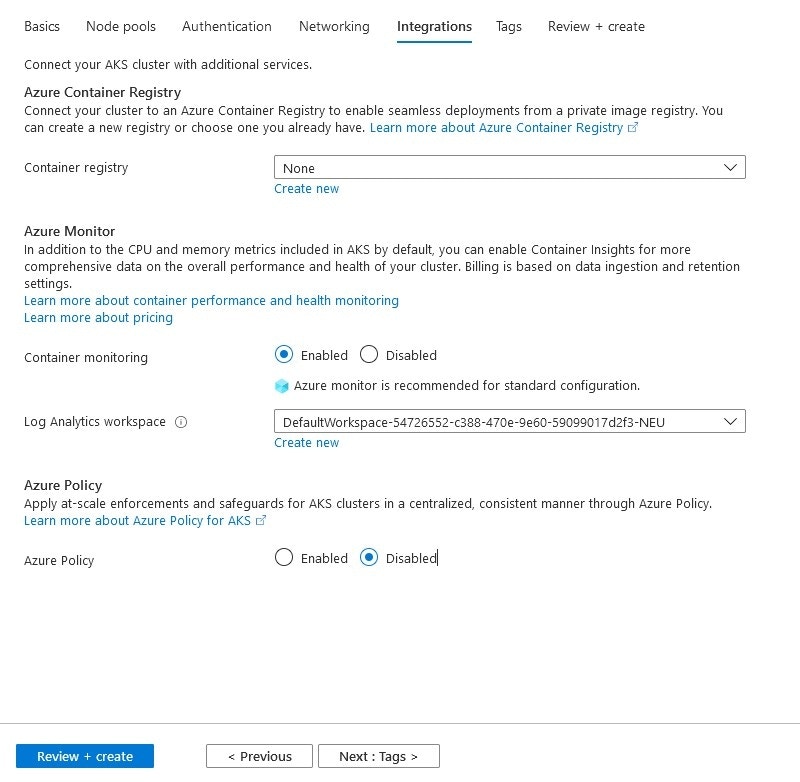 In the final step, your settings go through a review mechanism and are presented for your approval.
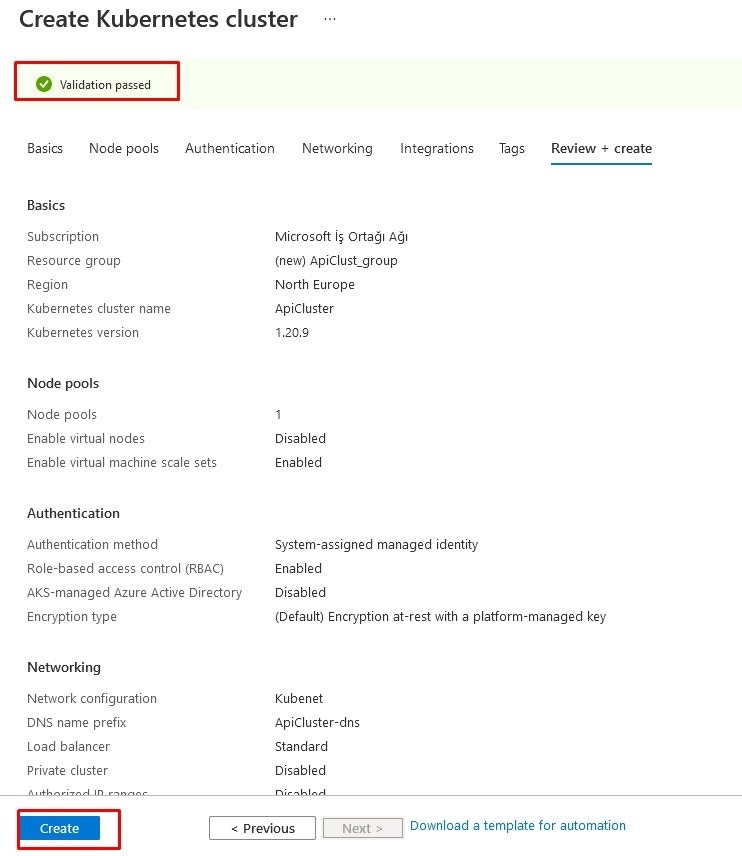 When you complete the process, you will encounter a screen like below.
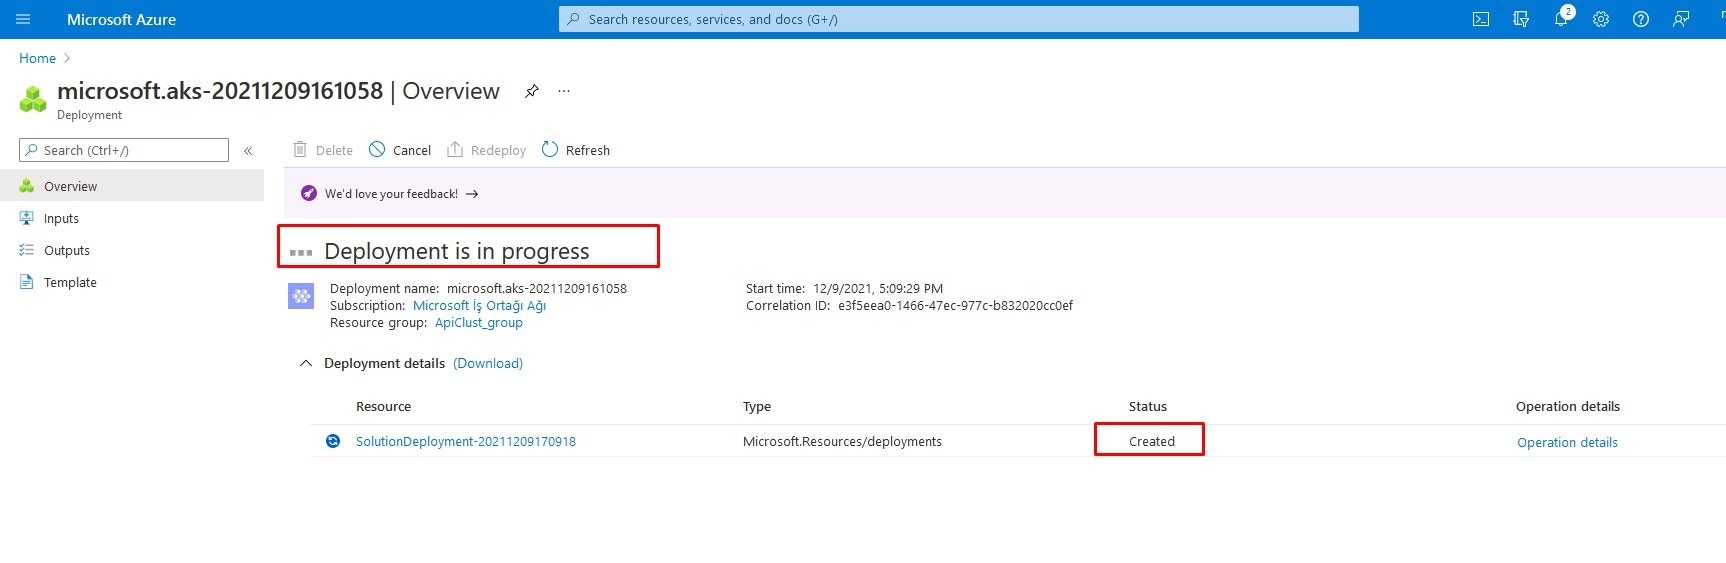 After creating your cluster, the AKS CLI and kubernetes-related system to be installed on your computer can be checked.
## 3. AKS CLI Installation
Azure CLI can be installed on Windows, MacOS and Linux environments. It can also be run in a Docker container.
The version of Azure CLI suitable for the operating system can be downloaded and installed from: [Azure CLI Installation Guide](https://docs.microsoft.com/tr-tr/cli/azure/install-azure-cli)
Then connect to your client account on your computer with the following command and the subsequent process.
```bash theme={null}
az login
```
CLI can open your default browser and load an Azure sign-in page.
Otherwise, open a browser page and go to: [https://aka.ms/devicelogin](https://aka.ms/devicelogin). Enter the authorization code displayed in your terminal.
If there is no web browser or the web browser cannot be opened, use the device code flow with the **az login --use-device-code** command.
Sign in to the browser with your account credentials.
Then the Kubernetes command line tool kubectl should be downloaded and installed.
```bash theme={null}
az aks install-cli
```
Access credentials should be obtained for a managed Kubernetes cluster.
By default, credentials are merged in the **.kube/config** file, so kubectl can use them.
You can configure the default group using the name of the managed cluster and the name of the resource group:
```bash theme={null}
az aks get-credentials --resource-group myResourceGroup --name myAKSCluster
```
Whether access is provided correctly is checked with the following command.
```bash theme={null}
kubectl get nodes
```
## 4. Installing and Setting Up Cloud MongoDb and ElasticSearch
As stated in the Installation and Configuration document, **Replicaset MongoDB** and **Elasticsearch** are needed. These can be installed on any virtual server, used as cloud, or if they already exist, proceed to the next step.
In this section, cloud systems in the applications' own environments are used.
* For MongoDB, go to [MongoDB Atlas](https://account.mongodb.com/account/register) and create an account, and it can be used free of charge up to a limited DB size. Apinizer does not need a large database because it only keeps configuration definitions in MongoDB.
* For Elasticsearch, Apinizer can be defined by using an **elastic service** in the **cloud** environment through the [Elastic Cloud](https://cloud.elastic.co/registration) address.
### MongoDB Cloud Settings
After creating an account from MongoDB's own site, create a database with the desired name and edit the related settings.
Click the **Add IP Address** button from the **Network Access** menu for access permission.
After creating your cluster, the AKS CLI and kubernetes-related system to be installed on your computer can be checked.
## 3. AKS CLI Installation
Azure CLI can be installed on Windows, MacOS and Linux environments. It can also be run in a Docker container.
The version of Azure CLI suitable for the operating system can be downloaded and installed from: [Azure CLI Installation Guide](https://docs.microsoft.com/tr-tr/cli/azure/install-azure-cli)
Then connect to your client account on your computer with the following command and the subsequent process.
```bash theme={null}
az login
```
CLI can open your default browser and load an Azure sign-in page.
Otherwise, open a browser page and go to: [https://aka.ms/devicelogin](https://aka.ms/devicelogin). Enter the authorization code displayed in your terminal.
If there is no web browser or the web browser cannot be opened, use the device code flow with the **az login --use-device-code** command.
Sign in to the browser with your account credentials.
Then the Kubernetes command line tool kubectl should be downloaded and installed.
```bash theme={null}
az aks install-cli
```
Access credentials should be obtained for a managed Kubernetes cluster.
By default, credentials are merged in the **.kube/config** file, so kubectl can use them.
You can configure the default group using the name of the managed cluster and the name of the resource group:
```bash theme={null}
az aks get-credentials --resource-group myResourceGroup --name myAKSCluster
```
Whether access is provided correctly is checked with the following command.
```bash theme={null}
kubectl get nodes
```
## 4. Installing and Setting Up Cloud MongoDb and ElasticSearch
As stated in the Installation and Configuration document, **Replicaset MongoDB** and **Elasticsearch** are needed. These can be installed on any virtual server, used as cloud, or if they already exist, proceed to the next step.
In this section, cloud systems in the applications' own environments are used.
* For MongoDB, go to [MongoDB Atlas](https://account.mongodb.com/account/register) and create an account, and it can be used free of charge up to a limited DB size. Apinizer does not need a large database because it only keeps configuration definitions in MongoDB.
* For Elasticsearch, Apinizer can be defined by using an **elastic service** in the **cloud** environment through the [Elastic Cloud](https://cloud.elastic.co/registration) address.
### MongoDB Cloud Settings
After creating an account from MongoDB's own site, create a database with the desired name and edit the related settings.
Click the **Add IP Address** button from the **Network Access** menu for access permission.
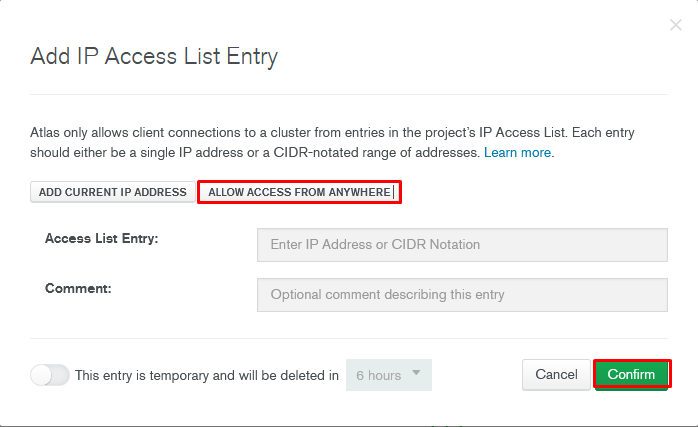
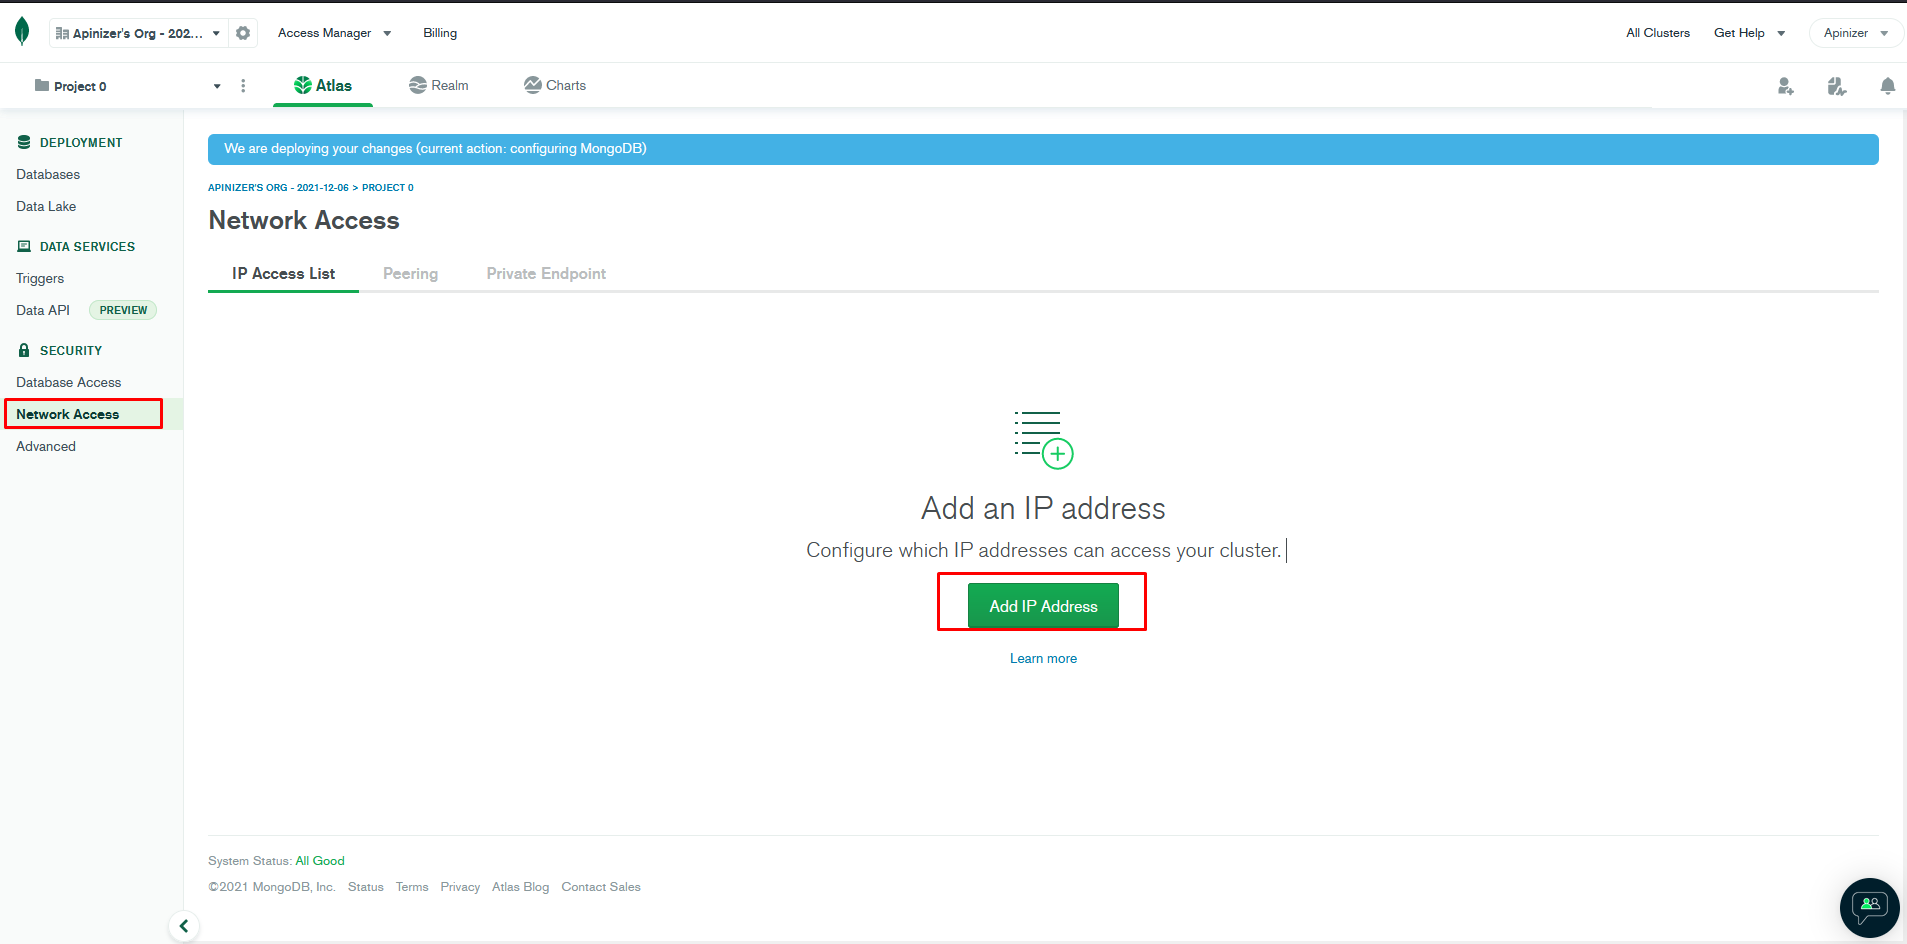 Then fill in the fields so that access is open from anywhere, such as the desired IPs or the **Allow Access From Anywhere** option selected in the image below.
 ### Getting MongoDB connection string:
To get the **connection string (Connection String)** that will provide the connection to the created database, return to the **Databases** page and press the **Connect** link.
From here, you can get the necessary information to connect to any MongoDb database editor yourself, or press the **Connect your application** button to connect the Apinizer application.
### Getting MongoDB connection string:
To get the **connection string (Connection String)** that will provide the connection to the created database, return to the **Databases** page and press the **Connect** link.
From here, you can get the necessary information to connect to any MongoDb database editor yourself, or press the **Connect your application** button to connect the Apinizer application.
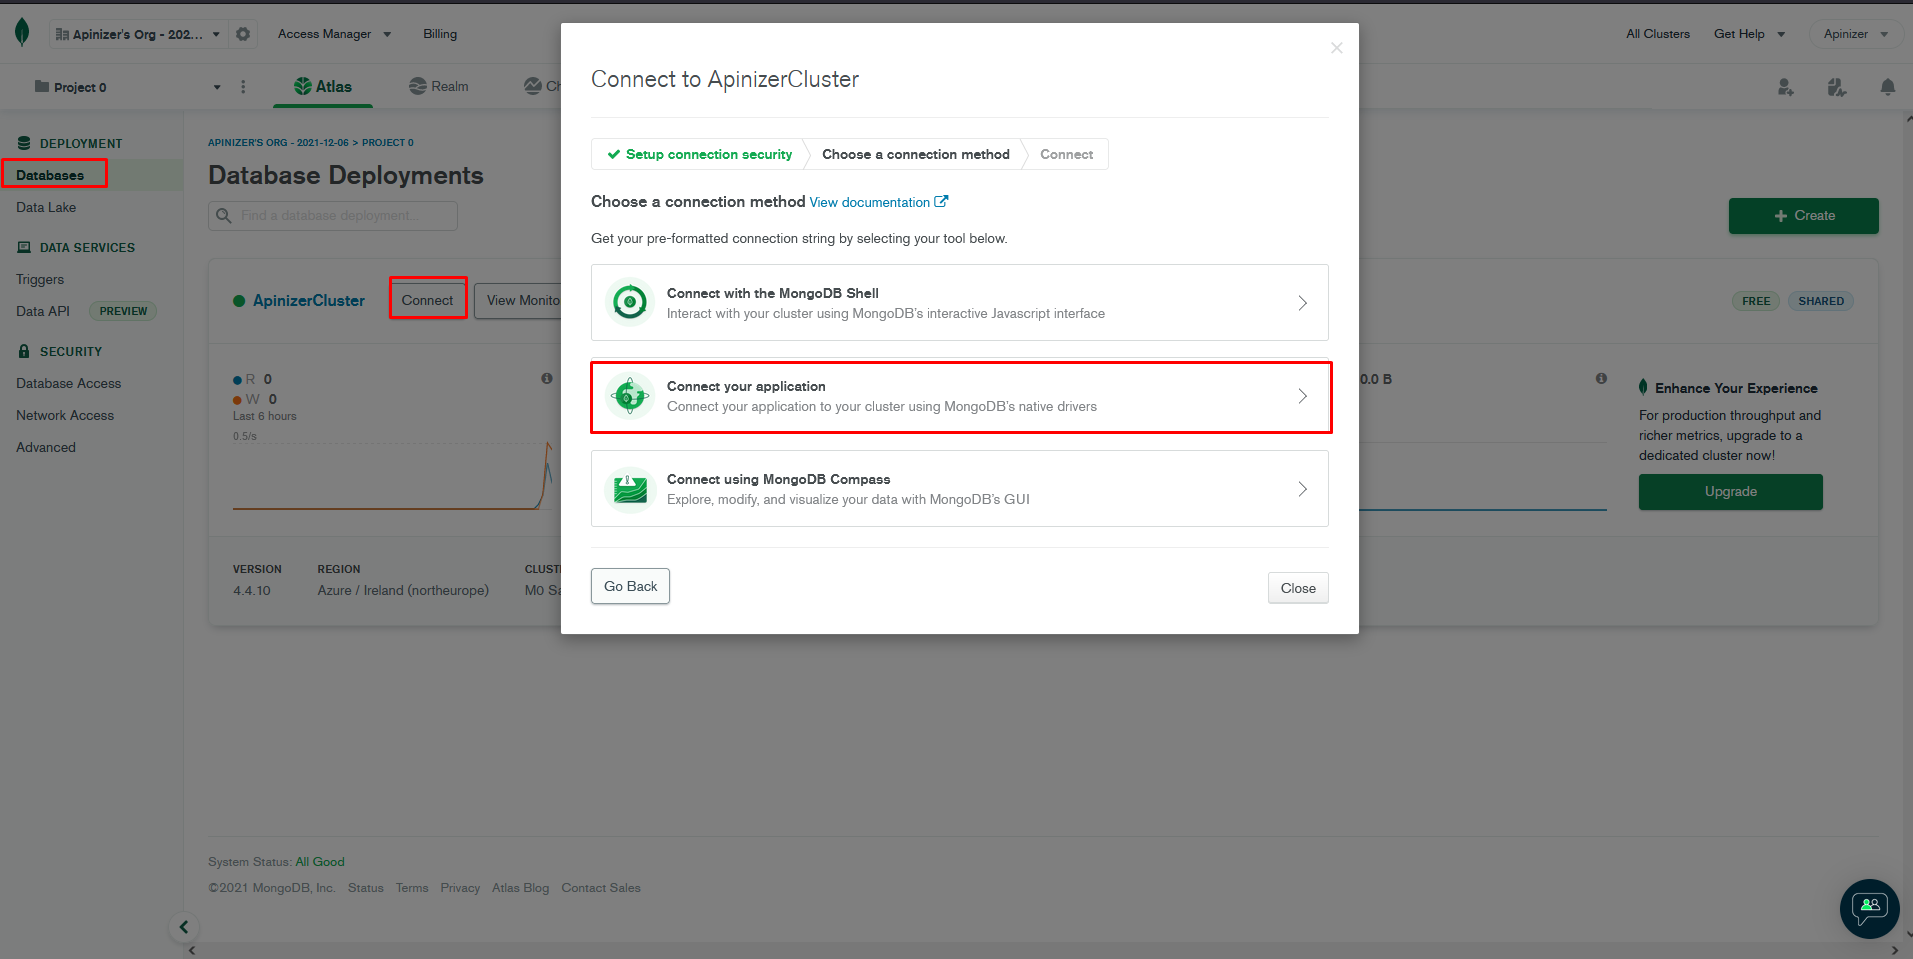 When **Java** is selected as **Driver** and **"3.4"** or higher is selected as **Version** on the opened screen, a text appears at the bottom of the screen.
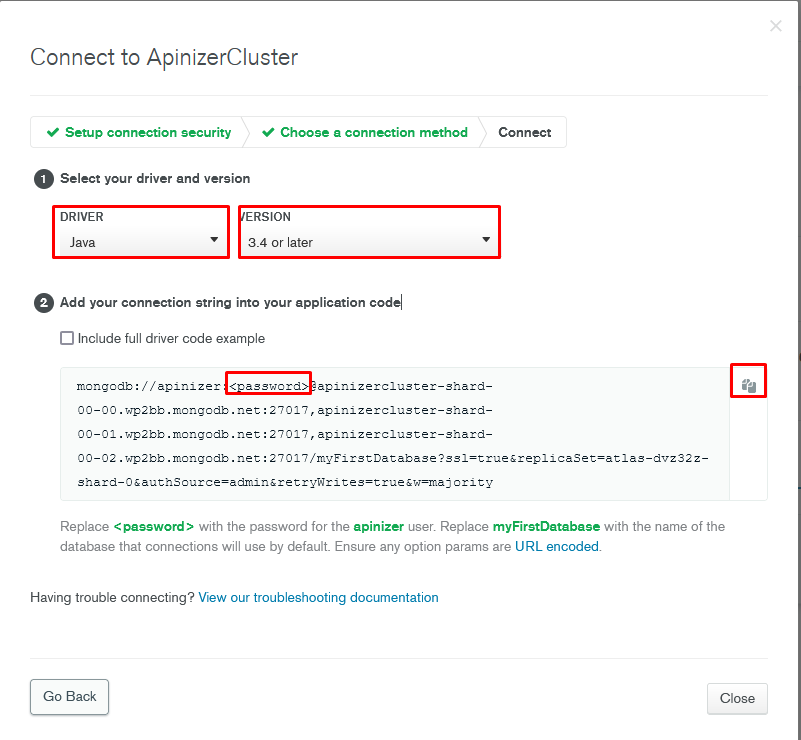 This text is the connection definition that you will write to the **apinizer-deployment.yaml** file in the following sections to connect Apinizer to MongoDB.
## 5. Installing Apinizer on AKS
What is described under this heading describes the definition of opening Apinizer as a service, different from Apinizer installation documents.
### Apinizer Management Console installation
A **.yaml** file should be created for Apinizer and loaded to AKS cluster.
Example **apinizer-deployment.yaml** file settings are below:
```yaml theme={null}
apiVersion: v1
kind: Namespace
metadata:
name: apinizer
---
apiVersion: apps/v1
kind: Deployment
metadata:
name: manager
namespace: apinizer
spec:
replicas: 1
selector:
matchLabels:
app: manager
version: 'v1'
template:
metadata:
labels:
app: manager
version: 'v1'
spec:
containers:
- name: manager
image: apinizercloud/manager:2023.01.1
imagePullPolicy: IfNotPresent
env:
- name: SPRING_PROFILES_ACTIVE
value: prod
- name: SPRING_DATA_MONGODB_DATABASE
value: apinizerdb-aws
- name: SPRING_DATA_MONGODB_URI
value: 'mongodb://apinizer:@apinizercluster-shard-00-00.wp2bb.mongodb.net:25080,apinizercluster-shard-00-01.wp2bb.mongodb.net:25080,apinizercluster-shard-00-02.wp2bb.mongodb.net:25080/ApinizerDb?ssl=true&replicaSet=atlas-dvz21z-shard-0&authSource=admin&retryWrites=true&w=majority'
- name: JAVA_OPTS
value: ' -Xmx1400m -Xms1400m'
resources:
requests:
memory: '2Gi'
cpu: '1'
limits:
memory: '2Gi'
cpu: '1'
ports:
- name: http
containerPort: 8080
```
```powershell theme={null}
kubectl apply -f apinizer-deployment.yaml
kubectl get pods -n apinizer
```
After Apinizer Management Console is loaded to AKS environment, a database named **apinizerdb** will be created in MongoDB database. The license key provided to you by Apinizer should be entered into the **general\_settings** table.
The following permissions should be defined for Apinizer Management Console to access and manage Kubernetes resources.
Example **service.yaml** file settings are below:
```yaml theme={null}
apiVersion: v1
kind: Namespace
metadata:
name: kube-system
---
apiVersion: v1
kind: ServiceAccount
metadata:
name: admin-user
namespace: kube-system
```
Example **adminuser.yaml** file settings are below:
```yaml theme={null}
apiVersion: rbac.authorization.k8s.io/v1
kind: ClusterRoleBinding
metadata:
name: admin-user
roleRef:
apiGroup: rbac.authorization.k8s.io
kind: ClusterRole
name: cluster-admin
subjects:
- kind: ServiceAccount
name: admin-user
namespace: kube-system
```
```powershell theme={null}
kubectl apply -f service.yaml
kubectl apply -f adminuser.yaml
kubectl create clusterrolebinding permissive-binding --clusterrole=cluster-admin --user=admin --user=kubelet --group=system:serviceaccounts
kubectl create clusterrolebinding apinizer -n kube-system --clusterrole=cluster-admin --serviceaccount=kube-system:apinizer
```
### Creating Access Service for Apinizer Management Console
After the installation is completed, a service is needed to access Apinizer Management Console.
A service is created by following the steps below. It may take a minute or two to get the external IP sometimes.
```powershell theme={null}
kubectl expose -n apinizer deployment.apps/manager --port=80 --target-port=8080 --name=apinizer-console-service --type=LoadBalancer
kubectl get svc -n apinizer
```
## 6. Apinizer Management Console Login
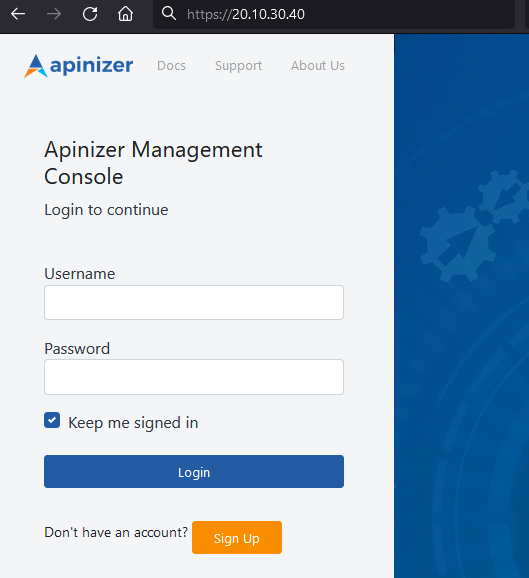
Login is made by writing the service access address in step 2 to the browser's address bar.
You can contact Apinizer support team for default username password.
The Apinizer Management Console Address created according to these settings: `http:///`
This text is the connection definition that you will write to the **apinizer-deployment.yaml** file in the following sections to connect Apinizer to MongoDB.
## 5. Installing Apinizer on AKS
What is described under this heading describes the definition of opening Apinizer as a service, different from Apinizer installation documents.
### Apinizer Management Console installation
A **.yaml** file should be created for Apinizer and loaded to AKS cluster.
Example **apinizer-deployment.yaml** file settings are below:
```yaml theme={null}
apiVersion: v1
kind: Namespace
metadata:
name: apinizer
---
apiVersion: apps/v1
kind: Deployment
metadata:
name: manager
namespace: apinizer
spec:
replicas: 1
selector:
matchLabels:
app: manager
version: 'v1'
template:
metadata:
labels:
app: manager
version: 'v1'
spec:
containers:
- name: manager
image: apinizercloud/manager:2023.01.1
imagePullPolicy: IfNotPresent
env:
- name: SPRING_PROFILES_ACTIVE
value: prod
- name: SPRING_DATA_MONGODB_DATABASE
value: apinizerdb-aws
- name: SPRING_DATA_MONGODB_URI
value: 'mongodb://apinizer:@apinizercluster-shard-00-00.wp2bb.mongodb.net:25080,apinizercluster-shard-00-01.wp2bb.mongodb.net:25080,apinizercluster-shard-00-02.wp2bb.mongodb.net:25080/ApinizerDb?ssl=true&replicaSet=atlas-dvz21z-shard-0&authSource=admin&retryWrites=true&w=majority'
- name: JAVA_OPTS
value: ' -Xmx1400m -Xms1400m'
resources:
requests:
memory: '2Gi'
cpu: '1'
limits:
memory: '2Gi'
cpu: '1'
ports:
- name: http
containerPort: 8080
```
```powershell theme={null}
kubectl apply -f apinizer-deployment.yaml
kubectl get pods -n apinizer
```
After Apinizer Management Console is loaded to AKS environment, a database named **apinizerdb** will be created in MongoDB database. The license key provided to you by Apinizer should be entered into the **general\_settings** table.
The following permissions should be defined for Apinizer Management Console to access and manage Kubernetes resources.
Example **service.yaml** file settings are below:
```yaml theme={null}
apiVersion: v1
kind: Namespace
metadata:
name: kube-system
---
apiVersion: v1
kind: ServiceAccount
metadata:
name: admin-user
namespace: kube-system
```
Example **adminuser.yaml** file settings are below:
```yaml theme={null}
apiVersion: rbac.authorization.k8s.io/v1
kind: ClusterRoleBinding
metadata:
name: admin-user
roleRef:
apiGroup: rbac.authorization.k8s.io
kind: ClusterRole
name: cluster-admin
subjects:
- kind: ServiceAccount
name: admin-user
namespace: kube-system
```
```powershell theme={null}
kubectl apply -f service.yaml
kubectl apply -f adminuser.yaml
kubectl create clusterrolebinding permissive-binding --clusterrole=cluster-admin --user=admin --user=kubelet --group=system:serviceaccounts
kubectl create clusterrolebinding apinizer -n kube-system --clusterrole=cluster-admin --serviceaccount=kube-system:apinizer
```
### Creating Access Service for Apinizer Management Console
After the installation is completed, a service is needed to access Apinizer Management Console.
A service is created by following the steps below. It may take a minute or two to get the external IP sometimes.
```powershell theme={null}
kubectl expose -n apinizer deployment.apps/manager --port=80 --target-port=8080 --name=apinizer-console-service --type=LoadBalancer
kubectl get svc -n apinizer
```
## 6. Apinizer Management Console Login
Login is made by writing the service access address in step 2 to the browser's address bar.
You can contact Apinizer support team for default username password.
The Apinizer Management Console Address created according to these settings: `http:///`
 ## 7. Apinizer Configurations
### Defining Log Servers
Apinizer stores API traffic and metric information in Elasticsearch database. To continue the installation process, Elasticsearch cluster definitions need to be made.
Go to **Administration → Server Management → Elasticsearch Clusters** page from the menu in Apinizer Management Console application.
**The image containing Elasticsearch cluster definition settings is given below:**
## 7. Apinizer Configurations
### Defining Log Servers
Apinizer stores API traffic and metric information in Elasticsearch database. To continue the installation process, Elasticsearch cluster definitions need to be made.
Go to **Administration → Server Management → Elasticsearch Clusters** page from the menu in Apinizer Management Console application.
**The image containing Elasticsearch cluster definition settings is given below:**
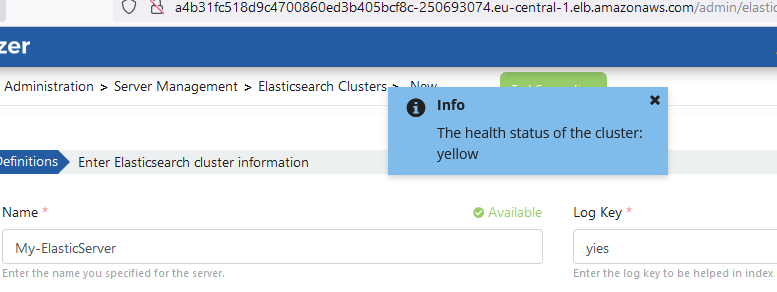
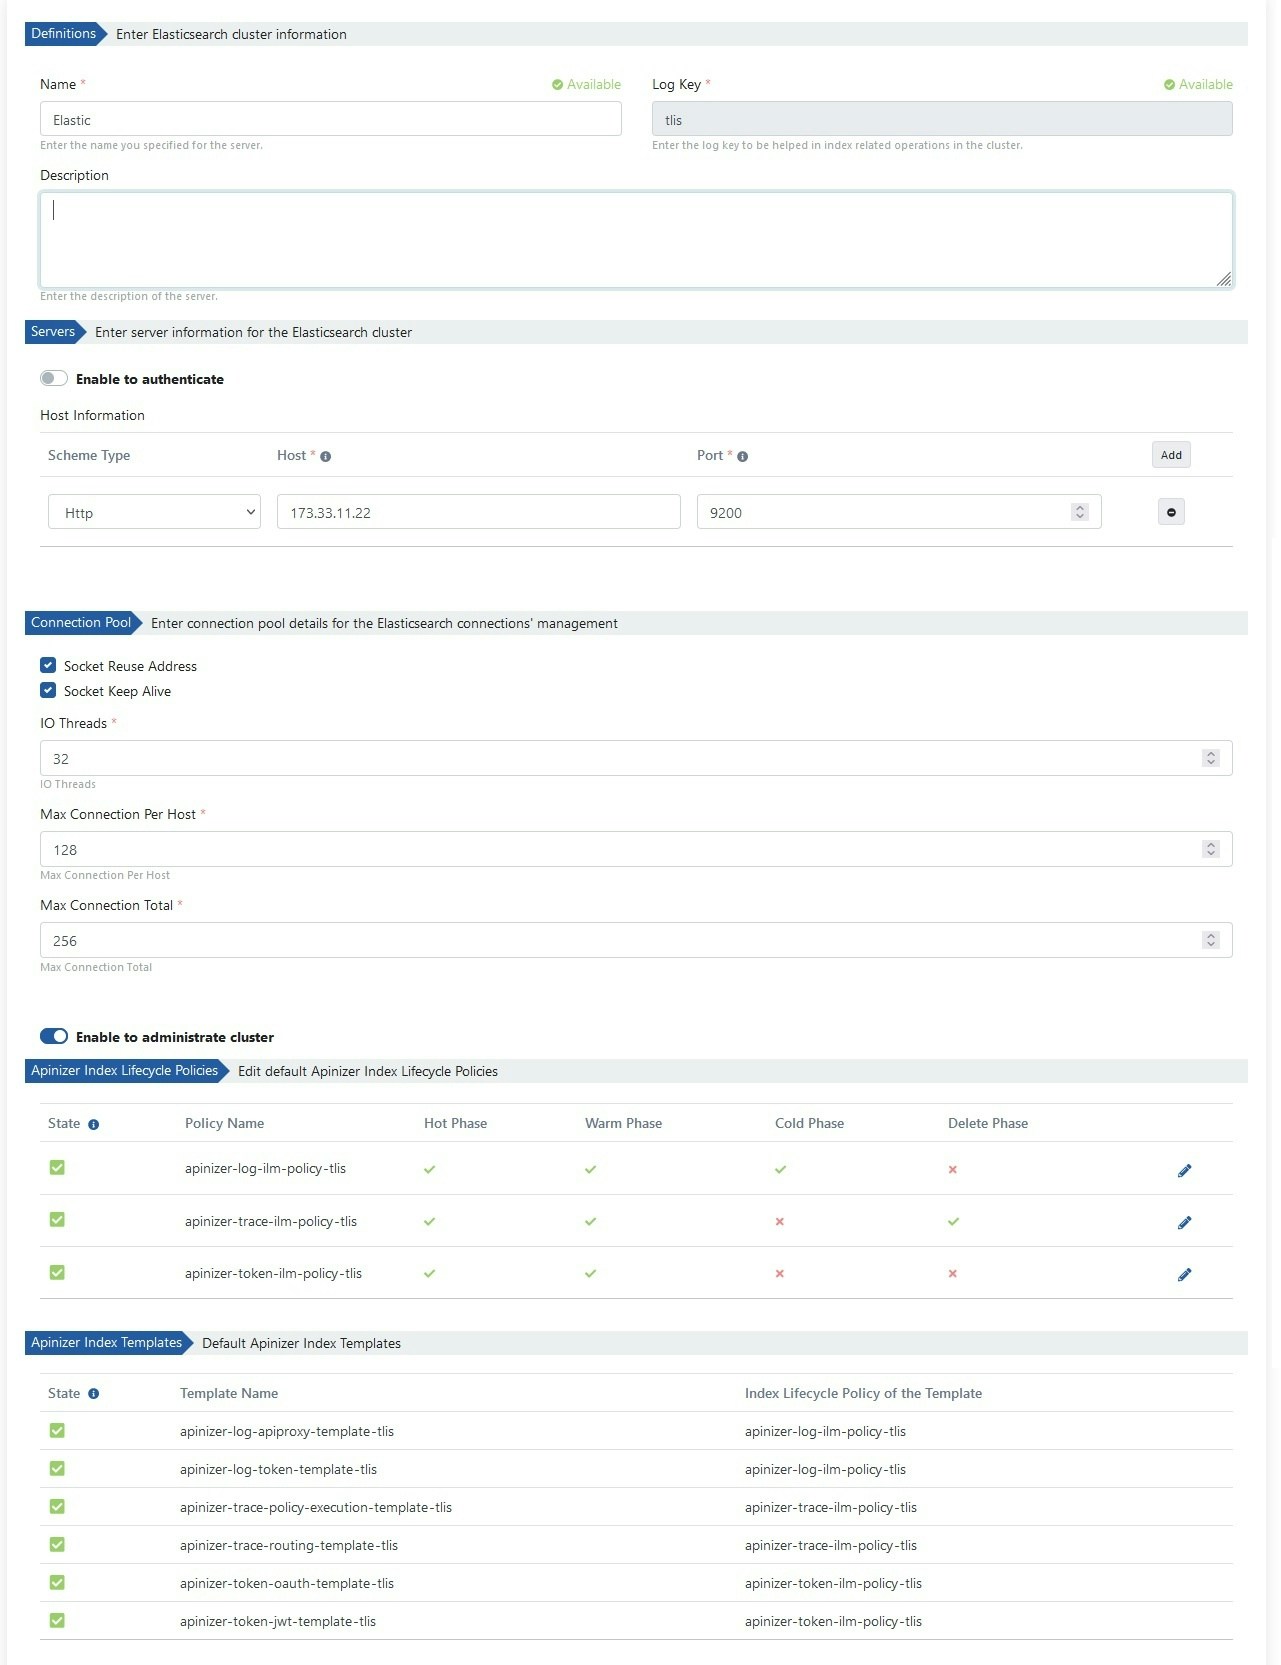 **Test Connection** button can be used to test Elasticsearch server connection with Apinizer.
 ### Environment Definition
At least one environment needs to be loaded (**deploy**) for an **API Proxy** to be accessible. Apinizer also allows an API Proxy to be loaded to multiple environments.
Go to **Administration → Server Management → Gateway Environment** page from the menu in Apinizer Management Console application.
**The image containing environment definition settings is given below:**
### Environment Definition
At least one environment needs to be loaded (**deploy**) for an **API Proxy** to be accessible. Apinizer also allows an API Proxy to be loaded to multiple environments.
Go to **Administration → Server Management → Gateway Environment** page from the menu in Apinizer Management Console application.
**The image containing environment definition settings is given below:**
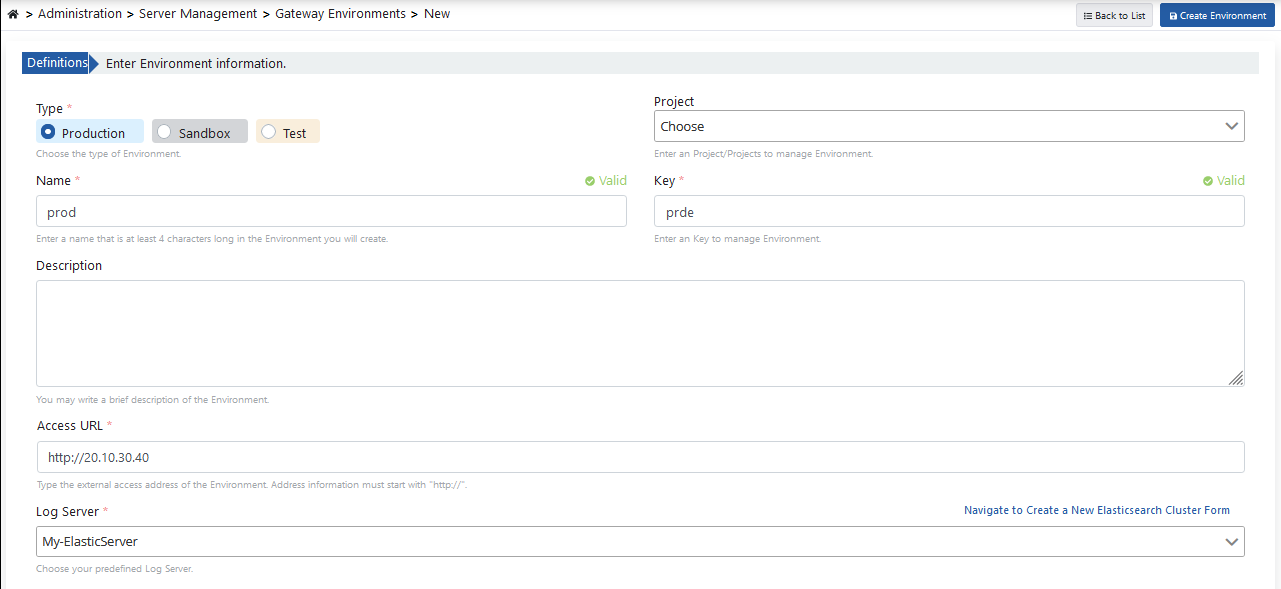 The following values are the default values of the servers. They can be changed according to your cluster resources.
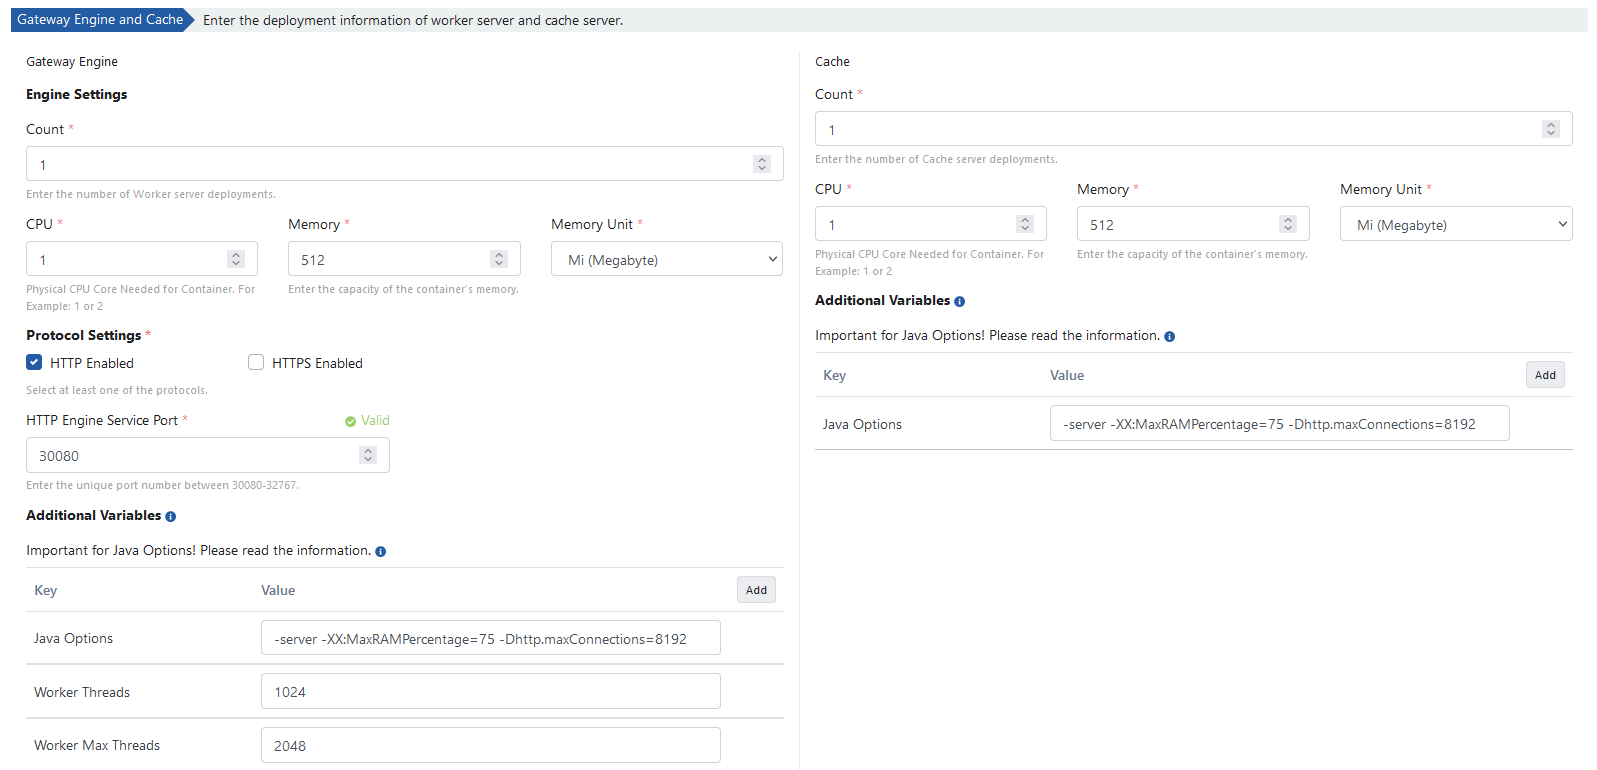 The environment definition process is completed by clicking the **Create Environment** button.
When environments are listed, the **Prod** type environment is deployed to AKS by clicking the **Unpublished** button showing the status of the relevant environment on the screen.
The environment definition process is completed by clicking the **Create Environment** button.
When environments are listed, the **Prod** type environment is deployed to AKS by clicking the **Unpublished** button showing the status of the relevant environment on the screen.
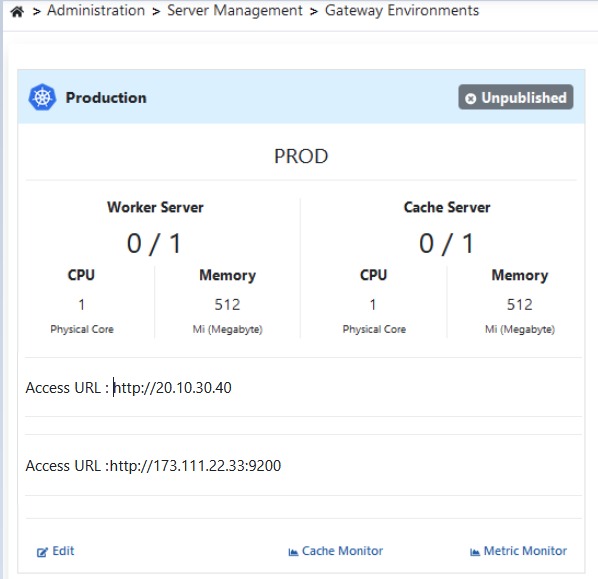 The environment loading process will be loaded to AKS in approximately 3 minutes.
For detailed information about environment definition and publishing operations, see [Environment documentation](/en/concepts/core-concepts/what-is-environment).
### Opening Environment as Service
Finally, a service needs to be created to access APIs that will run in the environment we published.
```powershell theme={null}
kubectl expose -n prod deployment.apps/worker --port=80 --target-port=8091 --name=apinizer-worker-service --type=LoadBalancer
kubectl get svc -n prod
```
The **LoadBalancer (EXTERNAL-IP)** value produced by AKS should be assigned as the **Access URL** value of the defined **Prod** environment.
First, click the edit button in the **Environment Info** table of the page where the environment is edited.
The environment loading process will be loaded to AKS in approximately 3 minutes.
For detailed information about environment definition and publishing operations, see [Environment documentation](/en/concepts/core-concepts/what-is-environment).
### Opening Environment as Service
Finally, a service needs to be created to access APIs that will run in the environment we published.
```powershell theme={null}
kubectl expose -n prod deployment.apps/worker --port=80 --target-port=8091 --name=apinizer-worker-service --type=LoadBalancer
kubectl get svc -n prod
```
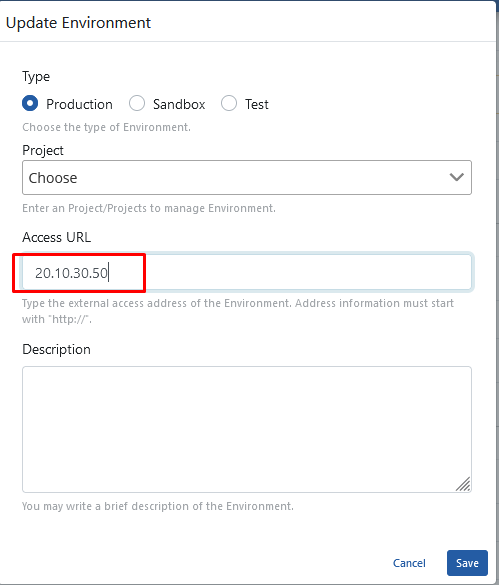
The **LoadBalancer (EXTERNAL-IP)** value produced by AKS should be assigned as the **Access URL** value of the defined **Prod** environment.
First, click the edit button in the **Environment Info** table of the page where the environment is edited.
 Then, click the edit button and change the Access URL information of the environment.
 ## 8. Publishing and Testing the First API in Apinizer
In the last step, opening an API to Apinizer as an API Proxy through a sample API definition file is described.
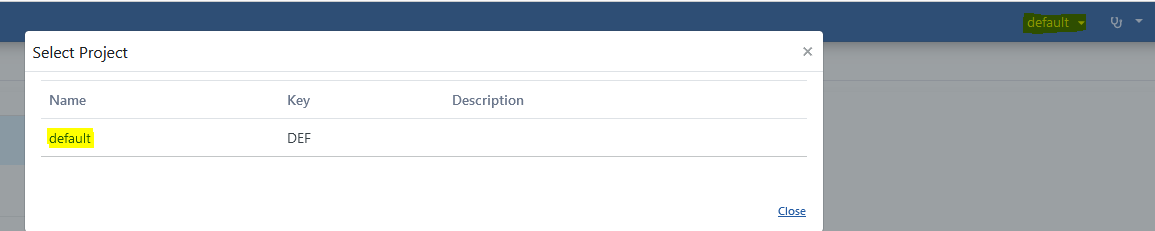
The project where the API Proxy will be registered is selected from the navbar menu.
## 8. Publishing and Testing the First API in Apinizer
In the last step, opening an API to Apinizer as an API Proxy through a sample API definition file is described.
The project where the API Proxy will be registered is selected from the navbar menu.
 Go to **Development → API Proxies** page from the project menu in Apinizer Management Console application.
Click the **Proxy** button to define a new API Proxy.
Go to **Development → API Proxies** page from the project menu in Apinizer Management Console application.
Click the **Proxy** button to define a new API Proxy.
 Select the source from which the API Proxy will be created with the selected link in the image below.
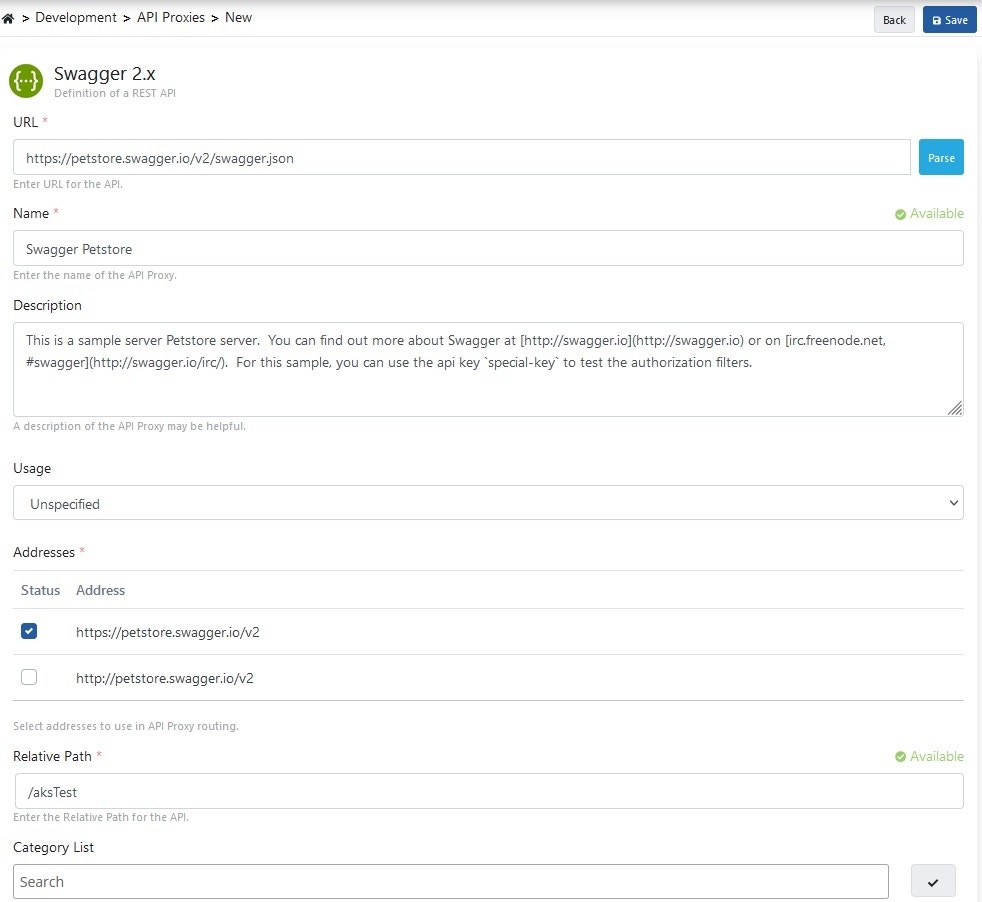
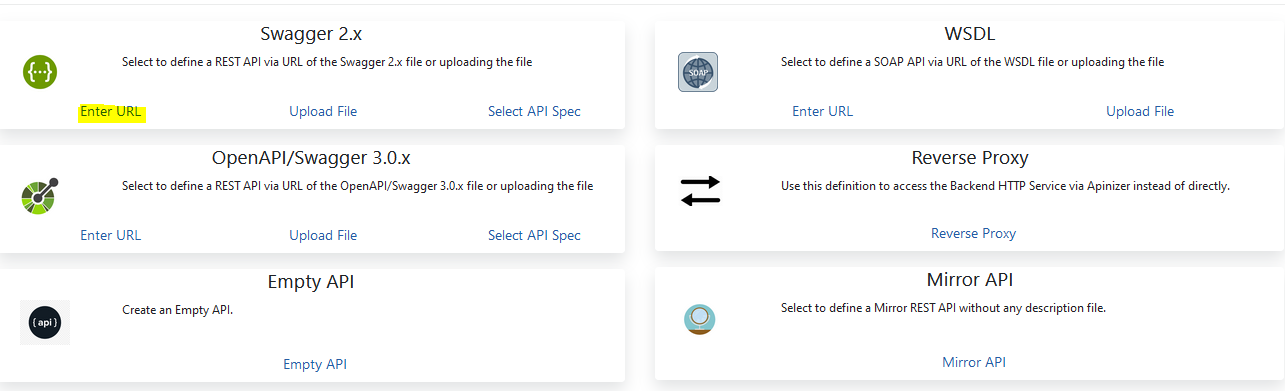 Enter the link of the API Definition file and **Parse** it.
 Enter API Proxy information and click the **Save** button.
 The **Deploy** button selected in the image below is used to load (deploy) the API Proxy.
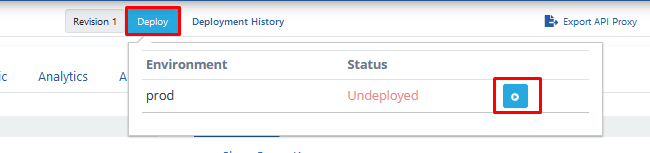 The loading process is confirmed.
 Come to the endpoint (endpoint) you want to test from the **Develop** tab of the API Proxy and click the **Test Endpoint** button.
 The image containing the test dialog is given below.
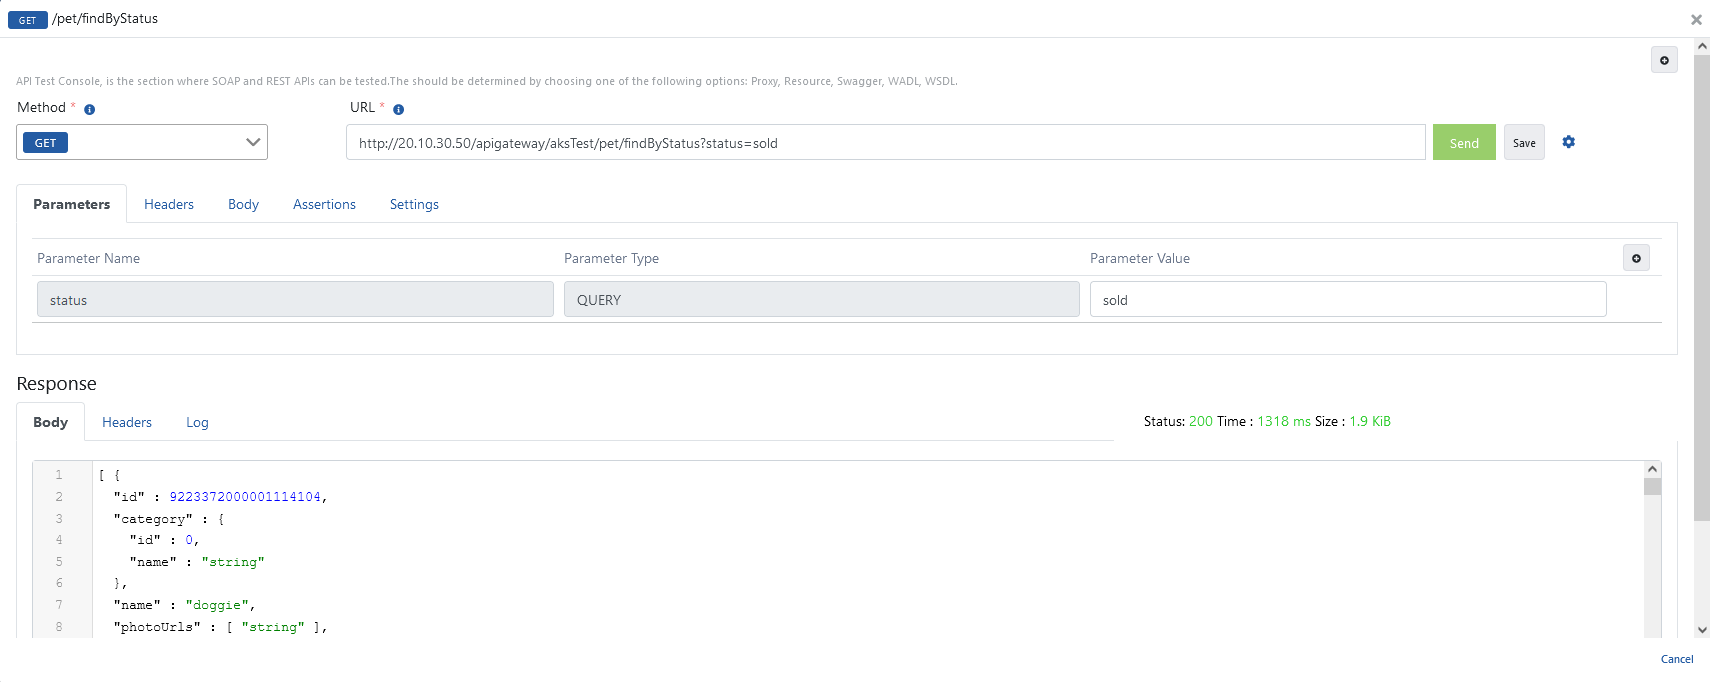 For detailed information about API Proxy, see [Developer Guide](/en/develop/quick-start).
For detailed information about Test Console, see [Test Console documentation](/en/develop/test-debug-tools/test-console).
For detailed information about API Proxy, see [Developer Guide](/en/develop/quick-start).
For detailed information about Test Console, see [Test Console documentation](/en/develop/test-debug-tools/test-console).