


Integration Settings
Note: For detailed information about creating custom fields in Jira and finding their IDs, you can review the Atlassian Custom Fields Documentation.
Step-by-Step Jira Integration Setup Guide
1
Step 1: Pre-preparation (Jira Side)
- Determine the Atlassian account you will use for integration (preferably a service account).
- Make sure this user has
Create Issuespermission and permission to edit necessary custom fields in the relevant Jira project. - Create a new token from the Atlassian API token page and store it securely.
- Note the
Project Keyvalue of the Jira project to be used and the issue type to be used.
2
Step 2: Access Portal Jira Config Page
- Go to Portal Management → Portal Jira Config menu in Apinizer Manager.
- When the page opens, existing configuration is loaded if present; fields come empty on first setup.
3
Step 3: Enter Basic Connection Information
- Write the instance address in the Jira URL field (e.g., https://company.atlassian.net).
- Enter the Atlassian email where you created the token in the Username field.
- Paste the token you created in the API Token field.
- Fill in Project Key and Issue Type fields.
4
Step 4: Configure Optional Fields
- If you want to transfer category, API product, or endpoint information to Jira issues, fill in the relevant custom field ID fields.
- If you need automatic labels, add one or more labels to the Label List field.
- Use the Description field if you need a description for your internal teams.
5
Step 5: Activate Integration
- If you wish, you can first leave the Status toggle passive and save. When all fields are ready, activate the integration by bringing the toggle to Active position.
6
Step 6: Save and Test
- Press the Save button in the top right.
- After successful save, create a test request from a form on the portal that uses Jira integration.
- Go to the relevant project in Jira and verify that the new issue is opened correctly.
7
Step 7: Troubleshooting
- If you get an error, review portal logs and browser console.
- If necessary, create a new token and save again or update project permissions.
Frequently Encountered Scenarios and Solution Steps
Portal Support Requests and JIRA Integration
Overview
The JIRA integration configured in Apinizer Manager enables automatic transfer of support requests created by Portal users to JIRA. This section explains in detail the relationship between the configuration in Manager and support requests on Portal and the data flow.- Enables Portal users to communicate problems they encounter, development requests, or suggestions to the support team.
- Sent requests are created as tickets on JIRA and their statuses can be tracked on this screen.
- Users can filter their past requests and review their statuses.
- All users logged into Portal account can access this page.
- Menu path: Portal → Support Requests.
- Required fields (label, summary, description) must be filled to send a request.
List View

- When the page opens, existing requests are listed in a table.
- You can quickly search in the Issue ID or Summary field with the search boxes at the top.
- You can go to the new request creation form by clicking the “New” button.
- Clicking the Issue ID link opens the detail page of the relevant request.
- Table columns include;
- Request code (Issue ID)
- Summary text
- Status, label, and category information
- Related API product and endpoint name (if any)
- Last update date information.
Creating New Request
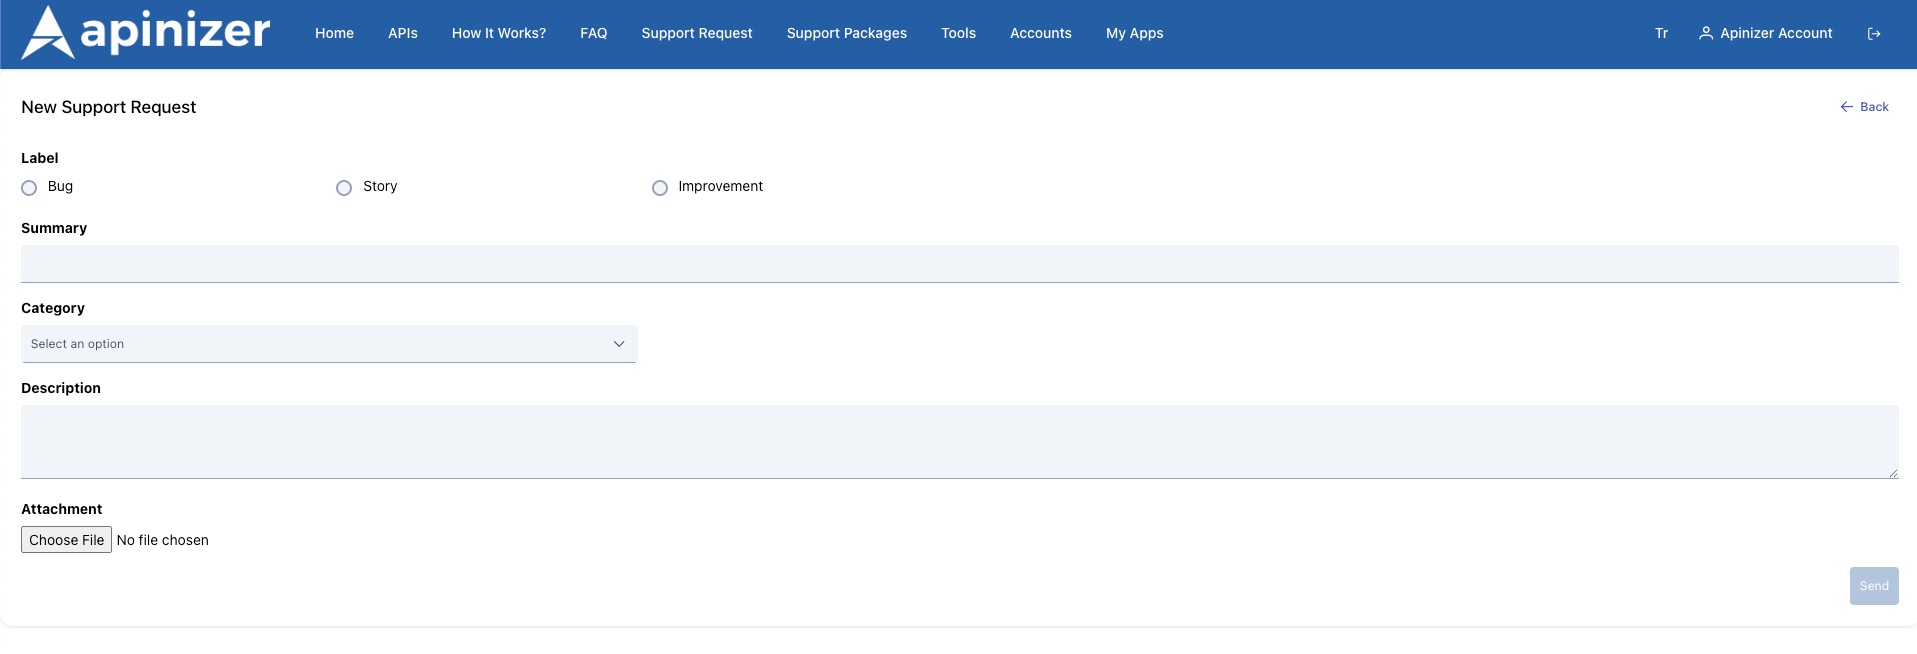
1
Step 1: Click New button
Press the New button on the list page.
2
Step 2: Fill Fields in Opened Form
- Label: Select the type of request (e.g., Bug, Enhancement). System administrator pre-defines which labels are required.
- Summary: Write the problem or request briefly and clearly.
- Description: Specify details, how it can be reproduced, or your expectation.
- Category: Select which area the request belongs to. If you select “Other Request”, the product field closes.
- API Product and Endpoint: If the subject is related to a specific API product, select the product and relevant endpoint. Specifying which endpoint experienced the problem speeds up the solution process.
- Attachment: Users who want to add screenshots, logs, or documents can upload files here.
3
Step 3: Saving
Press the Send button when you complete the form. The process may take a few seconds; the created request is automatically added to the list.
How to View Request Details?
- Click on the issue ID on the list screen.
- On the opened page:
- Request code, label, status, and reporter information are included.
- Which category, API product, and endpoint it is connected to can be seen.
- Summary and description texts are visible in full.
- If there is an attachment file, you can download it with the “Download” button.
- Notes left by support teams and their history are listed in the “Comments” section.
- You can return to the list with the “Back” button.
Connection with API Manager
- This portal screen collects user requests and creates tickets on JIRA in the background.
- The API Product selection in the request form is based on products published in API Manager. This way, the support team easily understands which product the problem is related to.
- Management of request processes (status changes, comments, resolution) is done on JIRA; portal only provides viewing.
Connection Between Manager JIRA Configuration and Portal
1. Configuration Source The support requests system on Portal directly uses the JIRA integration settings defined in Manager.- All settings made on the Manager → Portal Management → Portal Jira Config screen are valid for the Support Requests page on the Portal interface.
- Portal does not have a separate JIRA configuration within itself; all connection information is managed centrally through Manager.
- Every change made in Manager (URL, token, project key, custom field IDs, etc.) is automatically reflected to Portal.
- When Portal users create a new request from the Support Requests page:
- Request information is sent to Portal API
- Portal API makes a request to JIRA REST API using the JIRA configuration in Manager
- New issue is automatically created in JIRA
- The Issue Key (e.g., SUP-123) of the created issue is returned to Portal
- Request on Portal is associated with this issue key
- User can see the JIRA issue key in the request list on Portal
- Portal users can create support requests
- However, no request is sent to JIRA
- Request is only stored in Portal database
- No issue is created on JIRA side
- This mode is used when testing integration or when it is desired to temporarily disable it
Portal Support Requests Page and JIRA Integration Data Flow
1
Step 1: User Creates New Request on Portal
Portal user opens the request creation form by clicking Portal → Support Requests → New button and fills in the following fields:
2
Step 2: Portal API Pulls Manager Configuration
When user presses the Send button:
- Portal frontend POSTs form data to Portal backend API
- Portal backend:
- Pulls JIRA integration settings from Manager API
- Checks integration status (Active/Passive)
- If Active, gets JIRA connection information
3
Step 3: JIRA REST API Call is Made
Portal backend sends REST call to JIRA with information received from ManagerAuthentication:
- Username: Atlassian account email address defined in Manager
- API Token: Token securely stored in Manager
- Basic Auth: Sent in Base64 encoded
username:tokenformat
- Category Custom Field ID (e.g., customfield_10070) defined in Manager carries Portal category information
- API Product Custom Field ID (e.g., customfield_10071) contains selected API product name
- API Product Endpoint Custom Field ID (e.g., customfield_10072) stores endpoint path
- If these fields are left empty in Manager, Portal only sends basic fields (summary, description, labels)
4
Step 4: JIRA Response is Processed
When JIRA successfully creates an issue;Portal backend:
- Gets the Issue Key (SUP-123) returned from JIRA
- Associates this key with the request record in Portal database
- Shows success message to user
- When list page is refreshed, SUP-123 appears in the Issue ID column
5
Step 5: Request is Displayed in Portal List
On the Support Requests list page on Portal:
- JIRA Issue Key (SUP-123) is shown as clickable link in each row
- When link is clicked, detail page on Portal opens (no redirection to JIRA)
- Status information is periodically synchronized from JIRA
- User can track their request’s status on JIRA through Portal
Frequently Asked Questions
Where does my request go?
Where does my request go?
The request you send is created in the relevant project on JIRA. Support team tracks it from there.
When is status updated?
When is status updated?
When the support team updates your request on JIRA, the status in the portal list is also refreshed shortly.
Can I edit or delete a request?
Can I edit or delete a request?
Portal only offers the ability to send new requests and view existing requests. Update/closure operations are done by the support team.
Is adding an attachment file mandatory?
Is adding an attachment file mandatory?
No, but adding screenshots or logs that may help with problem detection speeds up the process.
Request Created on Portal But No Issue in JIRA Why?
Request Created on Portal But No Issue in JIRA Why?
Possible Causes:
- Status is “Passive” in Manager
- JIRA URL is incorrect
- Network connection issue
- API Token expired
- Check Manager → Portal Jira Config → Status toggle (should be “Active”)
- Review logs in Manager
- Verify you can access JIRA URL from browser
- Create a new API token in Atlassian and update in Manager
- Send test request from Portal and track logs
Issue Created in JIRA But Custom Fields Empty
Issue Created in JIRA But Custom Fields Empty
Possible Causes:
- Custom Field IDs entered incorrectly in Manager
- Custom fields do not exist in JIRA
- Custom fields’ data type incompatible
- Open the relevant issue in JIRA
- Click Settings (•••) → View Screen
- Verify custom fields are visible
- Verify field IDs from JIRA Admin → Issues → Custom Fields:
- Press Edit button
- Copy
customfield_XXXXXexpression from URL
- Update Custom Field IDs in Manager
- Send new test request
Conclusion
The JIRA integration configuration made in Manager is critical for automatically transferring support requests from Portal users to JIRA. Thanks to this integration:- Centralized Management: All JIRA settings are controlled from a single point (Manager)
- Automatic Synchronization: Portal requests instantly become JIRA issues
- Data Consistency: Portal and JIRA data remain synchronized thanks to custom field mappings
- Easy Tracking: Users can view JIRA issue statuses through Portal
- Efficient Support: Support teams manage all requests centrally on JIRA