

Prerequisites
Claude Desktop
Must be downloaded and installed from the official Anthropic website.Download Link
Node.js
MCP servers run on Node.js. v16.0.0 or higher is required.Download Link
MCP SDK
Can be installed globally for advanced usage (optional).
Node.js Installation Check
After installation, you can check the version with the following command in terminal/command prompt:- Node.js v16.0.0 or higher
- npm v8.0.0 or higher
MCP SDK Installation (Optional)
You can install MCP SDK globally for advanced usage:Model Context Protocol (MCP) is an open standard that enables AI assistants to securely communicate with external tools and data sources. Claude Desktop can work integrated with Apinizer API Portal thanks to this protocol.More information: https://modelcontextprotocol.io/quickstart/user
Getting Apinizer MCP Token
1. Enabling MCP Usage from Apinizer Management Console
Go to Portal settings page in Apinizer interface and enable MCP.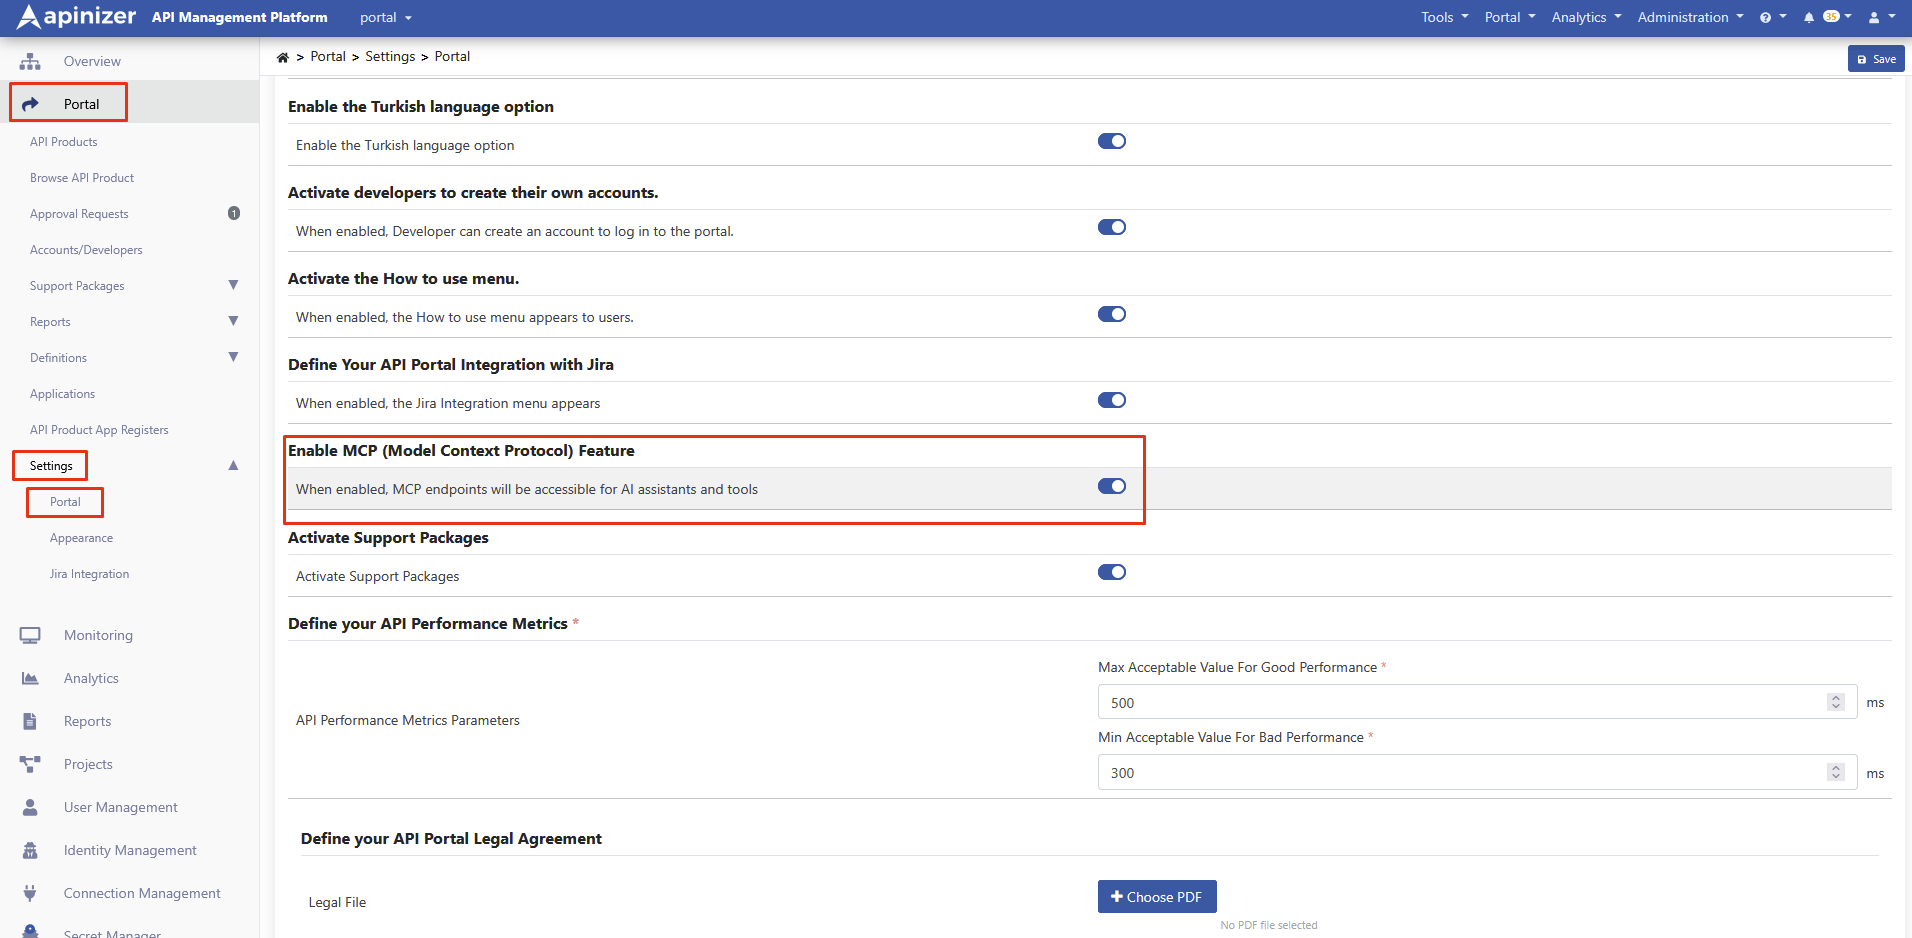
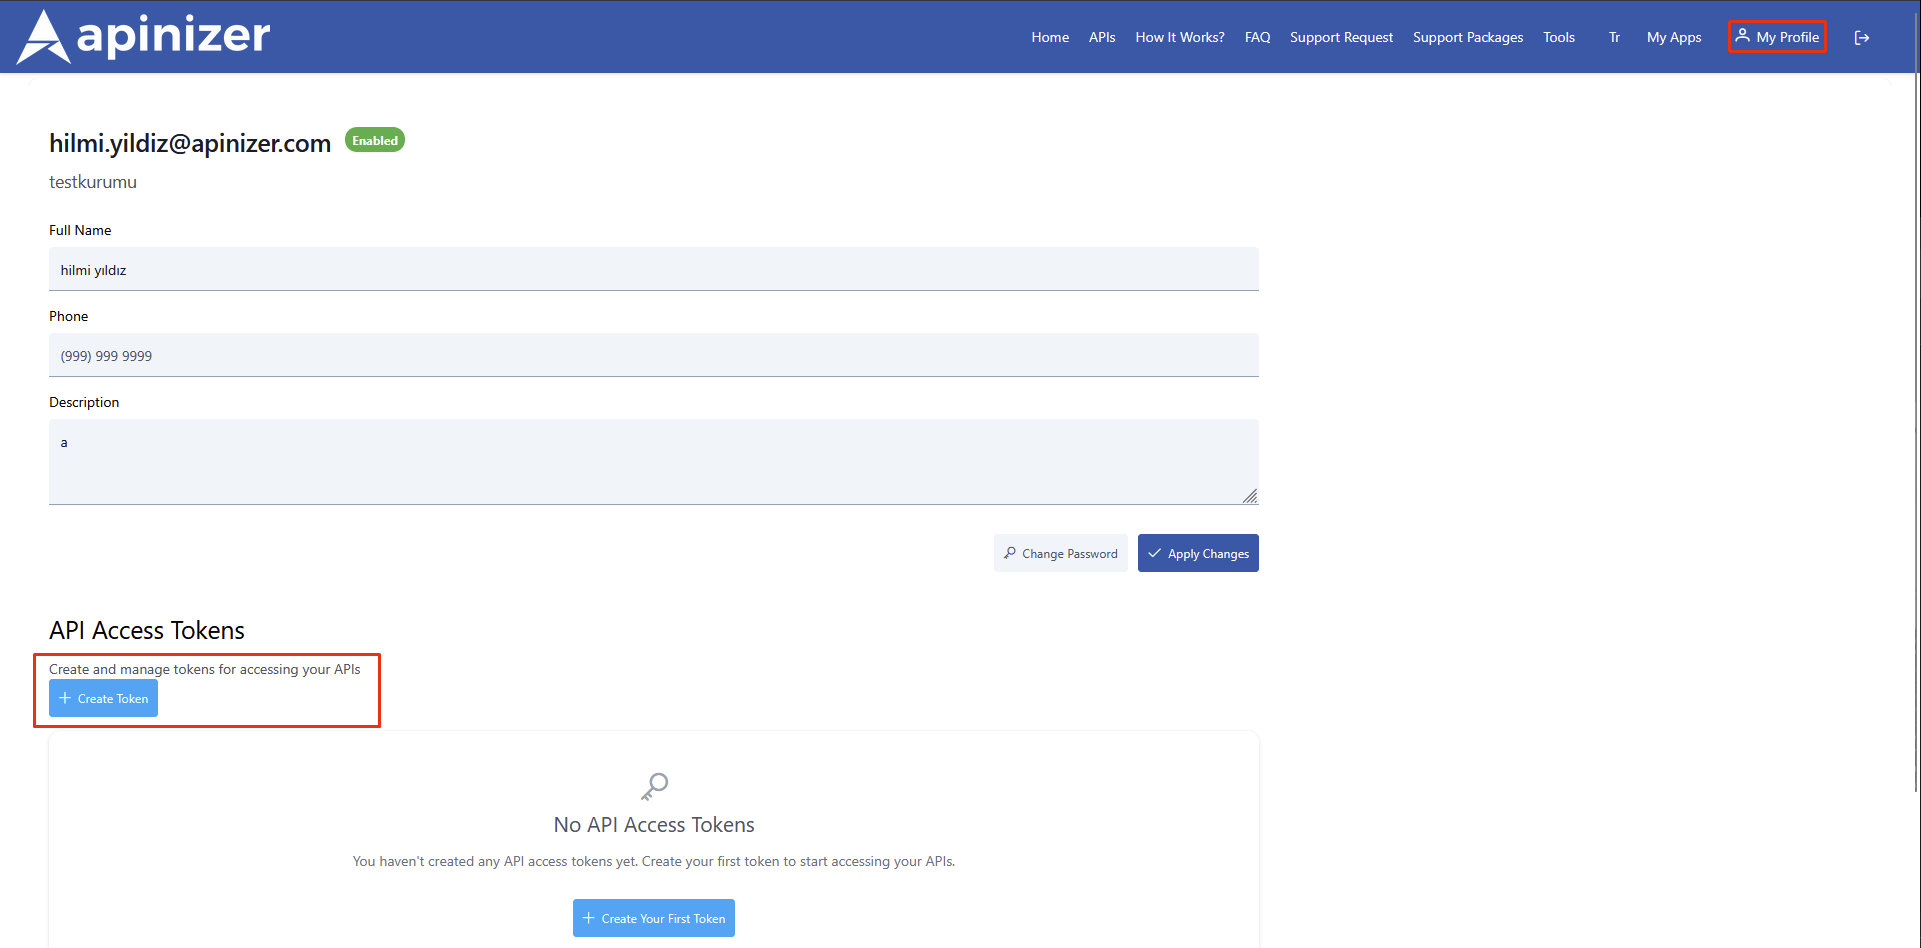
2. Logging into API Portal and Creating Token for MCP Connection
1
Log into API Portal
Log into Apinizer API Portal
2
Go to Profile Page
Go to My Profile page
3
Go to Token Section
Scroll down to API Access Tokens section at the bottom of the page
4
Create Token
Click the Create Token button
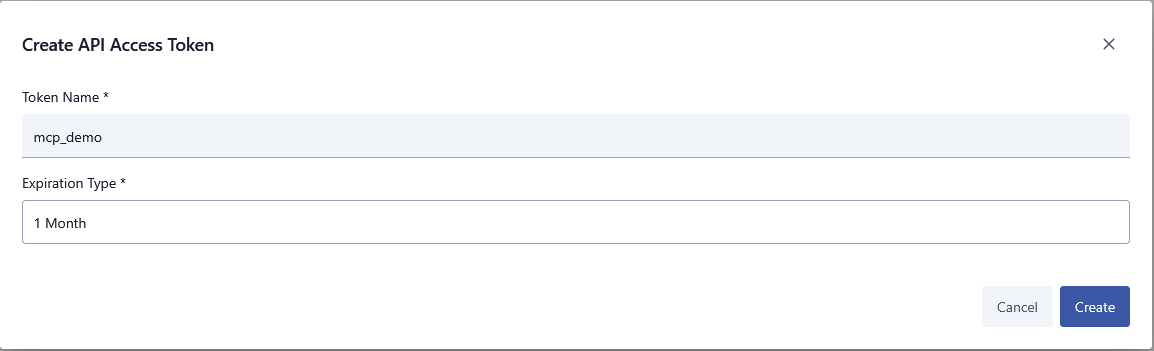
5
Enter Token Information
Give the token a name, determine the token’s lifetime, and create it
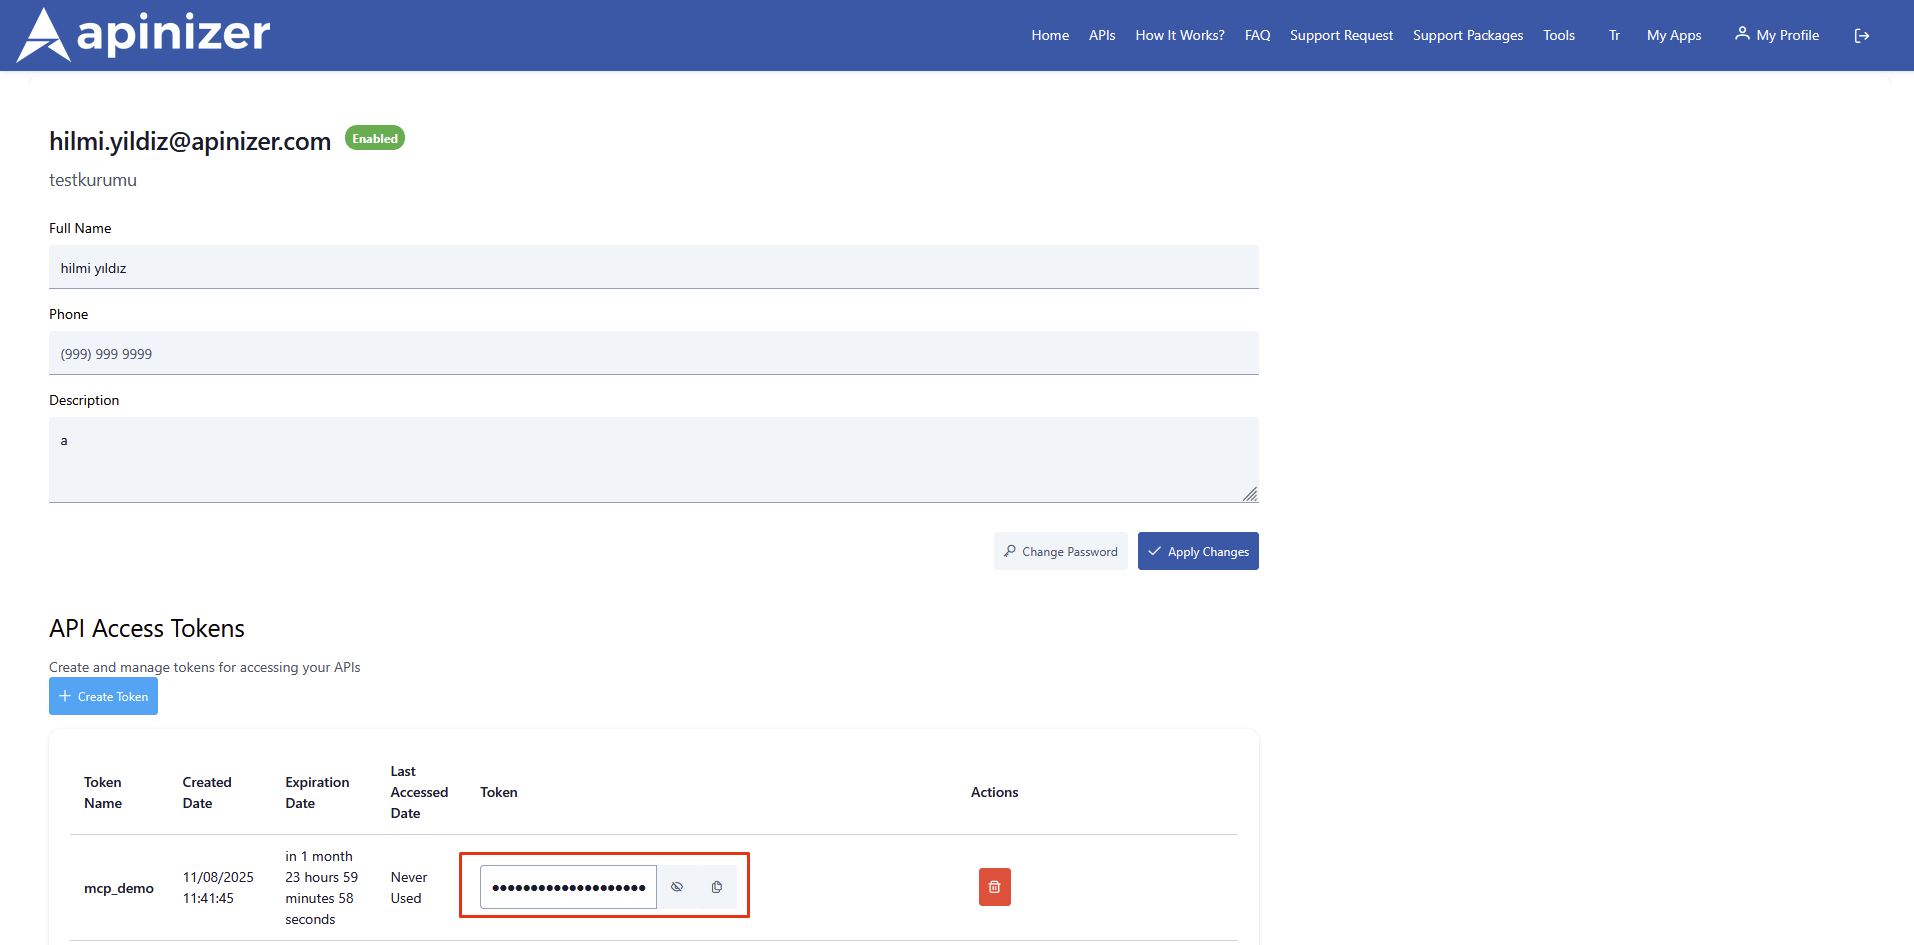
6
Save Token
Store the created token in a secure location
Claude Desktop MCP Configuration
1. Accessing Configuration File
1
Go to Settings
Go to Settings > Developer > Local MCP Servers page in Claude Desktop
2
Edit Config File
Click the Edit Config button
macOS
~/Library/Application Support/Claude/claude_desktop_config.jsonWindows
%APPDATA%\Claude\claude_desktop_config.jsonLinux
~/.config/claude/claude_desktop_config.json2. Preparing Proxy Files
First, you need to save MCP proxy files to a folder on your system. Save the files with the following content. Confirm that you do not need Administration permissions when accessing the files, change the location where you save them if necessary.The recommended directory structure is as follows. Different directory paths are used for Windows, macOS, and Linux.
Windows
macOS/Linux
HTTP Connection Settings (apinizer_http_proxy.js)
If you are on Unix/Linux/macOS systems, you must add the following expression at the beginning of this file you will create.WebSocket Connection Settings (apinizer_ws_proxy.js)
3. Editing Configuration File
Edit theclaude_desktop_config.json file as follows.
File Path Examples:
Windows
"C:\\Users\\[kullanıcı_adı]\\AppData\\Local\\Claude\\mcp\\apinizer_http_proxy.js""C:\\Users\\[kullanıcı_adı]\\AppData\\Local\\Claude\\mcp\\apinizer_ws_proxy.js"
macOS/Linux
"/Users/[kullanıcı_adı]/.claude/mcp/apinizer_http_proxy.js""/Users/[kullanıcı_adı]/.claude/mcp/apinizer_ws_proxy.js"
Claude Desktop MCP Connection Settings (claude_desktop_config.json)
Restarting Claude Desktop
For configuration changes to take effect, you need to completely close and reopen Claude Desktop:1
Close Claude Desktop
Completely close Claude Desktop
2
Exit from System Tray
Windows: Also exit from system tray (bottom right corner)macOS: Right-click on Dock and select “Quit”
3
Reopen
Reopen the application
Connection Check
1. Settings Check
After reopening Claude Desktop:1
Go to Settings
Go to Settings > Developer > Local MCP Servers page
2
Check Servers
Verify that Apinizer MCP servers appear in the list
3
Verify Connection Status
Verify that connection statuses are displayed as Connected
2. Connection Test
To test whether the connection is successful, you can ask Claude questions like:Troubleshooting
Server not connected Error
Server not connected Error
Possible Causes:
- Token is invalid or incorrect
- Network connection issue
- Incorrect host/port information
- Check token from Apinizer Portal
- Test network connection (
ping apiportal.apinizer.com) - Verify host/port information in configuration
- Create a new token and try
Command not found Error
Command not found Error
Cause: Node.js is not installed or not defined in PATHSolution:
File not found Error
File not found Error
Cause: Proxy file paths are incorrectSolution:
- Check file paths
- Verify that files are actually in that location
- Use absolute path (instead of relative path)
Permission denied Error
Permission denied Error
Cause: File permissions issuemacOS/Linux Solution:Windows Solution:
- Right-click files
- Check permissions in Properties → Security
- If necessary, open Claude Desktop with “Run as Administrator”
SSL/TLS Connection Errors
SSL/TLS Connection Errors
Cause: Corporate firewall or proxySolution:Add this part to the Json file:
Reviewing Log Files
For more detailed check, review log files:Windows
%APPDATA%\Claude\logs\macOS
~/Library/Logs/Claude/Linux
~/.config/claude/logs/Support
If you encounter problems during installation:- Review the steps in this document again
- Check log files
- Contact Apinizer support team
Security Notes
Token Security
- Create tokens with minimal validity period (30-90 days)
- Store tokens in secure password manager
- Never store tokens in code repository
- Immediately revoke unused tokens
- Regularly perform token rotation
System Security
- Store proxy files in secure directory
- Keep file permissions at minimum required level
- Backup configuration file
- Monitor network traffic
Monitoring
- Regularly check connection logs
- Track abnormal API usage