

Overview
What is its Purpose?
- Script Policy aims to solve integration requirements without writing code by applying custom business rules and data transformations in the API Proxy request pipeline.
- Script Policy enables centralized management of operations such as masking, enriching incoming data, or adapting error messages in the response pipeline.
- Script Policy makes it possible to create a global/local shared script library for consistent behavior across different environments.
- Script Policy activates only for specific endpoint or header combinations through its condition engine, maintaining performance.
Working Principle
- Request Arrival: For every HTTP/HTTPS request arriving at the API Gateway, the source IP address of the request is detected.
- Policy Check: If Script Policy is active, the system checks in the following order:
- Is a Condition defined? If so, is the condition met?
- Is the policy active (active=true)?
- Is a Variable being used or Apinizer default?
- Script Engine Execution: According to the selected executionType (SYNC/ASYNC) and scriptLanguage (Groovy/Javascript) values, the script runs in the specified pipeline region; request/response body, headers, and parameter maps can be updated.
- Decision Making:
- Match Found: Message components updated as a result of the script are written back to the pipeline; in case of error, the defined statusCode and message are returned.
- No Match: Script is skipped, request/response continues to default flow.
- Error Handling: Customizable HTTP status code and error message are returned for requests that do not comply with policy rules.
Features and Capabilities
Core Features
- ExecutionType Management (Sync/Async): Determines whether the script will run synchronously or in the background; asynchronous mode does not block the endpoint during long-running operations.
- Dual Script Language Support: Allows teams to use the language they are proficient in by choosing between Groovy and Javascript.
- Context Variable Library: Provides ready-made variable maps for From Client, To Backend, From Backend, and To Client flows; readable/writable fields are clearly separated.
- Active/Passive Status Control: Easily switch the policy’s active or passive state (active/passive toggle). Policy is not applied when passive, but configuration is retained.
- Condition-Based Application: Create complex conditions with Query Builder to determine when the policy will be applied (e.g., only for specific endpoints or header values).
Advanced Features
- Script Test Laboratory: Run scripts with sample header/param/body data for different pipeline segments using the integrated test window and examine results.
- Dependency Tracking: See which API Proxy or groups the policy is used in through Used Proxies/Policy Groups sections and perform change impact analysis.
- Dynamic Context Value Selection: Automatically copy date, environment, or proxy metadata information from EnumScriptContextValue for use within scripts.
- Export/Import Feature: Export policy configuration as a ZIP file. Import to different environments (Development, Test, Production). Version control and backup capability.
- Policy Group and Proxy Group Support: Manage multiple policies within Policy Groups. Assign policies in bulk to Proxy Groups. Centralized update and deploy operations.
- Deploy and Versioning: Deploy policy changes to production environment. View which API Proxies use it (Policy Usage). Proxy Group and Policy Group usage reports.
Usage Scenarios
Configuring Policy Parameters
At this step, users can create a new policy or configure existing policy parameters to define access rules.Creating New Script Policy
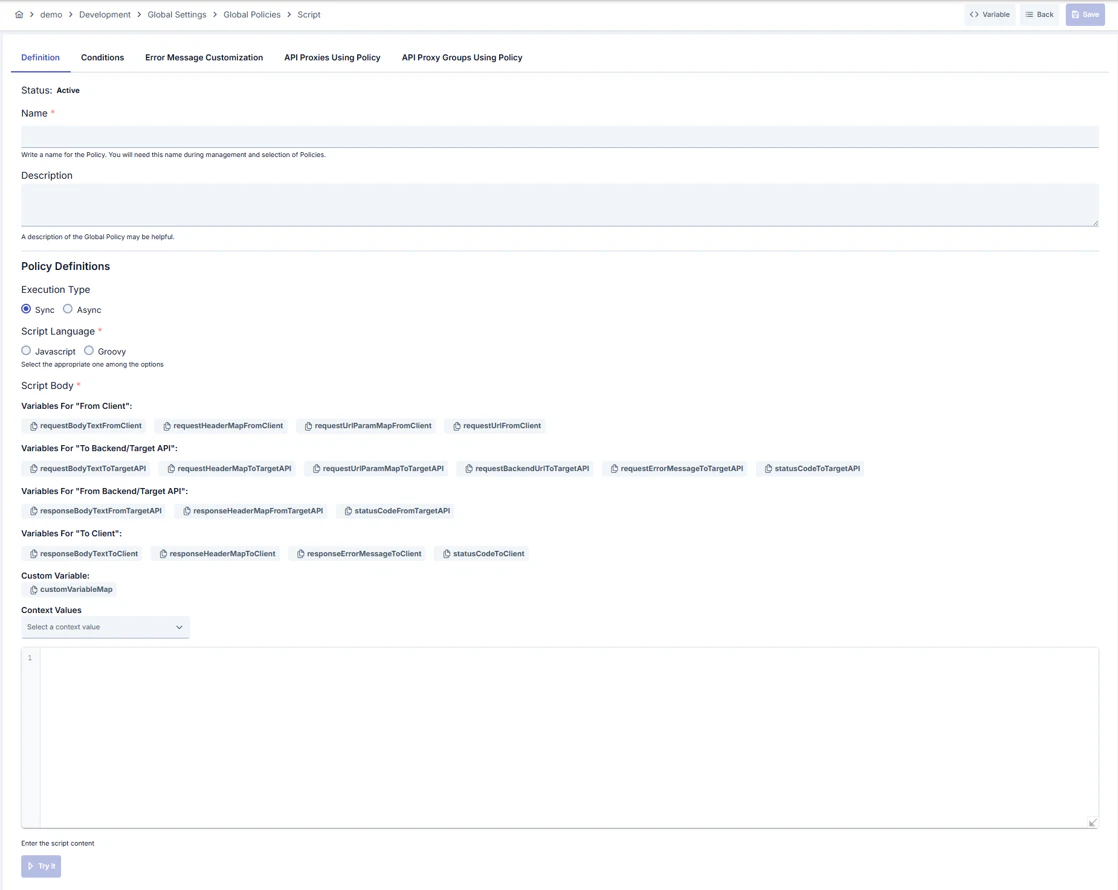
Configuration Steps
Step 1: Navigate to Creation Page
Go to Development → Global Settings → Global Policies → Script Policy from the left menu and click the [+ Create] button in the upper right.Step 2: Enter Basic Information
Policy Status: Shows Active/Passive status. New policies are active by default. Name - Required: Enter unique name (example: Production_ScriptPolicy). System checks automatically. Green check: available, Red cross: existing name. Description: Explain the policy’s purpose (Max. 1000 characters). Example: “Adds campaign header in request pipeline.”Step 3: Variable Usage
- In the action button area at the top of the page, you can use the [<> Variable] button to select dynamic values.
- Using context/global variable expressions, you can manage policy parameters with variable-based values instead of fixed values.
- This reduces manual update effort when values change and provides operational convenience.
- For detailed information, review Dynamic Variables.
Step 4: ExecutionType Selection
SelectSync or Async in Execution Type section:
- When
Syncis selected, script runs synchronously in gateway pipeline Asynctriggers side channel to avoid blocking client during long operations
Step 5: Script Language Configuration
SelectJavascript or Groovy under Script Language. Selection determines code editor syntax and IntelliSense.
Step 6: Script Body and Variable Management
- Write or paste your script in the code editor
- Copy fields like requestHeaderMapToTargetAPI, responseBodyTextToClient from variable tags with one click
- You can transfer data to other policies via customVariableMap
- Open test dialog with Try It button and run script with sample inputs
Step 7: Define Condition (Optional)
Switch to Condition tab. Conditions determine when the policy will be active. Examples:- Environment-based:
Header = X-Environment, Operator = Equals, Value = production - API Key-based:
Header = X-API-Key, Starts With = PROD- - Endpoint-based:
Path = /api/admin/*
Step 8: Error Message Customization (Optional)
Go to Error Message Customization tab and customize the message to be returned when access is denied. Default:Step 9: Save
Click [Save] button in upper right. Checklist:- Unique name
- Required fields filled
- At least one script body line present
- Policy is added to list
- Can be connected to APIs
- Automatically applied if global policy
Flow Variables
Flow variables and properties that you can use within Script Policy are explained in detail in the tables below.Request Variables (Client → Apinizer)
Request Variables (Apinizer → Backend API)
Response Variables (Backend API → Apinizer)
Response Variables (Apinizer → Client)
Detailed Usage Examples
Form URL-Encoded Usage
Form Data Usage
Backend URL Modification
Example Scenario: Current routing address: “https://apinizer.com/api” Incoming request context path: “/findByStatus?param=value” In this case, the request goes to: “https://apinizer.com/api/findByStatus?param=value” When the following code is written:Important Notes
If Script type is Groovy:
- JsonSlurper for JSON message body,
- XMLSlurper for XML message body
Message Variables
Message variables and properties that you can use within Script Policy are explained in detail in the tables below.Request Pipeline Variables
Response Pipeline Variables
Behavior of Encoding Variables and Routing Settings
In the script policy, the data format variables (gzip, deflate, br, zstd, compress, identity) on the request or response pipeline can be written. These variables work in combination with the encoding override settings in the routing configuration, and the precedence between them is important.Execution Order
A request’s data flow goes through the following steps:- Client-side headers are read — The data format header sent by the client is evaluated.
- Routing override settings are applied — Encoding override values defined on the API Proxy or Routing override the client-supplied header.
- Body is decompressed — The compressed request body is decompressed according to the resolved settings.
- Backend-side compression override is applied — The format to be used when forwarding to the backend is determined.
- Request pipeline policies run — The script policy kicks in at this stage. If an encoding variable is written inside the script, it overrides all previous settings.
- Body is forwarded to the backend — Compression is applied based on the final value left by the script.
One Format at a Time
Only one data format should be active at a time for a given request or response. If a format is set totrue inside the script, all other format variables must explicitly be set to false. Otherwise, multiple formats may remain active simultaneously and cause unexpected results on the backend or client side.
Recommended usage:
Header Consistency
When an encoding variable is changed, the Content-Encoding value in the request or response headers must also be set to the same value. A mismatch between the format variable and the header value will cause the client or backend to fail when decompressing the body.When to Use Script, When to Use Routing Settings
- Routing setting (override): Use when a fixed rule is to be applied for all requests (e.g., every request must go to the backend as gzip). This is the safer, less error-prone option.
- Script: Use when the decision must be made dynamically at runtime (e.g., use a different format based on the client’s IP address or a header value). Inside the script, all format variables and the corresponding headers must be managed together.
Message Variables
Environment Variables
Credential Variables
Custom Variables
There may be a need to temporarily define variables with policies on the Request or Response pipeline and use them in the next policy. In this case, thecustomVariableMap variable is used.